7.21
Date Code 20120126 Instruction Manual SEL-2032 Communications Processor
Settings
Automatic Message (SET A) Settings
received beyond the number of expected data items may end up in the
Unsolicited Message Buffer or may even be captured by a subsequent data
collection process. Setting the DELAYx setting to “ON” helps to ensure that
excess characters in a device response will not be treated as part of a
subsequent request-response sequence. This introduces time delays in the
parsing process, preventing rapid successive data collections. When it is
known that the responding device sends a fixed number of items without any
excess trailing characters, setting DELAYx to “OFF” may be preferable
because this enables the parsing process to complete quickly, allowing for
rapid successive data collections.
Checksum
Validation
If you choose a parse type of Character String (PARSEn=3), Integer String
(PARSEn=4), or Integer String with XON/XOFF encoding (PARSEn=5), you
can set the SEL-2032 to perform checksum validation on the parsed response.
The CHECKn setting specifies the type of checksum being used (CRC-16, 8-
bit checksum, or 16-bit checksum) and the format of the checksum (ASCII
hexadecimal or binary). The ORDERn setting specifies the byte ordering of
the checksum for CRC-16 and 16-bit checksums. The STARTn, STOPn, and
CHKPOSn settings specify the locations of the data to be validated and the
checksum in the received data stream. Three methods are available for
specifying these position settings:
➤ specify a byte index in the received data stream, where byte
index 1 is the first position
➤ specify a character or character code, where a trailing ‘i’ can be
appended to indicate that the character itself is included
➤ specify the number of bytes that follow the item being specified
To specify a byte index, you enter a positive integer. To specify a character
you can enter the character or, if the character is nonprintable, the ASCII
character code. Add the trailing ‘i’ to specify inclusion of the character itself.
You must quote any numeric character so that it is not treated as a byte index
(e.g., enter ‘9’ or “9” to indicate the character 9 as opposed to byte 9). The
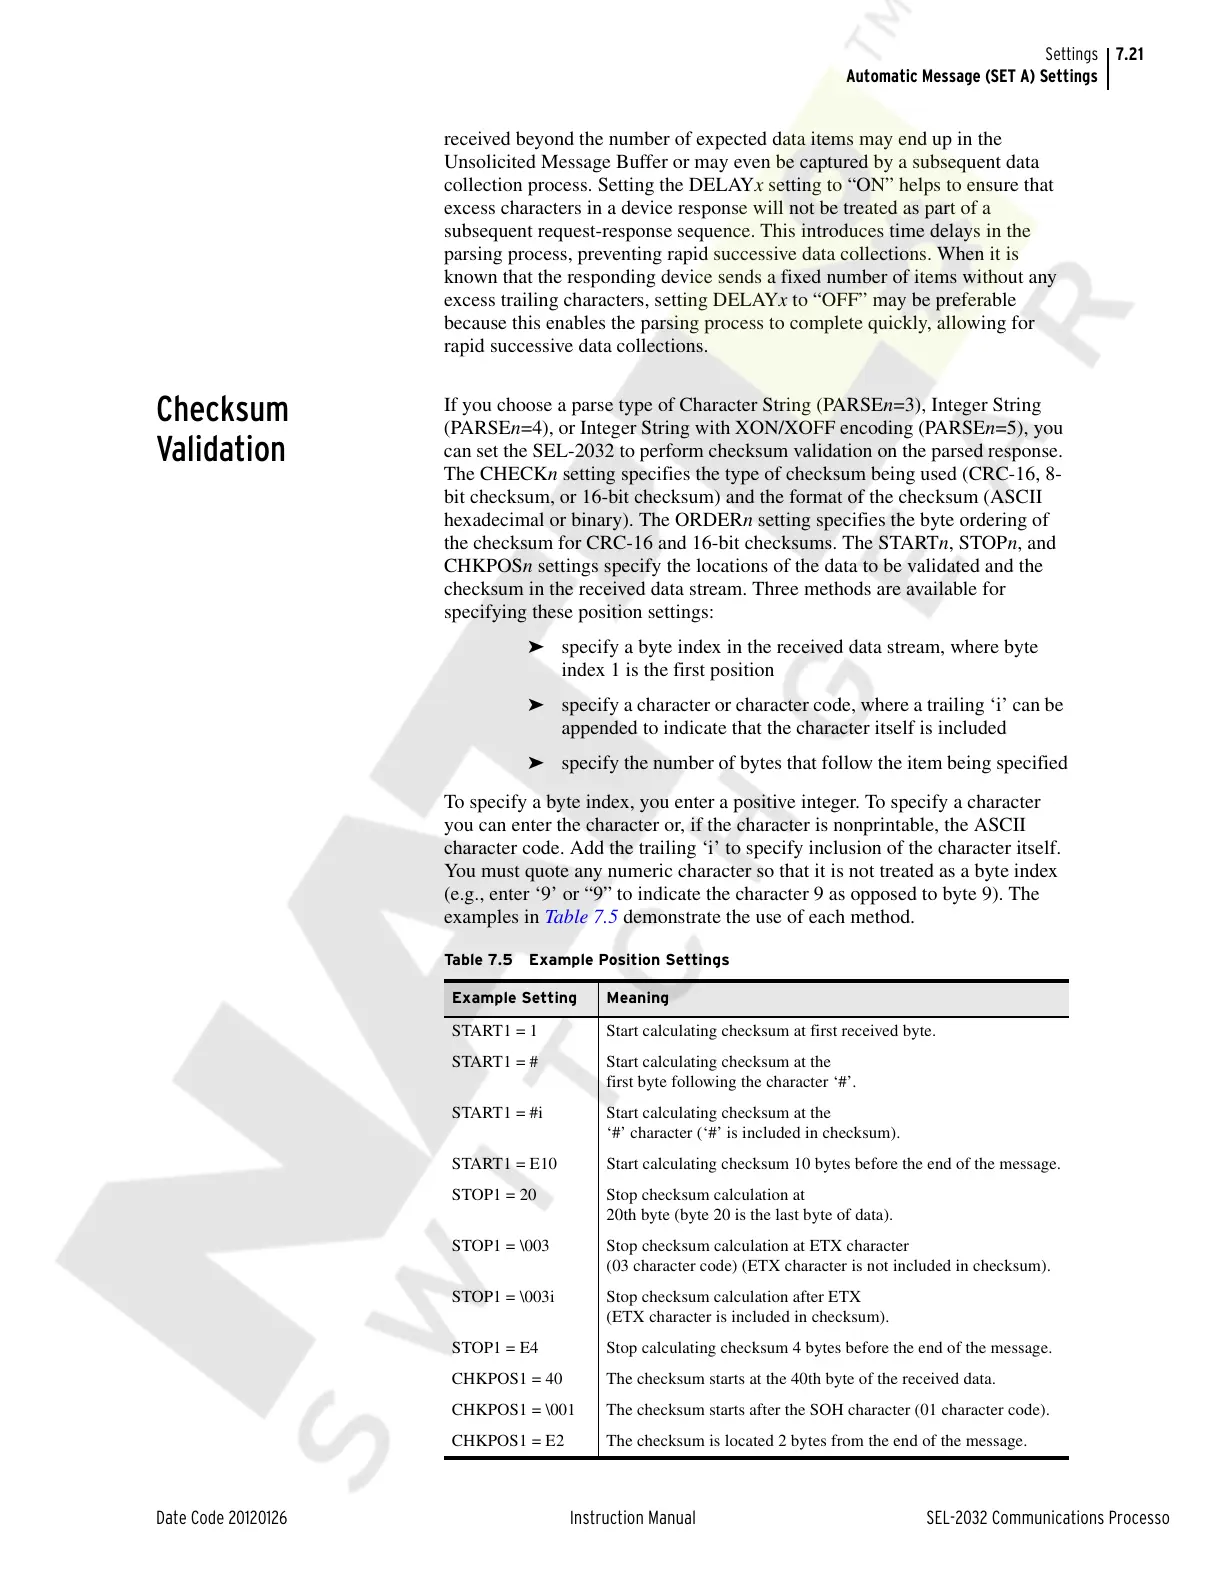
examples in Table 7.5 demonstrate the use of each method.
Table 7.5 Example Position Settings
Example Setting Meaning
START1 = 1 Start calculating checksum at first received byte.
START1 = # Start calculating checksum at the
first byte following the character ‘#’.
START1 = #i Start calculating checksum at the
‘#’ character (‘#’ is included in checksum).
START1 = E10 Start calculating checksum 10 bytes before the end of the message.
STOP1 = 20 Stop checksum calculation at
20th byte (byte 20 is the last byte of data).
STOP1 = \003 Stop checksum calculation at ETX character
(03 character code) (ETX character is not included in checksum).
STOP1 = \003i Stop checksum calculation after ETX
(ETX character is included in checksum).
STOP1 = E4 Stop calculating checksum 4 bytes before the end of the message.
CHKPOS1 = 40 The checksum starts at the 40th byte of the received data.
CHKPOS1 = \001 The checksum starts after the SOH character (01 character code).
CHKPOS1 = E2 The checksum is located 2 bytes from the end of the message.
Courtesy of NationalSwitchgear.com