8.25
Date Code 20120126 Instruction Manual SEL-2032 Communications Processor
Serial Port Communications and Commands
Command Set
SWAP n m
The SWAP command (Access Level 2), as shown in Figure 8.32, switches all
port-specific settings (P, A, M, U, O, and L settings) between two ports. The
SEL-2032 requests confirmation, as for the COPY command. This command
can only be performed if neither of the two ports is currently communicating
transparently. Before performing the SWAP, the SEL-2032 requests
confirmation. If you answer yes, the alarm contact is pulsed and the involved
ports are reset. Neither of the selected ports may be the current port or Port F.
In the SEL-2032, Ports 17 and 18 can be used only to swap with each other
only if identical cards are installed in both slots.
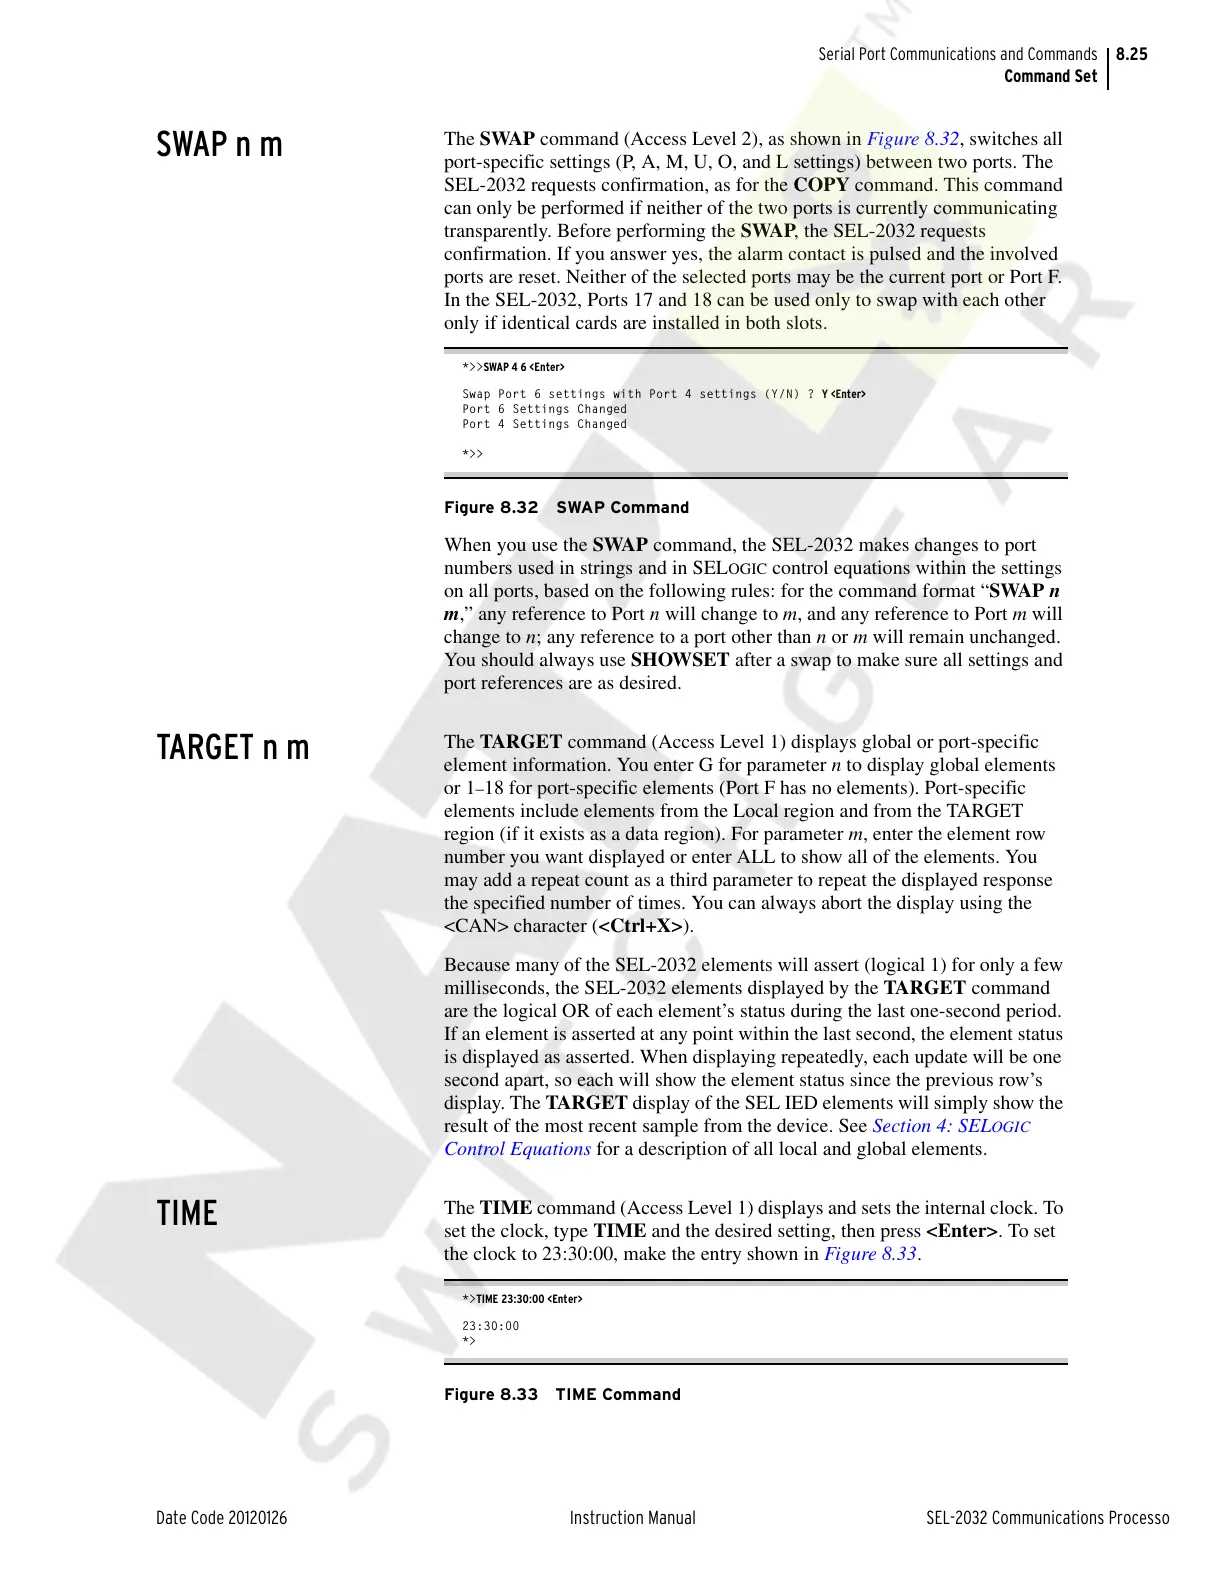
*>>SWAP 4 6 <Enter>
Swap Port 6 settings with Port 4 settings (Y/N) ? Y <Enter>
Port 6 Settings Changed
Port 4 Settings Changed
*>>
Figure 8.32 SWAP Command
When you use the SWAP command, the SEL-2032 makes changes to port
numbers used in strings and in SEL
OGIC control equations within the settings
on all ports, based on the following rules: for the command format “SWAP n
m,” any reference to Port n will change to m, and any reference to Port m will
change to n; any reference to a port other than n or m will remain unchanged.
You should always use SHOWSET after a swap to make sure all settings and
port references are as desired.
TARGET n m
The TARGET command (Access Level 1) displays global or port-specific
element information. You enter G for parameter n to display global elements
or 1
–18 for port-specific elements (Port F has no elements). Port-specific
elements include elements from the Local region and from the TARGET
region (if it exists as a data region). For parameter m, enter the element row
number you want displayed or enter ALL to show all of the elements. You
may add a repeat count as a third parameter to repeat the displayed response
the specified number of times. You can always abort the display using the
<CAN> character (<Ctrl+X>).
Because many of the SEL-2032 elements will assert (logical 1) for only a few
milliseconds, the SEL-2032 elements displayed by the TARGET command
are the logical OR of each element’s status during the last one-second period.
If an element is asserted at any point within the last second, the element status
is displayed as asserted. When displaying repeatedly, each update will be one
second apart, so each will show the element status since the previous row’s
display. The TARGET display of the SEL IED elements will simply show the
result of the most recent sample from the device. See Section 4: SEL
OGIC
Control Equations for a description of all local and global elements.
TIME
The TIME command (Access Level 1) displays and sets the internal clock. To
set the clock, type TIME and the desired setting, then press <Enter>. To set
the clock to 23:30:00, make the entry shown in Figure 8.33.
*>TIME 23:30:00 <Enter>
23:30:00
*>
Figure 8.33 TIME Command
Courtesy of NationalSwitchgear.com