Uni-Probe LB 490
BERTHOLD TECHNOLOGIES GmbH & Co. KG
7 – 685
Volume 7 4 Calibration with FOUNDATION
™
Fieldbus
7
4.5.1 Measure Background
Determine the background as described on page 7–679.
4.5.2 Enter Calibration Points
Typically, the first calibration point is recorded at 0% level. If the
vessel cannot be emptied, you may also enter levels above 0%.
Please note: The higher the value is above 0%, the less accurate
will be the reading at 0% after calibration.
In the following example we assume that the calibration curve
includes three calibration points:
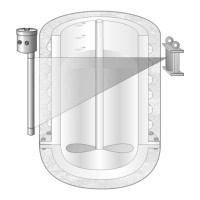
– 0%, i.e. empty vessel or level below the measuring range
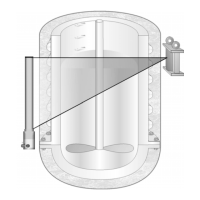
– 50%
– 100%, i.e. vessel filled up to the upper end of the measuring
range.
Please see also the instructions in sections 6.2 and 6.4.
Go to the function block
TRANSDUCER.
At LE_NUMBER_OF_CAL_POINTS enter the number of calibra-
tion points.
Send the entry to the Uni-Probe.
First calibration point: Tank empty
At LE_TAB_ENTRY enter 1 to measure the first calibration point.
In the record
LE_TAB_X_Y_VALUE in the first subparameter
LE_TAB_X_Y_VALUE, enter 0 for the level (0%).
Start reading-in by selecting Read In at
LE_START_STOP_READ_IN.
• Watch the display of
LE_READ_IN_SENSOR_VALUE in
LE_READ_IN_DATA. At the start of the measurement, the value
fluctuates and should reach a stable state at the end. Other-
wise, increase the averaging time in
LE_READ_IN_TIMEOUT.
•
LE_READ_IN_TIMEOUT_ACTUAL shows the time you have to
wait,
LE_READ_IN_STATUS shows Read In Off, as soon as the
measurement is finished.
Read off the actual pulse rate at LE_READ_IN_SENSOR_VALUE
in the record
LE_READ_IN_DATA.
In the record
LE_TAB_X_Y_VALUE enter the read off pulse rate
in the second subparameter
LE_TAB_X_Y_VALUE.
For detailed information on the empty calibration please refer to
section 6.2.
 Loading...