Do you have a question about the BERTHOLD TECHNOLOGIES Uni-Probe LB 490 and is the answer not in the manual?
Explains symbols and typefaces used in the manual for clear communication of warnings and information.
Outlines essential safety instructions and regulations to be followed during installation, operation, and maintenance.
Specifies the intended purpose and limitations of the Uni-Probe LB 490 for safe and compliant operation.
Details actions considered contrary to intended use, which must be prevented for safety.
Defines specialized personnel and their prerequisites for working with the Uni-Probe LB 490.
Provides information on permissible radiation exposure limits and safety measures for operating personnel.
Explains safety instructions and radiation exposure calculations during shielding installation.
Describes the procedure for replacing point sources in various shieldings, emphasizing safety regulations.
Defines the validity of the safety manual for radiometric measuring systems and Uni-Probe LB 490.
Provides general instructions and restrictions for project planning, including system behavior and assumptions.
Details ATEX type of protection requirements for Uni-Probe housing and screwed cable glands.
Explains the basic measuring configuration of the Uni-Probe LB 490, including its components and method.
Details how the Uni-Probe communicates with PCS via HART® and PC-based software.
Warns about potential radioactivity hazards and the need for trained personnel and proper handling.
Provides safety instructions and procedures for transporting the Uni-Probe and its components.
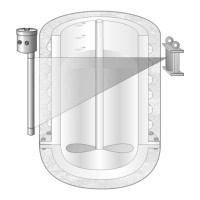
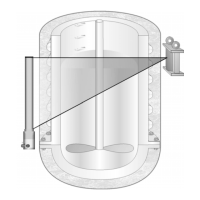
Illustrates various arrangements for Uni-Probe detectors and sources, referring to installation instructions.
Provides instructions for installing rod and point detectors, emphasizing vibration and heat transfer prevention.
Explains the process of mounting shieldings for rod and point sources, including safety and design considerations.
Warns about electric shock hazards when opening the housing and working with live parts.
Describes the Uni-Probe housing's NPT conduits and the proper installation of cables and sealing.
Provides special information for Uni-Probes with intrinsically safe current output, including cable extension.
Emphasizes observing national regulations and the need for qualified personnel for repair and maintenance.
Offers solutions for common problems encountered with the Uni-Probe, including signal issues and drifts.
Guides through the process of safely replacing the entire Uni-Probe unit, including parameter documentation.
Details the procedure for replacing the electronics module, including important notes on parameter re-entry.
Provides technical drawings and specifications for point detectors, including dimensions and weights.
Presents technical drawings and specifications for rod detectors, with and without water cooling.
Provides dimensions and specifications for LB 744X point source shieldings.
Provides cooling water curves for NaI point detectors based on ambient and input temperatures.
Explains how to connect, power on, and power off the HART® Communicator for Uni-Probe communication.
Provides an overview of the Uni-Probe menu structure, indicating read-only and editable parameter access.
Presents a graphical overview of the Uni-Probe menu structure, mapping functions to page numbers.
Describes the Start menu as the primary access point to all other menu items on the HART® Communicator.
Provides access to Configuration, Calibration I/O, Service, and Change Password functions.
Covers parameters like Isotope, Level Unit, Temperature Unit, and Error Handling.
Covers Damping Data, Radiation Interference detection, and Pulse Rate Limits.
Provides access to calibration windows for 1-2 Point Curve, No. of Cal. Points, Show Cal. Curve, and Save & Load Curve.
Allows setting probe number, code, device ID, and number of probes for detector configuration.
Covers HV setup, default HV, HV reading, and HV mode for detector operation.
Explains how to perform plateau measurements to check detector function.
Outlines the step-by-step procedure for taking the Uni-Probe into operation using the HART® Communicator.
Ensures detector and basic settings are correct before calibration, including resetting to factory settings and setting HV.
Explains the two-point calibration method, including steps like measuring background and empty/full calibration.
Explains one-point calibration, including setting background, empty, and full calibration using tank data.
Describes multi-point calibration for tanks requiring linearization, involving recording and checking multiple points.
Explains how to perform plateau measurements to check detector function and edit parameters.
Explains how to set and change passwords to restrict parameter access.
Defines background count rate and presents options for measuring it.
Outlines conditions for empty calibration, including mounting, shutter status, and tank preparation.
Explains linear and exponential calibration curves for one- and two-point calibrations.
Describes when multi-point calibration is beneficial and how to perform it.
Explains how to detect and handle radiation interference.
Details the procedure for reading or entering count rates for calibration.
Lists error messages, probable causes, and error handling responses for the Uni-Probe.
Explains the Continue measurement and Stop measurement modes for error handling.
Provides a table of error messages with probable causes and potential solutions for troubleshooting.
Describes methods for resetting the Uni-Probe.
Illustrates practical examples of connecting the Uni-Probe to a PC via HART® modem with an active current output.
Shows practical examples of connecting the Uni-Probe to a PC via HART® modem with a passive current output.
Lists the software and hardware requirements for installing and working with Uni-Probe DTMs.
Explains how to download PACTwareTM, a manufacturer-independent software for operating field devices.
Details the necessary PC hardware specifications for installing the software.
Guides through the installation process of PACTwareTM, requiring administrator rights.
Explains how to install DTM software and update the device catalog for Uni-Probe LB490.
Illustrates different PC connection methods using HART® modem for Uni-Probe.
Lists the necessary PC hardware and HART® modem specifications for SIMATIC PDM.
Explains the need to disable the Fifo buffer when connecting Uni-Probe via USB-HART® modem for communication.
Details prerequisites and the installation process for SIMATIC PDM software.
Explains the product-specific authorization required to use SIMATIC PDM and the steps for installation and transfer.
Guides through creating a new project in SIMATIC Manager for the Uni-Probe LB 490.
Guides on starting the SIMATIC PDM main window after project setup.
Covers general file functions like save, delete, compare, import, export, print, and rename.
Includes device-specific functions for configuration, calibration, and monitoring of the Uni-Probe.
Provides options for program view and live display of measured values, including Live Display, Y T diagram, and Status Bar.
Includes program settings, HCF catalog import, OPC server, and LifeList.
Ensures detector and basic settings are correct before calibration, including resetting to factory settings and setting HV.
Guides on resetting the Uni-Probe to factory settings, overwriting all user-defined configurations.
Explains how to set the detector HV, including automatic and manual modes.
Details the three calibration modes: Two-point, One-point, and Multi-point calibration.
Explains the two-point calibration method, including steps like measuring background, empty, and full calibration.
Explains one-point calibration, including setting background, empty, and full calibration using tank data.
Describes multi-point calibration for tanks requiring linearization, involving recording and checking multiple points.
Provides key information on Profibus PA operation, including function blocks, channels, and factory settings.
Explains how to configure and calibrate the Uni-Probe via HART® if Profibus connection is unavailable.
Illustrates Uni-Probe integration into a fieldbus system for standard and multi-detector configurations.
Guides on installing the Uni-Probe LB 490 Device Description into SIMATIC Manager for Profibus PA.
Explains how to start SIMATIC PDM and access its main window.
Details the menu items within the DEVICE tab for configuring, calibrating, and monitoring the Uni-Probe.
Details setting the time constant and rapid switch for smoothing output signals.
Guides on setting the background count rate for rod and point detectors.
Guides on setting the lower calibration point, typically at 0% level.
Details setting the upper calibration point, typically at 100% level.
Covers defining the number of calibration points and saving calibration data.
Explains how to define and set digital inputs for Uni-Probe.
Guides on setting digital outputs (relays) and their functions.
Details performing test calculations to verify calibration and check output.
Explains how to start and perform plateau measurements for detector function checks.
Shows recorded plateau points in a table for analysis.
Displays plateau points graphically for analysis.
Includes options for program view and live display of measured values.
Allows viewing Live Display, Y T diagram, Alarm States, Device Status, Toolbar, Status Bar, and Update.
Ensures detector and basic settings are correct before calibration, including resetting to factory settings and setting HV.
Details resetting the Uni-Probe to factory settings.
Guides on setting the detector HV, including automatic and manual modes.
Explains the three calibration modes: Two-point, One-point, and Multi-point calibration.
Details the two-point calibration process, including measuring background, empty, and full calibration.
Explains one-point calibration, including setting background, empty, and full calibration using tank data.
Describes multi-point calibration for tanks requiring linearization, involving recording and checking calibration points.
Explains how to perform plateau measurements and define measurement parameters.
Guides on configuring the multi-detector mode for linking multiple detectors.
Defines background count rate and presents options for measuring it.
Outlines conditions for empty calibration, including mounting, shutter status, and tank preparation.
Explains linear and exponential calibration curves for one- and two-point calibrations.
Describes when multi-point calibration is beneficial and how to perform it.
Explains how to detect and handle radiation interference.
Details the procedure for reading or entering count rates for calibration.
Lists error messages, probable causes, and error handling responses for FOUNDATION™ Fieldbus devices.
Explains the Continue measurement and Stop measurement modes for error handling.
Provides a table of error messages with probable causes and potential solutions for troubleshooting.
Describes methods for resetting the Uni-Probe with FOUNDATION™ Fieldbus.
| Output | Analog and digital signals |
|---|---|
| Power Supply | Battery or External Power Supply |
| Operating Temperature | -10°C to +50°C |
| Interface | RS-232 |
| Display | LCD |
| Detector Type | Plastic scintillator |
| Energy Range | 50 keV to 3 MeV |