134
Program description - Dual Rate / Expo | Winged models
»Control switch« menu, see page 146, and a logical
switch must have been appropriately defined in the
»Logical switch« menu, see page 150.
Whichever switch has been assigned … the respec-
tive switch appears on the display together with a
switch icon that indicates the switch's respective
direction when moved.
0%
0%
0%
Aileron
Elevator
Rudder
DUAL
–––
SEL
–––
–––
–––
100%
100%
100%
EXPO
SEL
Normal
3
Select the right-hand column at the lower edge of the
display marked with SEL and activate the value field
with a brief tap on the centre SET key of the right
touch pad, the selection keys on the left or right touch
pad can now be used to alter the Expo value shown
in the highlighted field, separately for each of the two
switch positions.
Now, for example, there is an opportunity to fly with
a linear curve characteristic with the switch in one
direction, and to preset a value other than 0 % for the
other switch direction:
+50%
0%
0%
Aileron
Elevator
Rudder
DUAL
–––
SEL
–––
–––
–––
100%
100%
100%
EXPO
SEL
Normal
3
At the same time, the Expo curve will be presented in
the graph.
A simultaneous tap on the or keys of the
right touch pad (CLEAR) will reset a changed entry
field value displayed in inverse video back to "0 %".
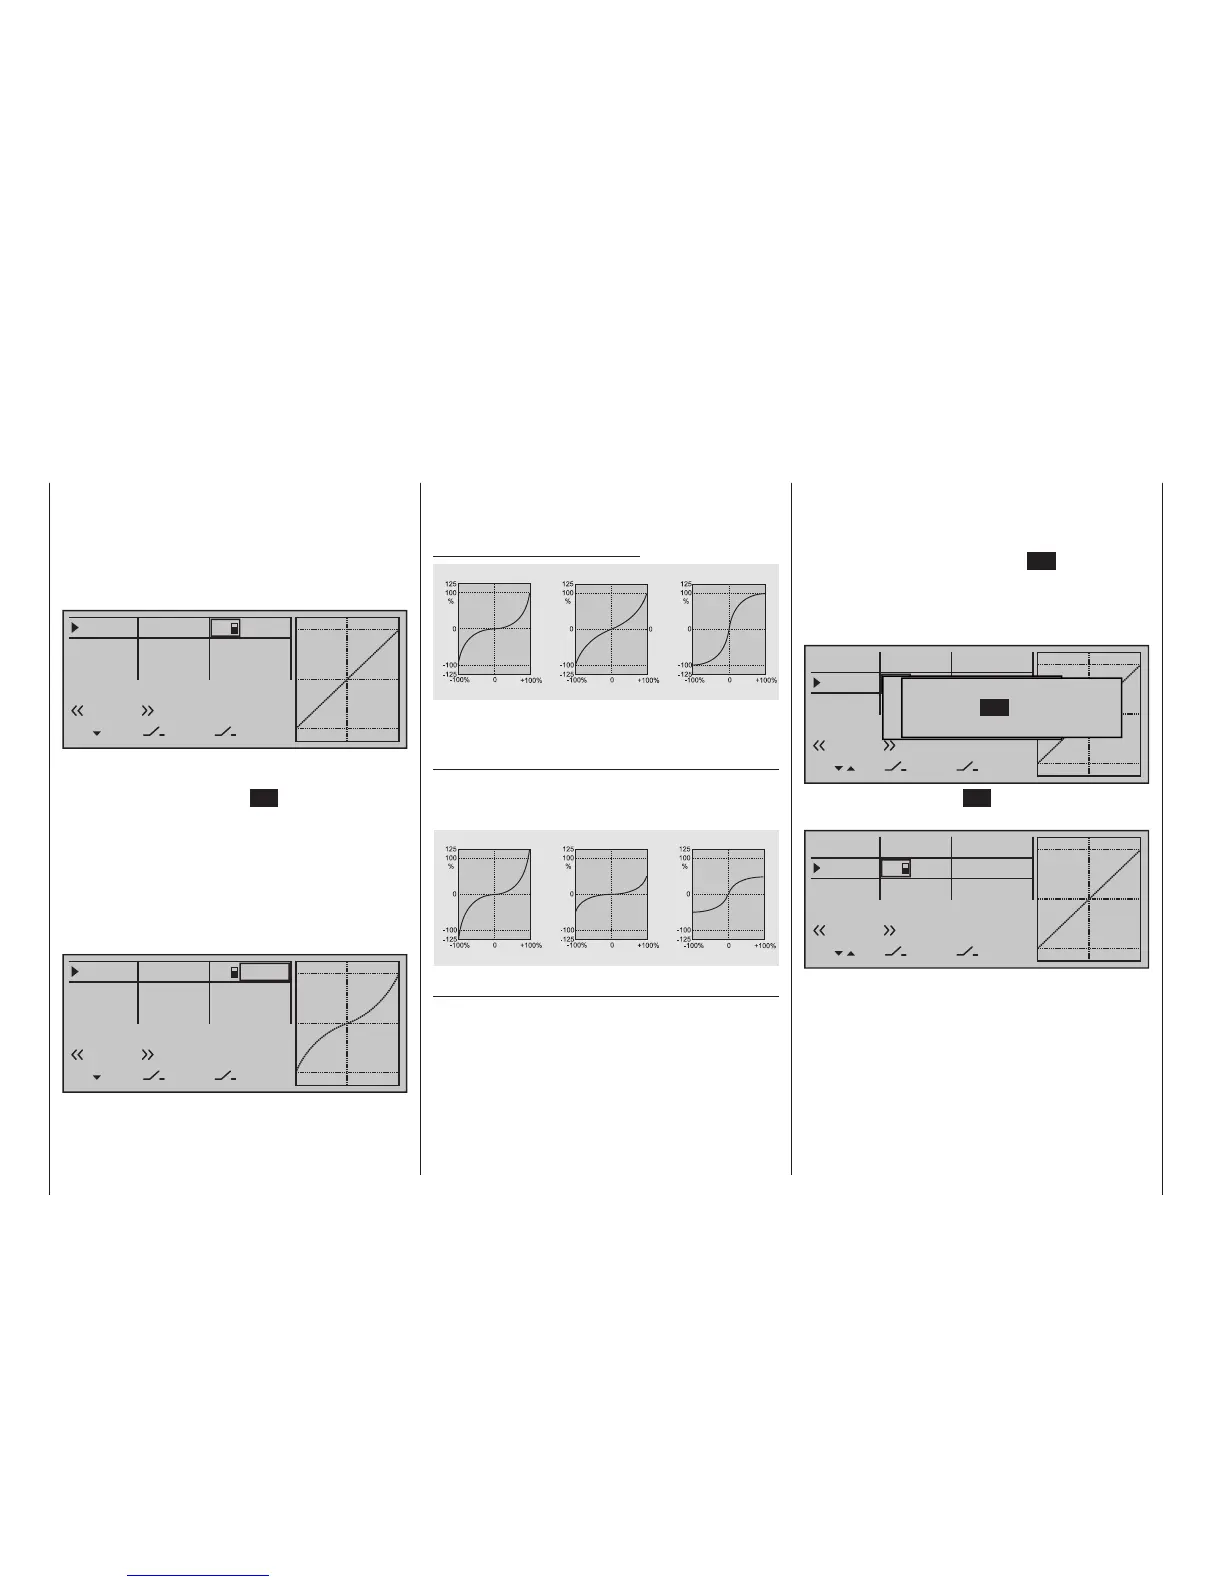
Some examples of Expo values:
Servo travel
Servo travel
Servo travel
Stick deflection
Stick deflection
Stick deflection
Expo = +100%
Expo = +50%
Expo = –100%
In each of these examples, the Dual Rate value
equals 100 %.
Combining Dual Rate and Expo
If values have been entered for both the Dual Rate
and the Expo function, the effects of both functions
will overlap, for example, as follows:
Servo travel
Servo travel
Servo travel
Stick deflection
Stick deflection
Stick deflection
Expo = +100%, DR = 125%
Expo = +100%, DR = 50%
Expo = –100%, DR = 50%
Asymmetric setting of Dual Rate and Expo
To make an asymmetric setting, i. e. a Dual Rate
or Expo setting dependent on the direction of the
respective stick, first access the »Control switch«
menu and assign one of the C1 … C8 control switch-
es – "C3", for example – to the desired transmitter
control, e. g. control 3 for the elevator function.
Do not change the switching point for the stick's
neutral position (0 %). Now return to the "Dual Rate
/ Expo" menu and select the corresponding control
function ("Elevator" in this example).
Now, with a brief tap on the centre SET key of the
right touch pad, activate the switch assignment and
change to the expanded switches then use the selec-
tion keys to move on to the previously defined "C3"
control switch.
0%
0%
0%
Aileron
Elevator
Rudder
DUAL
––––––
–––
SEL
–––
–––
–t–
100%
100%
100%
EXPO
SEL
Moewünschten Schalter
toe die EIN Position
(erw. Schalter: SET)
Normal
Control/Logic/fix switch
C2 C4 C5 C6
C7
C8
FX FXi L1 L2
C1 C3
A brief tap on the centre SET key of the right touch
pad will confirm the assignment of this switch.
0%
0%
0%
Aileron
Elevator
Rudder
DUAL
–––
–––
SEL
–––
–––
–––
100%
100%
100%
EXPO
SEL
G3
Normal
Now use one of the selection keys to move into the
right column then move the elevator stick into its
appropriate end-point to enter a separate Dual Rate
value for each direction, e. g. for "Up elevator" …