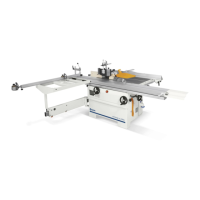
4 - INSTALLATION
EN
Pag. 28/53 - Cap. 4 THIS MANUAL IS PROPERTY OF SCM INDUSTRIA S.P.A - ANY TOTAL OR PARTIAL REPRODUCTION IS STRICTLY FORBIDDEN
- Loosen the lock nut (C fig. 4.3-43) using a 24 mm hex wrench and remove flange (D fig. 4.3-43).
- Remove the hole cover (U fig. 4.3-43).
- Remove the saw blade (O fig. 4.3-43).
- Mount the hole cover (V fig. 4.3-43).
- In sequence mount the blades (E fig. 4.3-43), the flange (D fig. 4.3-43) and the nut (C fig. 4.3-43) (to avoid
possible vibrations carefully clean the “DADO SET” blades and the flange D).
- Tighten the nut using the 24 mm wrench and the pin (B fig. 4.3-43).
- Lower the engraver (Z fig. 4.3-43) completely, as described in Chapter 6.
DANGER-WARNING:
USE the flange to mount the "dado-set" blades.
DANGER-WARNING:
the cutters (W fig. 4.3-43) must be positioned inside the blades (Y fig. 4.3-43) and rotated 45°
respectively. Machining without external blades (Y fig. 4.3-43) is prohibited.
DANGER-WARNING:
for safety reasons you must close guard (N fig. 4.3-43), otherwise:
- the machine does not start (U.S.A. and CANADA version).
- The guard interferes with the sliding table motion.
- Remount protection (P fig. 4.3-43).
The guard (P fig. 4.3-43) must always be mounted and must be positioned in such a way as to
completely cover the tool.