4 - INSTALLATION
EN
Pag. 24/53 - Cap. 4 THIS MANUAL IS PROPERTY OF SCM INDUSTRIA S.P.A - ANY TOTAL OR PARTIAL REPRODUCTION IS STRICTLY FORBIDDEN
4.3.40 RIVING KNIFE FITTING
(hg_4.3.40_0.0)
NOTE-INFORMATION:
see Chapter 6.
4.3.41 FITTING THE SAW BLADE
(he-4.3.41_0.0)
DANGER-WARNING:
use proper gloves for handling the tools.
DANGER-WARNING:
before carrying out any of the operations make sure to cut the main electric power and disconnect
socket T from plug S.
U.S.A. and CANADA version: before carrying out maintenance operations, adjustments or to
dismount any machine member turn main switch (Y fig. 4.3-41) to 0, lock it then indicate this with a
sign.
DANGER-WARNING:
WAIT UNTIL THE SAW BLADES ARE STILL.
For fitting or replacing the saw blade proceed as follows:
1) lift the saw unit totally up (inclination: 90°).
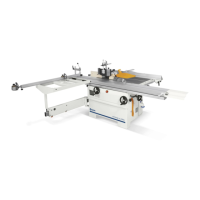
2) Position the squaring frame (A fig.4.3-41) as shown in the figure and translate the wagon (H fig.4.3-41)
completely to the right.
3) Lower the lever (M fig.4.3-41) and open the guard (N fig.4.3-41).
4) Fit pin (B fig.4.3-41) into the saw shaft pulley hole.
NOTE-INFORMATION:
(U.S.A. and CANADA version) a limit switch ensures that with guard (N fig. 4.3-41) open the motor
can not be started.
NOTE-INFORMATION:
the locking nut (C fig. 4.3-41) of the saw blade is counter-clockwise; to unscrew it turn it clockwise.
5) Loosen the lock nut (C fig. 4.3-41) using a 24 mm hex wrench and remove flange (D fig. 4.3-41).
6) In sequence mount the saw (E fig. 4.3-41), the flange (D fig. 4.3-41) and the nut (C fig. 4.3-41) (to prevent
any vibration, thoroughly clean the flanges before mounting the saw blade).
7) Tighten the nut using the 24 mm wrench and the pin (B fig. 4.3-41).
8) Adjust dividing knife (F fig. 4.3-41) height by unloosing nut (G fig. 4.3-41).