62
Using the SonicCell in Performance Mode
1.
Press [MIDI INST] so its indicator is lit.
The MIDI INST screen will appear.
2.
Move the cursor to the part that you want to edit, and
press [PART VIEW].
The [PART VIEW] indicator will light, and the Part View
screen will appear.
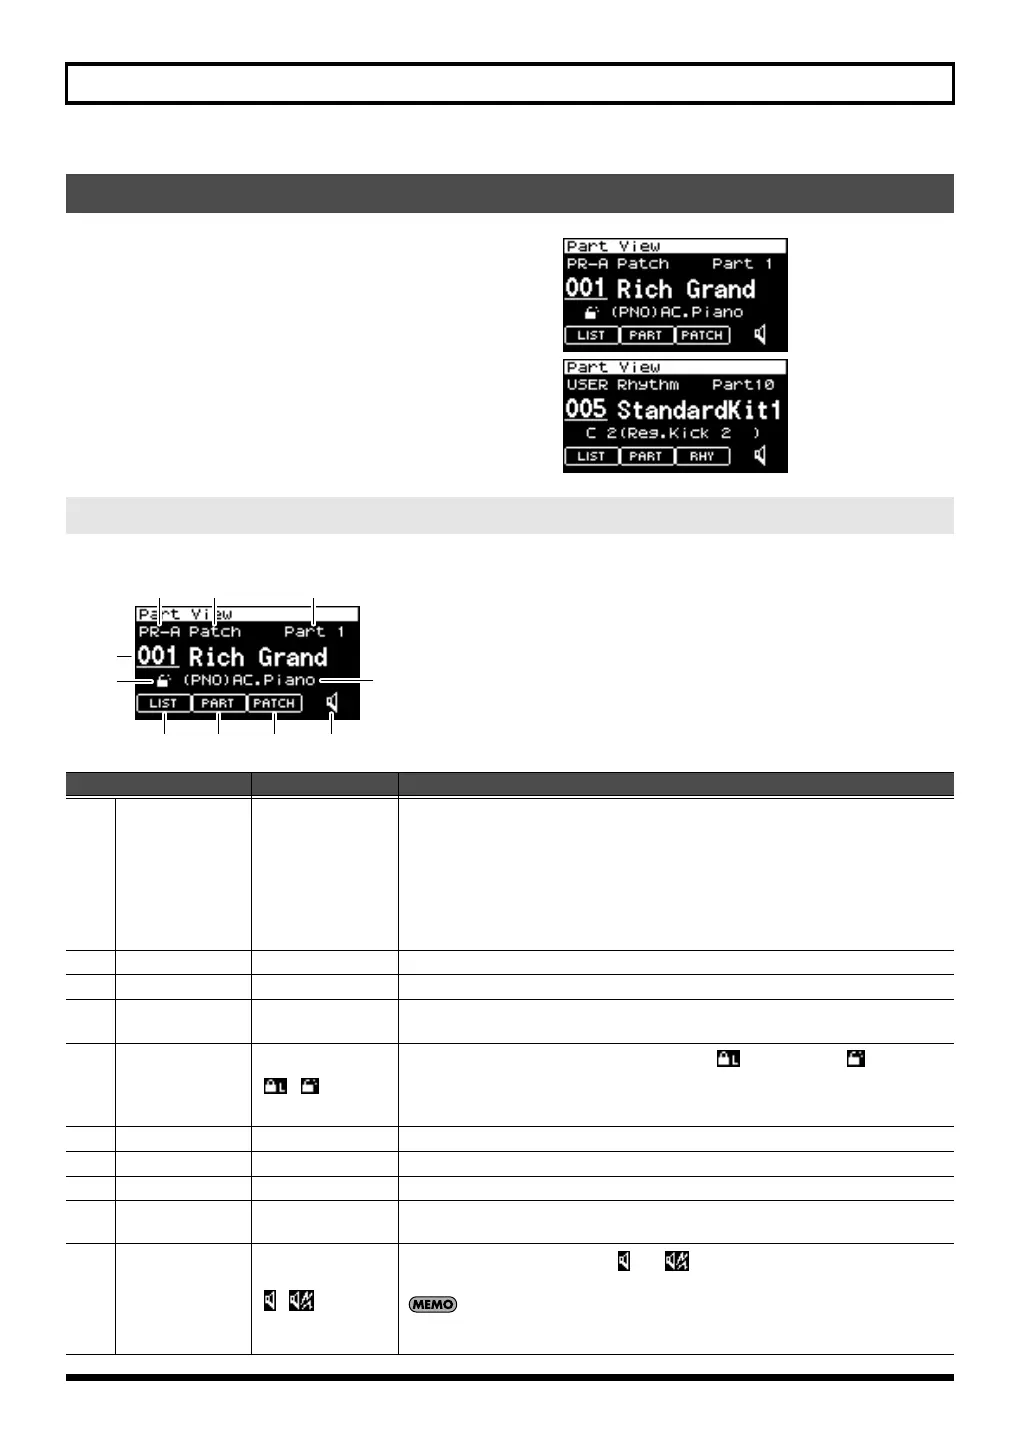
fig.disp-PartView-01
If in Performance mode you’ve set the current part’s patch type to “Patch,” the following screen will appear.
fig.disp-PartView-p
Viewing the part settings (Part View screen)
If the patch type is Patch
Parameter
Value Explanation
(1) Patch group
USER,
PR-A–PR-G, GM
XP-A, XP-B
Selects the patch group.
USER:
User
PR-A–PR-G:
Preset A–Preset G
GM:
General MIDI
XP-A, XP-B:
Wave Expansion Board A, Wave Expansion Board B
* It is not possible to choose XP-A, XP-B unless a wave expansion board is insert-
ed in to the corresponding slot.
(2)
Patch type
Patch, Rhythm
Specifies whether the current part will use a patch or a rhythm set.
(3)
Current part
Part1–Part 16
Selects the part (current part) that will be affected by your operations.
(4)
Patch
number/name
001–
Selects the patch used by the current part.
(5)
Category lock
,
Specifies whether the category will be locked ( ) or not locked ( ) when you
select patches.
If you lock the category, only sounds that are within the category will appear
when you select patches.
(6)
Patch category
- - - –CMB
Switches the category.
(7)
LIST
Press [CURSOR/VALUE] to access the Patch List screen (p. 65, p. 66).
(8)
PART
Press [CURSOR/VALUE] to access the Part Edit screen (p. 68).
(9)
PATCH
Press [CURSOR/VALUE] to access the edit screen for the patch used by the cur-
rent part (p. 88).
(10) Preview
,
If you switch the preview icon ( ) to ( ), you’ll be able to hear a preview
sound played by that patch.
The system Preview setting (p. 179) lets you specify how the preview will be
sounded.
(
1
)
(
7
)
(
2
) (
3
)
(
8
) (
9
) (
10
)
(
4
)
(
5
)(
6
)
SonicCell_e.book 62 ページ 2007年8月9日 木曜日 午後9時17分

 Loading...