4 - 2
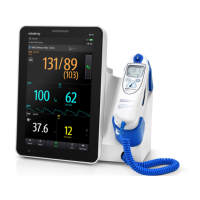
4.2 Managing Patient Information
4.2.1 Entering the Patient Management Menu
Use any of the following methods to enter the Patient Management menu:
■ Select the patient information area at the top left corner of the screen.
■ Select the Main Menu quick key → from the Patient Management column select
Patient Management.
4.2.2 Editing Patient Information
Edit patient information after a patient has been admitted, or when patient information
is incomplete, or when you want to change patient information.
To edit patient information, follow this procedure:
1. Enter the Patient Management menu. For more information, see 4.2.1 Entering
the Patient Management Menu.
2. Edit patient information as required.
If you connect a barcode reader with your monitor, you can scan the patient’s barcode to
enter the patient’s information.
Input the
Patient ID or Visit Number of a patient, other information will automatically fill
in if the patient is in the Local Patient List or ADT Database (if the monitor is connected
with the Admit-Discharge-Transfer (ADT) server through the eGateway).
• The monitor will reload the configuration if you changed the patient
category.
4.3 Discharging a Patient
The monitor discharges a patient in the following situations:
■ After a patient is manually admitted, the previous patient is automatically
discharged.
■ In Spot Check mode, a patient is discharged if the monitor is powered off or
workflow is switched.
■ For patients under Continuous Monitoring mode, you can let the monitor
automatically discharge after the monitor has been switched off for a period of
time. The configuration of this function is password protected. For more
information, see 18.3.3 The Discharge Tab.
■ If the monitor has not detected certain patient vital signs (SpO
2
, PR, RR, NIBP) for
30 minutes, you will be prompted whether to start monitoring a new patient if any
of the above vital signs are detected again.