2000X energy Power Supply Chapter 7: Maintenance
Instruction Manual Parts Replacement
011-003-991 EN 7-55
To reinstall the VFD Board, reverse the removal procedures.
Be sure the VFD is installed in its original orientation. When reinstalling and dressing the
membrane connectors, do the longer one first.
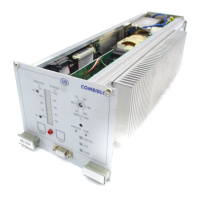
7.7.5 Power Supply Module
The ultrasonic Power Supply Module is affixed to the bottom of the power supply box with four screws
through the bottom board. To remove the Power Supply Module, perform the following steps listed in Table
7.13.
Transfer the DIP switch settings from the original module to the new module.
If installing a 1.1kw or 800w Power Supply Module into a 117 vac Power Supply, move the
115/230 jumper to the 115 position.
To remove the Power Supply Module, take the following steps:
To reinstall the DC Power Supply, reverse the removal procedure.
Table 7.13 Removing the Power Supply Module
Step Action
1 Turn off the Power Supply.
2 Unplug the main power.
3
Using a #2 Philips screwdriver, remove 7 screws from the 2000X cover
(3 on each side, 1 on the rear). Remove the cover.
4 Allow at least two minutes for capacitor discharge.
5 Remove the nose assembly as shown in Figure 7.4 op pagina 53.
6
Disconnect P13, P51, and P53 (analog module), or P60 (digital module)
from controller board as shown in Figure 7.3 op pagina 52.
7
Disconnect P21 and P24 from the lower board as shown in Figure 7.3
op pagina 52.
8 Use a Phillips screwdriver to remove retaining screws.
9 Slide the module out of the Power Supply