• Camera Selection: Select the left or right sensor to be used for the live image
if your camera is a dual-lens model. The
Both
option creates a side-by-side
image of both sensors.
RiL
displays a miniature version of the right sensor
within the image of the left sensor.
LiR
displays a miniature version of the left
sensor within the image of the right sensor.
Activating the
Auto
setting in a MOBOTIX Night model causes the camera to
automatically switch from the right to the left sensor when the illumination
falls below the value set for Camera Night Switch (DY/NI). Once the defined
threshold value is exceeded again, the system switches back to the right
daylight sensor (see section 5.8,
Day & Night Modes
).
In a MOBOTIX Dual model, combining the
Auto
option with a Time-table
Profile
(see section 7.8.6,
Time Tables
) will let the camera switch sensors in a
scheduled manner. When the Time Table profile is active, the camera uses
the right sensor; otherwise, the left sensor will be used.
• Display Mode: This option is preset to
Full Image
; selecting the
EiP
option
(Event in Picture) will show the last event as a small image in the bottom right
corner of the live image. The
PiZ
(Picture in Zoom) option will show the full
image as a small image in the bottom right corner of the zoomed image (2x,
4x).
• Resolution: This sets the image size that is displayed by the camera. You can
choose from the following resolutions:
MEGA (1280x960)
,
VGA (640x480)
,
CIF
(320x240)
,
PDA (160x120)
,
D-1 PAL (768x576)
and
Custom Size
.
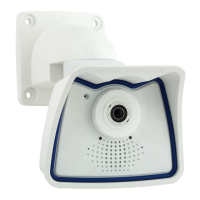
Custom Size
::
::
The
Custom Size
option allows defining a camera image of
almost any size. You can either define the image size using the mouse or by
manually entering the desired values in the text field. The camera software
always rounds the pixel values to the next lower multiple of 16.
To define a custom image size, proceed as follows:
• Define the first corner point of the image window by Shift-clicking with
your mouse in the live image.
• Define the second corner point of
the image window diagonally
across by clicking with your
mouse in the live image (left-click).
• You have drawn a yellow frame
that represents the user-defined
image window. Click on Set Rec-
tangle Size in the dialog to enter
the coordinates of the new image
window in the Custom Size field.
Clicking on the Set button will display only the custom size image on the
camera's Live screen.
© MOBOTIX AG • Security-Vision-Systems • Made in Germany
www.mobotix.com • sales@mobotix.com • 10.10.2006
105/288
Software Camera Manual Part 2
Image sensor selection:
• Right
• Left
• Both
• RiL
• LiR
• Auto
Display Mode:
• Full Image
• EiP (Event in Picture)
• PiZ (Picture in Zoom)
Custom image size
(SKYLINE)
X
X
-
-
-
-
X
X
Kamerafunktionen
Kameramodell
X
X
-
-
-
-
X
X
Kamerafunktionen
Kameramodell
X
X
-
-
-
-
X
X
Kamerafunktionen
Kameramodell
X
X
-
-
-
-
X
X
Kamerafunktionen
Kameramodell