Workshop
Manual
Rolls- Royce Silver Shadow
B
Bentley
T
Series
Chapter
M
hand side of the engine
-
when viewed from the
driving seat.
2.
Rotate the crankshaft by hand at least one
full turn in the normal direction of rotation, until
the
'Al' inlet valve has opened and just closed.
3. Further rotate the crankshaft in the correct
direction of the rotation until the flywheel is at
T.D.C.
4.
Fit the 'A' bank rocker covel.
5.
Renew the neoprene seal at the base of the
distributor housing.
6. Fit the distributor with the rotor arm adjacent
to the contact breaker adjuster.
7.
Set the ignition timing as described in
Ignition timing
-
To set.
Contact breaker points-To remove
Cars prior to Car Serial Number 8742
1.
Remove the distributor cap and rotor arm.
2.
Remove the nuts from the posts to which the
contact breaker points are anchored.
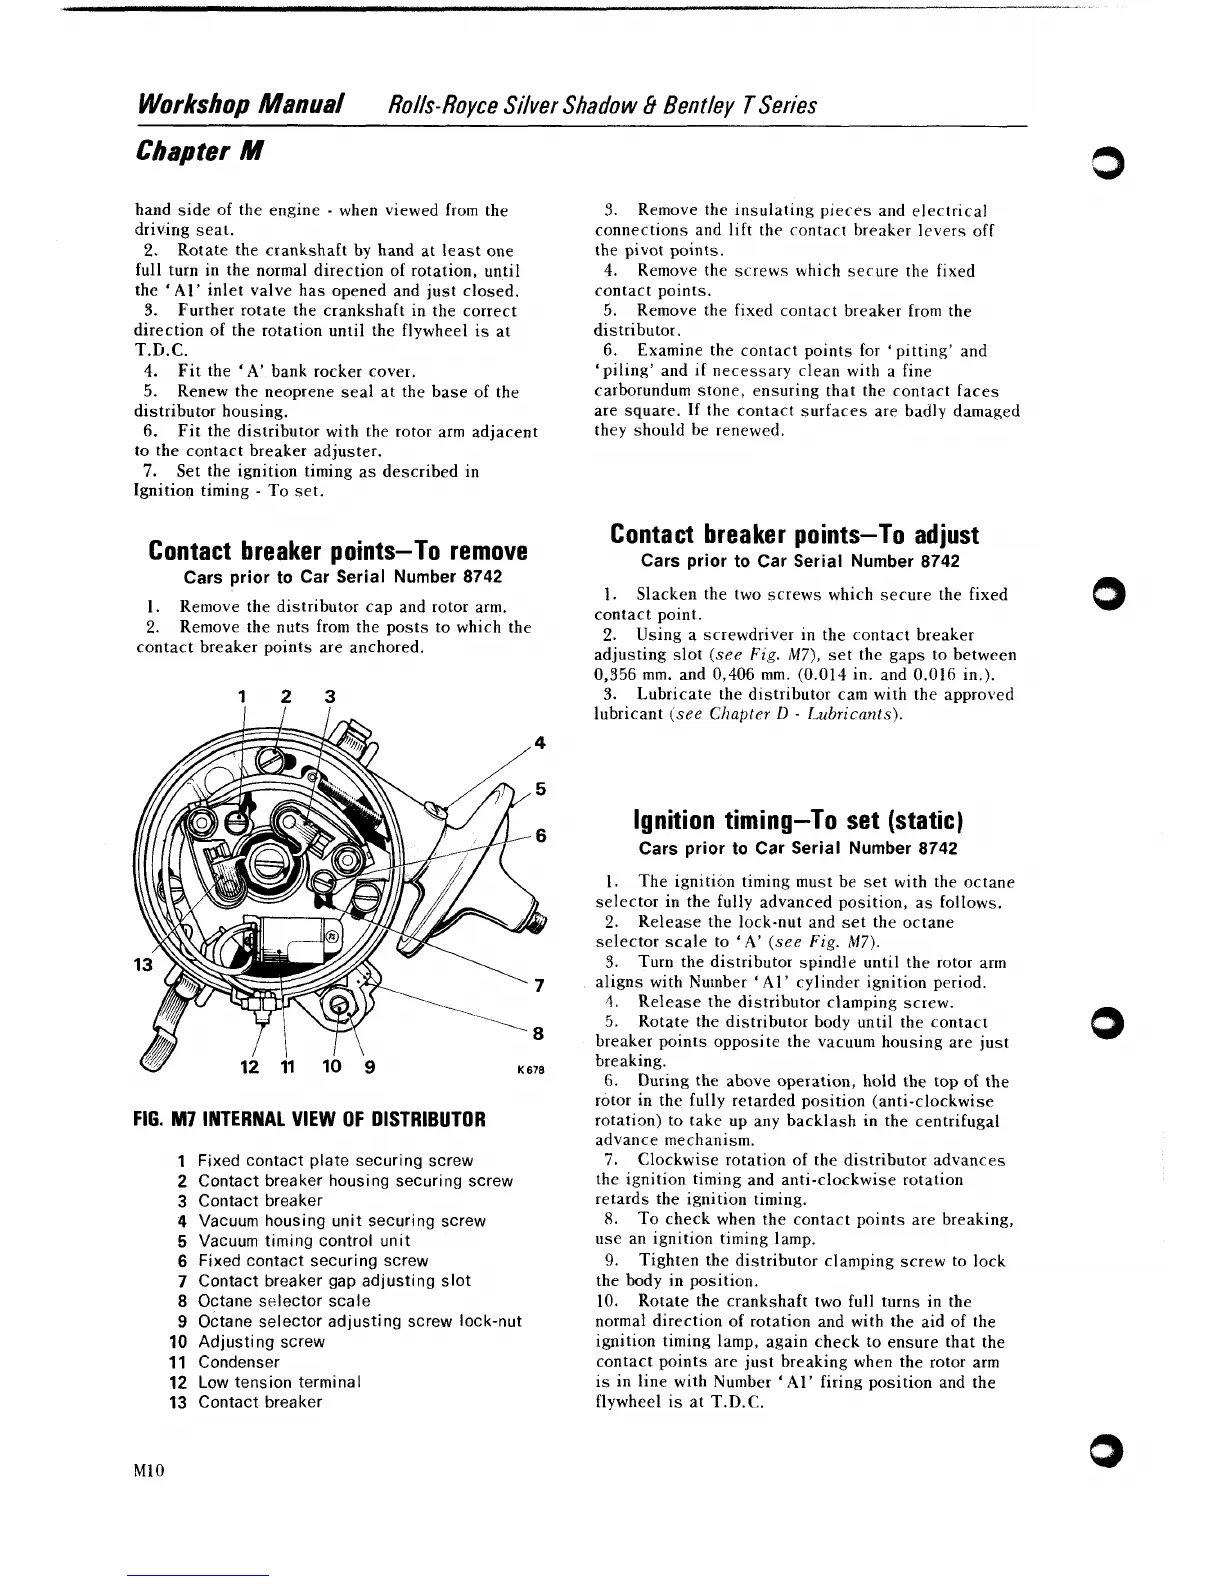
FIG.
M7
INTERNAL VIEW OF DISTRIBUTOR
1
Fixed contact plate securing screw
2
Contact breaker housing securing screw
3
Contact breaker
4
Vacuum housing unit securing screw
5
Vacuum timing control unit
6
Fixed contact securing screw
7
Contact breaker gap adjusting slot
8
Octane selector scale
9
Octane selector adjusting screw lock-nut
10
Adjusting screw
11
Condenser
12
Low tension terminal
13
Contact breaker
3.
Remove the insulating pieces and electrical
connections and lift the contact breaker levers off
the pivot points.
4.
Remove the screws which secure the fixed
contact points.
5. Remove the fixed contact breaker from the
distributor.
6.
Examine the contact points for 'pitting' and
'piling' and if necessary clean with a fine
carborundum stone, ensuring that the contact faces
are square. If the contact surfaces are badly damaged
they should be renewed.
Contact breaker points-To adjust
Cars prior to Car Serial Number 8742
1.
Slacken the two screws which secure the fixed
contact point.
2.
Using a screwdriver in the contact breaker
adjusting slot (see Fig.
M7), set the gaps to between
0,356 mm. and 0,406 mm. (0.014 in. and 0.016 in.).
3.
Lubricate the distributor cam with the approved
lubricant
(see Chapter
D
-
Lubricants).
Ignition timing-To set (static)
Cars prior to Car Serial Number 8742
1.
The ignition timing must be set with the octane
selector in the fully advanced position, as follows.
2.
Release the lock-nut and set the octane
selector scale to
'A'
(see Fig. M7).
3.
Turn the distributor spindle until the rotor arrn
aligns with Number
'
Al'
cylinder ignition period.
4.
Release the distributor clamping screw.
5.
Rotate the distributor body until the contact
breaker points opposite the vacuum housing are just
breaking.
6.
During the above operation, hold the top of the
rotor in the fully retarded position (anti-clockwise
rotation) to take up any backlash in the centrifugal
advance mechanism.
7.
Clockwise rotation of the distributor advances
the ignition timing and anti-clockwise rotation
retards the ignition timing.
8.
To check when the contact points are breaking,
use an ignition timing lamp.
9.
Tighten the distributor clamping screw to lock
the body in position.
10.
Rotate the crankshaft two full turns in the
normal direction of rotation and with the aid of the
ignition timing lamp, again check to ensure that the
contact points are just breaking when the rotor arm
is in line with Number
'Al'
firing position and the
flywheel is at T.D.C.