38
Available signal selections are as described below.
Button Signal Refer to
BLACK, IN01-08,
STILL1-4,
MATT1-2, CLBAR,
IN09-24 (option)
Signals assignable to the bus buttons in M/E, P/P and
KEY/AUX.
5-2
M/E PGM M/E program video
M/E PREV
M/E preview video
(next video with or without KEY1-2, DSK1-4 and/or PinP1-2)
6-2
M/E CLEAN
M/E clean video
(program video with or without KEY1-2, DSK1-4 and/or PinP1-2)
6-3
D_PGM Key cut signal for M/E program video 6-4
PGM P/P program video
PREV P/P preview video 6-2
CLEAN P/P clean video 6-3
P/P KEY Key cut signal for P/P program video 6-4
MV1-2 Multiviewer video 16-1
6-1-3. AUX Image Crossfade Transition
The background image displayed on an AUX bus can be switched by just selecting the next
image in the KEY/AUX bus. The auxiliary image will fade out and new auxiliary image will
fade onto the screen. The following example shows how to setup and perform the Crossfade
Transition of AUX1.
Setting Rate(Time) for Crossfade Transition
(1) Quickly press the AUX1 button in the BUS SELECT block to display the [SETUP-
OUTPUT- AUX XPT](1/2) menu.
(2) Turn F1 to select AUX1.
(3) Turn F3 to set the Crossfade transition to ON.
(4) Turn F4 to set the transition rate other than 0. Setting range is 0 to 999 in frames.
OUTPUT :SELECT : XPT : TRANS RATE : 1/2
AUX XPT : =AUX1 : =BLACK: En=ON =30 :
Performing Crossfade Transition of AUX1
Turn F3 in the [SETUP- OUTPUT- AUX XPT](1/2) menu to change the image. The
background on AUX1 fades out and a new image fades onto the screen.
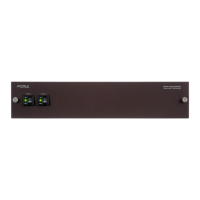
To perform the Crossfade transition on the control panel, press AUX1 in the BUS SELECT
block, and then select a desired image below the BUS SELECT section.
AUX
PREV M V1CLEAN MV2
2345 67891011121
KEY/AUX
PGMPREV CLEANPGM
M/E
2345 6781
P/P
DSK
2341
KEYER
212
P IN P
1
13 14 15 16 17 18 19 20