09/2007
2-43
Phaser 8860/8860MFP Service Manual
37,016.43
Error Messages and Codes
Initial Issue
37,016.43 PEST 50 Volt Supply Fault
An error has occurred related to the Electronics Module 50 V Power Supply. The clutches oper-
ate at 50 V. The Head Maintenance, Deskew, and Pick clutches are drawing too much power
indicating a short in the supply or one of the components connected to it.
Initial Actions
• Check the Electronics Module indicators.
• If the problem persists, follow the procedure below.
Primary Causes
The troubleshooting table lists parts and wiring referenced in the troubleshooting procedure.
Troubleshooting Procedure
CAUTION
Damage to circuits within the Electronics Module may occur if the power supply capacitors are
not allowed to fully discharge.
PEST 50 V Supply Fault
37,016.43 All three clutches failed.
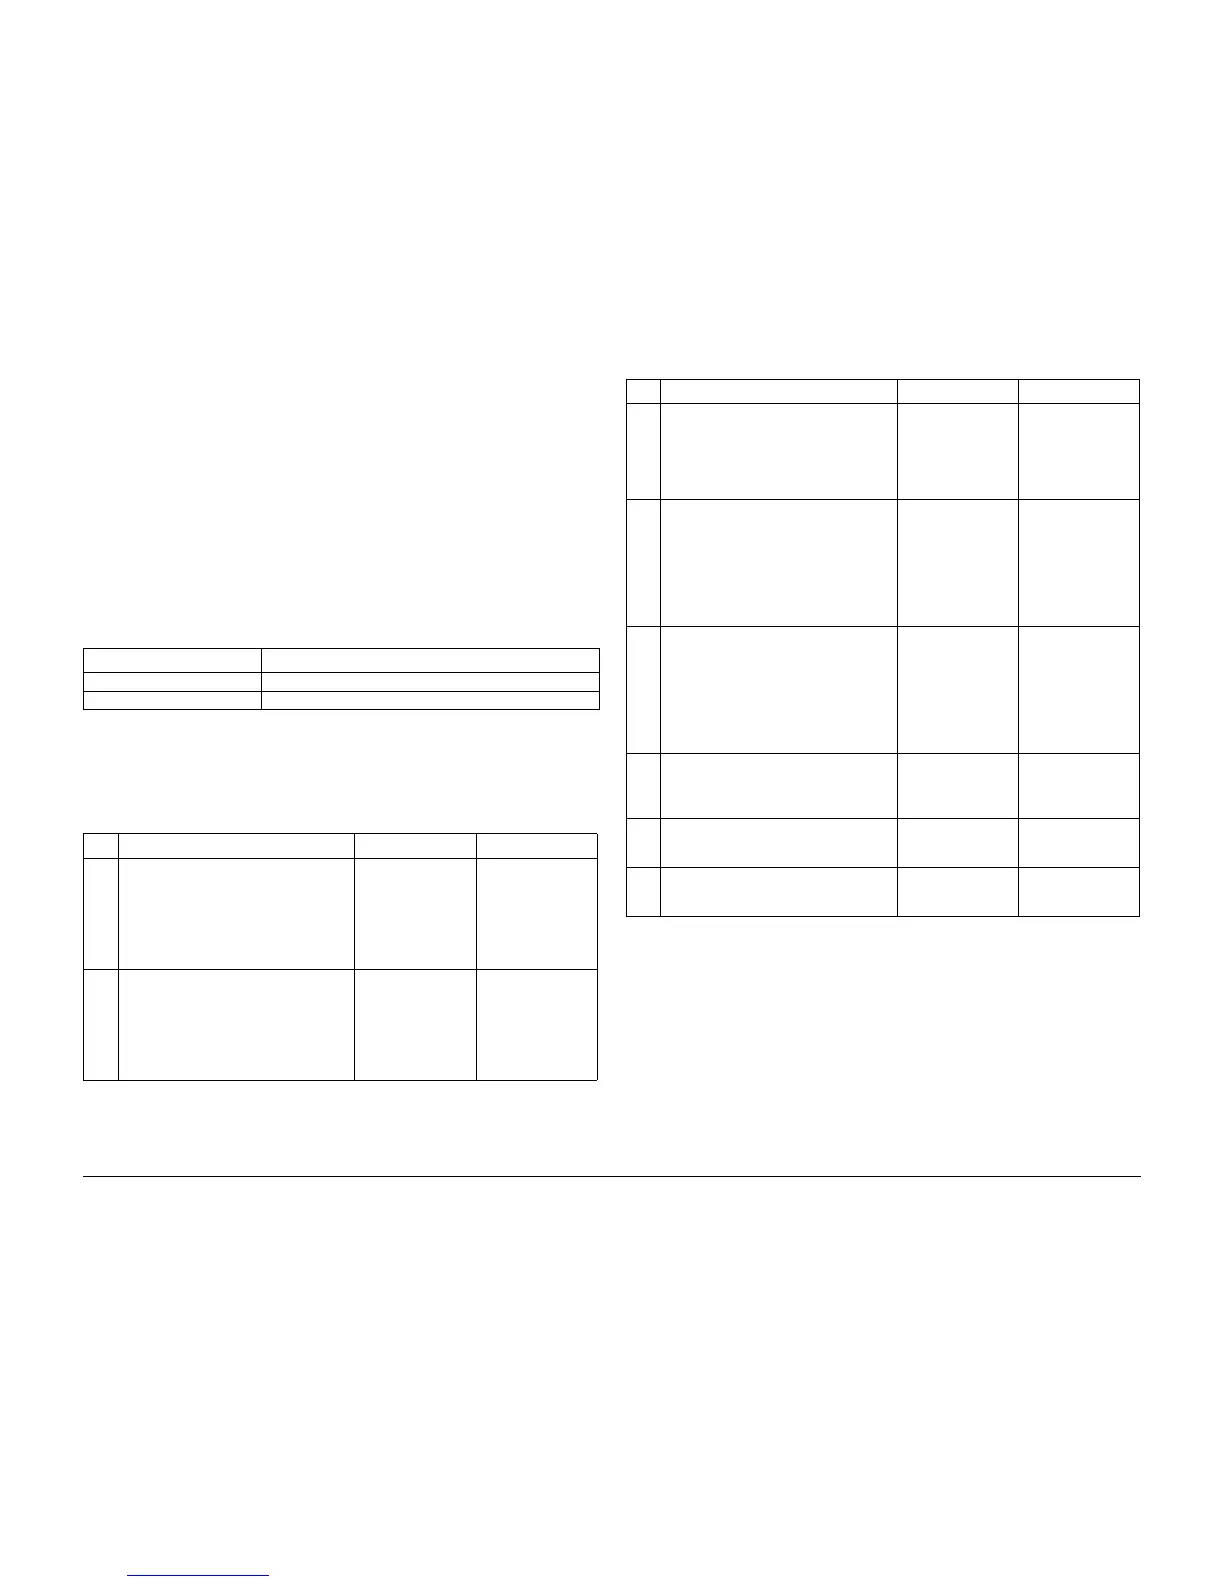
Table 1 37,016.43 Troubleshooting Reference Table
Applicable Parts Wiring and Plug/Jack References
Electronics Module, PL 4.0 Left Side Harness (1/2) - Figure 6
I/O Board, PL 5.0 I/O Board (2/2) - Figure 12
Table 2 PEST 50 V Supply Fault 37,016.43 Troubleshooting Procedure
Step Questions or Actions Yes No
1 Check for a short in the Electronics Mod-
ule.
Measure the 50 V power supply output.
The test point is located on the power con-
trol board below the main board RAM
DIMMs.
Is there 50 V across the TP and ground?
Go to Step 2. Go to Step 2.
2 Shutdown the system and wait 30 sec-
onds for the capacitors to discharge.
Unplug all connections to the Electronics
Module.
Turn the system On.
Do the PE and PS indicators (near the
Power Switch) flash momentarily?
Go to Step 3. Replace the Elec-
tronics Module (REP
5.0.5).
3 Shutdown the system and wait 30 sec-
onds for the capacitors to discharge.
Connect I/O Board connector (P/J840).
Turn the system On.
Do the PE and PS indicators (near the
Power Switch) flash momentarily?
Go to Step 4. Go to Step 5.
4 Check the 50 V Supply LED.
If the 50V LED (Figure 2) illuminates, the
short is on one of the external devices
unplugged earlier. In this case, systemati-
cally turn off the printer, plug a wiring har-
ness back in, and turn the printer on until
the 50V LED fails to illuminate.
Was the defective part isolated?
Replace the defec-
tive part.
Go to Step 5.
5 Shutdown the system and wait 30 sec-
onds for the capacitors to discharge.
Disconnect all connections to the I/O
Board.
Test the resistance of the I/O Board
across pin 1 of J270 and ground.
Pin 1 is on the left end of the jack.
Is the resistance still less than 1K ohm?
Replace the I/O
Board (REP 5.0.13).
Go to Step 6.
6 Reconnect connections on the I/O Board
until you find one that creates a short at
J270-1.
Does a short appear at J270-1?
Replace the affected
component.
Go to Step 7.
7 Reconnect the Wave Amplifier.
Turn the system On.
Does the error persist?
Go to Step 8. Leave power on to
ensure the problem
is fixed.
8 Reconnect the Printhead.
Turn the system On.
Does the error persist?
Replace the Elec-
tronics Module (REP
5.0.5).
Leave power on to
ensure the problem
is fixed.
Table 2 PEST 50 V Supply Fault 37,016.43 Troubleshooting Procedure
Step Questions or Actions Yes No