April 2017
6-15
Xerox® VersaLink® B7025/B7030/B7035 Multifunction Printer
GP 13
General Procedures and Information
Launch Issue
5. Check the IP addresses of the PWS and printer. If the PWS has been connected to the
same subnet, the PWS and printer address should share the same values for the first
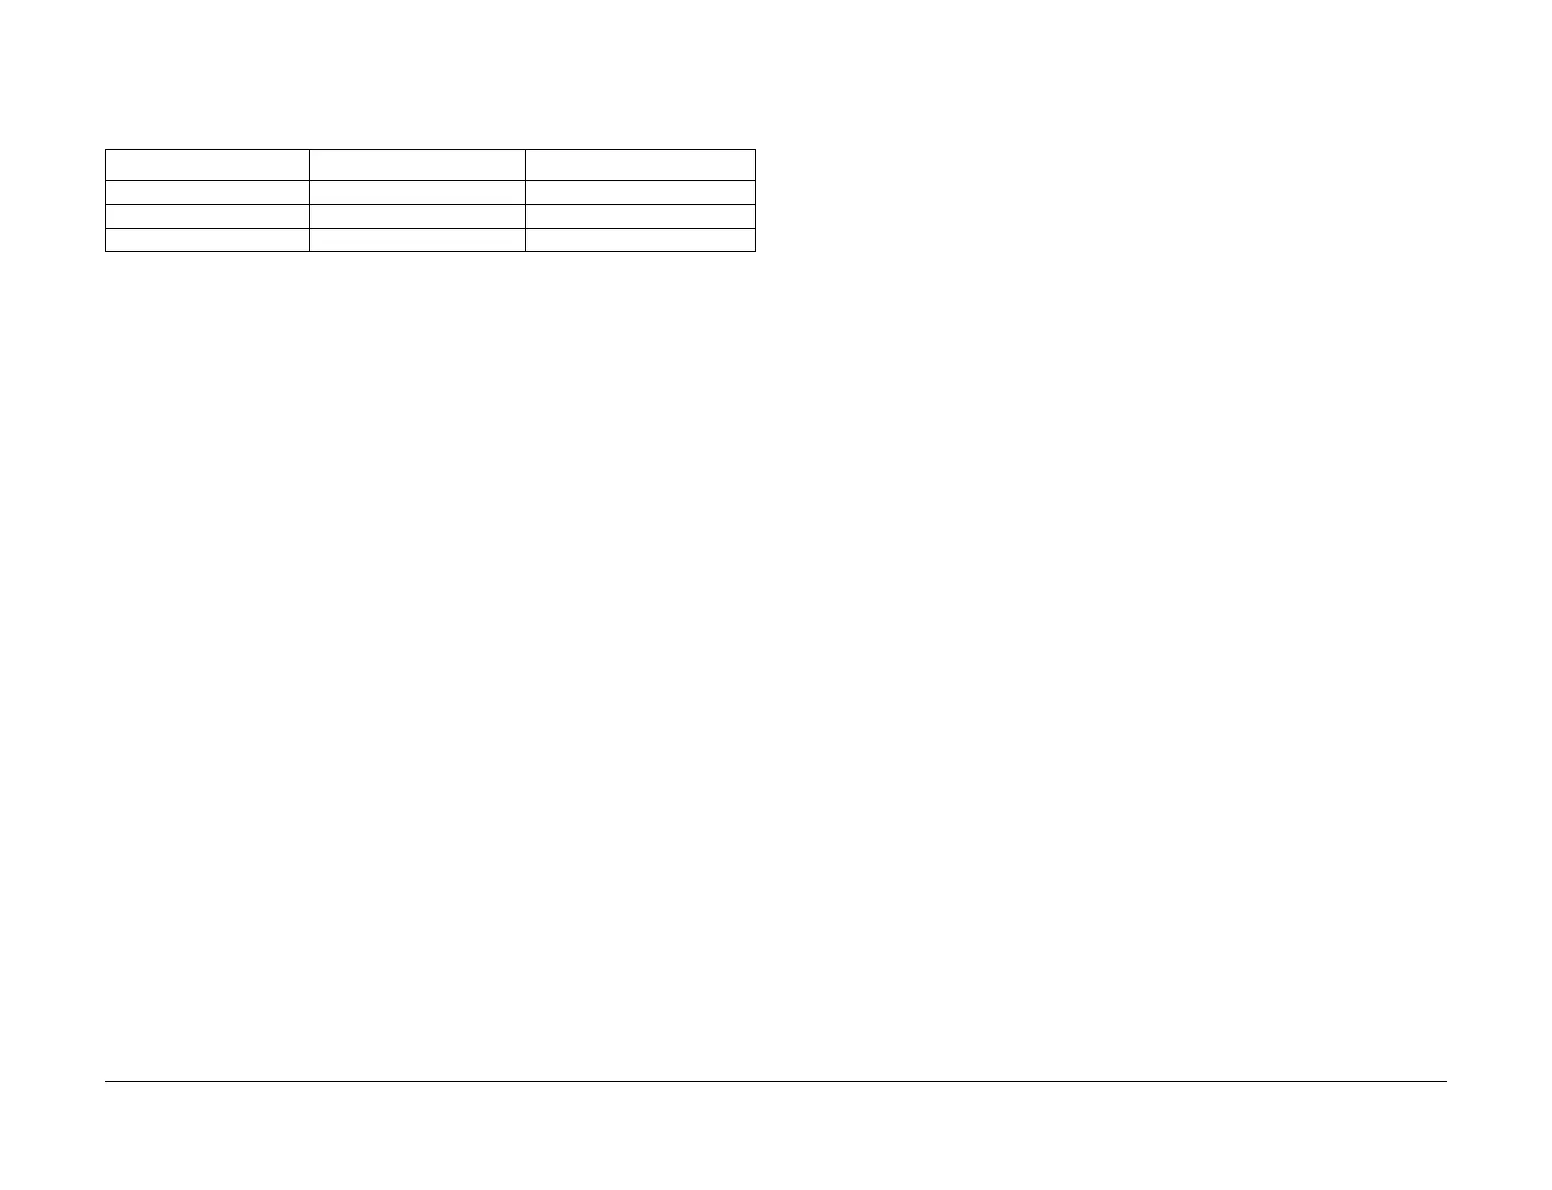
three and have a different value for the forth number. Refer to Table 1 for an example.
If the PWS and printer share similar, but unique IP address, continue. If not, use the Set a
Static IP Address on the PWS to set the PWS IP address.
6. After verifying the IP addresses are correctly configured, PING the printer:
a. In the Command window (where the blinking cursor is) type the word PING. Press
the space bar once and enter the printer’s IP address and press Enter. As an exam
-
ple: ping 192.168.0.2.
b. If the printer responds to the PING command, it replies four times. This should not
take more than two or three seconds.
c. If the PING command times out, or responds with “host unreachable”, check the IP
addresses that were entered. If the IP address is correct, contact 2nd level support.
7. If the PING command replies, exit the Command window (type “exit” at the prompt and
press Enter). This test verifies the Ethernet connection is good.
8. Install the printer driver and setup the printer as a local printer. Select connect to the
printer using “other” port type. From the dialog drop down select Standard TCP/IP port.
9. For the printer name or IP address, enter the printer’s IP address (192.168.0.2 in this
example).
10. When the driver installation finishes, Select Yes at the Print Test Print dialog box.
NOTE: If the test page does not print, the customer could have Accounting enabled (if the
device supports it) requiring that a special code is submitted with the print job before the
printer prints.
11. After the test print is completed, open a web browser on the PWS.
12. In the Address Bar (in place of a web site address or URL), enter the printer’s IP address
(192.168.0.2 in this example).
13. If the connection is working correctly, the web page of the printer will be displayed.
NOTE: If the printer’s webpage cannot be opened, verify that Web Services are enabled
on the configuration page. If the web browser is set to use a Proxy address for the internet
connection, it will not be possible to open the printer’s webpage as there will be no con
-
nection to that proxy server while directly connected to the printer via the crossover Ether-
net cable. Refer to PWS Browser Proxy Server Setting for instructions on Internet
Explorer proxy configuration.
Creating the Clone File
NOTE: This procedure can be performed from any PC connected to the network or the PWS
connected to the machine using an Ethernet crossover cable. The only requirement on the PC
is an Internet Browser.
1. Open Internet Explorer
2. Enter the machine’s IP address in the Address line and select Go.
3. When the Internet Services window opens, login to Admin mode, GP 23. Click on the
Home tab, then the Cloning link.
4. Select individual parameters to clone from the device or Select/Clear All.
5. Click on Create.
6. If prompted, save the clone file to an easily remembered location that for later installation.
If not prompted to save the file, look for it in the Downloads folder.
7. Click Close.
8. Log out of Admin mode, GP 19.
Using the Clone File
NOTE: This procedure can be performed from any PC connected to the network or the PWS
connected to the machine using an Ethernet crossover cable. The only requirement on the PC
is an Internet Browser.
1. Open Internet Explorer
2. Enter the machine’s IP address in the Address line and select Go.
3. When the Internet Services window opens, login to Admin, GP 23. Click on the Home
tab, then the Cloning link.
4. Click on the Select button.
5. Use the Browse button to navigate to the clone file, or type the full path to the file, then
click Open.
6. Click Install.
7. Verify the cloned settings with a new Configuration Report.
Set a Static IP Address on the PWS
Use this procedure to manually set the PWS IP address. Instructions are given for W7 and XP.
NOTE: If the PWS has a wireless Ethernet card/adapter installed, Windows will not use the
wired Ethernet port by default until either the PWS is rebooted or the wireless Ethernet card is
temporarily disabled. If unsure how to disable/enable the wireless Ethernet card, restart the
PWS after setting the IP address.
For W7:
1. Open the Control Panel.
2. Select Network Sharing Center.
3. Select Change Adaptor Settings in the upper left corner of the Control Panel.
4. Right-click on Local Area Connection, then select Properties.
5. On the Networking tab (for local area connection), click on Internet Protocol Version 4
(TCP/IPv4), then select Properties.
6. Select Use the following IP address and enter an IP address similar to the printer to
manually set the PWS IP address and subnet mask to match the printer’s IP configuration
settings.
Table 1 Example LAN settings
Printer PWS / Laptop
IP Address 192.168.0.2 192.168.0.5
Subnet Mask 255.255.255.0 255.255.255.0
Gateway/Router 192.168.0.1 192.168.0.1
 Loading...


