Table of figures
Figure 1: Front view of the iTero Element 5D imaging system 4
Figure 2: Rear view of the iTero Element 5Dimaging system 5
Figure 3: iTero Element 5D laptop configuration imaging system 5
Figure 4: Front view of the iTero Element 5D Plus cart-configuration imaging system 6
Figure 5: Rear view of the iTero Element 5D Plus cart-configuration imaging system 7
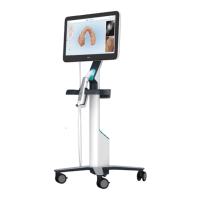
Figure 6: Front view of the iTero Element 5D Plus mobile-configuration imaging system 7
Figure 7: Rear view of the iTero Element 5D Plus mobile-configuration imaging system 8
Figure 8: iTero Element 5D wand 8
Figure 9: Protective sleeve 9
Figure 10: Disposable sleeve 9
Figure 11: Visible light spectrum showing NIRI on the 850nm wavelength 10
Figure 12: Reflective concept – healthy enamel is translucent while dentin and caries are reflective 10
Figure 13: Interproximal carious lesion 11
Figure 14: Removing the wand from the cradle 23
Figure 15: Moving the scanner 24
Figure 16: Do not lift the scanner using the main handle 24
Figure 17: Do not allow the power pack to dangle in the air 32
Figure 18: Never tilt the screen more than 45 degrees 32
Figure 19: Welcome screen 33
Figure 20: Connect page listing the available networks 34
Figure 21: Entering the security key 35
Figure 22: Scanner is connected to the Internet and online 35
Figure 23: Verifying the communication with Align 36
Figure 24: Selecting the time zone 36
Figure 25: Registering the system to customize the setup 37
Figure 26: iTero subscription package 37
Figure 27: License agreement 38
Figure 28: Checking for updates 38
Figure 29: System is registered and ready 39
Figure 30: iTero Element logo 40
Figure 31: Demo Mode option 40
Figure 32: Login window with a list of demo users 41
iTero Element 5D and iTero Element 5D Plus imaging systems User manual
xx © 2022 Align Technology, Inc. All rights reserved.