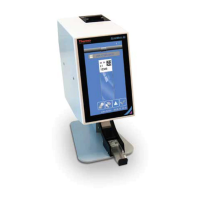
Maintain the instrument
■
Install a block ....................................................................... 156
■
Change the block ................................................................... 157
■
Remove the block ................................................................... 158
■
Decontaminate the sample block ...................................................... 159
■
Replace the instrument fuses ......................................................... 161
■
Power on or o, store, and move ...................................................... 163
IMPORTANT! This chapter contains user maintenance procedures for the instrument. Procedures
other than those described in this document must be performed by a qualified Thermo Fisher Scientific
service representative.
Install a block
This section describes installing a block when there is no block in the instrument. To change a block,
see “Change the block” on page 157.
A block can be installed by any user. This function is not restricted to administrators.
Each combination of a block and an instrument has its own calibration status. To determine the
calibration status of a block on an instrument, see “View the calibration status and set reminders” on
page 87. To calibrate a block on a specific instrument, see Chapter 7, “Calibrate and verify instrument
performance”.
1.
Tap (Settings)4Change block.
2.
Insert the block and heated cover into the instrument drawer.
The instructions are displayed on the screen.
3.
Tap Install.
The instrument displays one of the following options, depending on the calibration status:
•
Confirmation that the block was installed successfully and the expiration date of the current
calibration.
•
A warning that the block is not calibrated on the instrument.
•
A warning that the calibration of the block on the instrument is expired.
10
156
QuantStudio
™
6 Pro Real-Time PCR System and QuantStudio
™
7 Pro Real-Time PCR System User Guide