83
Activating and Changing Your Pod 55 Activating and Changing Your Pod
Begin insulin delivery (screen step ):
1. If you applied the Pod to a lean area, squeeze the skin around the Pod.
2. Tap START to insert the cannula.
Conrm Pod is securely attached
1. Conrm that the Pod is securely attached to your body, then tap YES.
2. If you are squeezing your skin, stop squeezing when the Omnipod 5 App asks
if the cannula is properly inserted.
5.5. Checking Your Infusion Site
Warning: ALWAYS check the infusion site oen to make sure the cannula
is properly inserted and secured to the Pod. Verify that there is no wetness or
scent of insulin, which may indicate that the cannula has become dislodged.
An improperly inserted, loose or dislodged cannula could result in under-
delivery of insulin, which can lead to hyperglycaemia.
Warning: NEVER attempt to inject insulin (or anything else) into the ll
port while the Pod is on your body. Attempting to do so could result in over-
delivery or under-delivery of insulin, which can lead to hypoglycaemia or
hyperglycaemia.
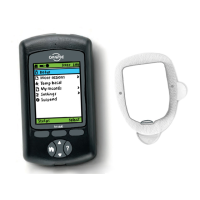
Following insertion of the cannula, check the Pod and infusion site:
1. Look through the viewing window on the edge of
the Pod to verify that the cannula is inserted into
the skin. e cannula is tinted light blue.
2. Verify that there is a pink colour on top of the Pod.
is is an additional check that the cannula was
inserted.
3. Verify that there is no wetness or scent of insulin
at the infusion site. e presence of either may
indicate that the cannula has become dislodged.
4. If the cannula is not properly inserted, tap NO.
en tap DEACTIVATE POD. Restart the process
with a new Pod.
5. If the cannula is properly inserted, tap YES.
Pod set-up is complete. e screen shows details about the active Pod and a
list of reminders.
Check
here
for pink
colour
Check here
for light blue
cannula