K106
ON-BOARD DIAGNOSTIC
Diagnostic procedure
End Of Sie
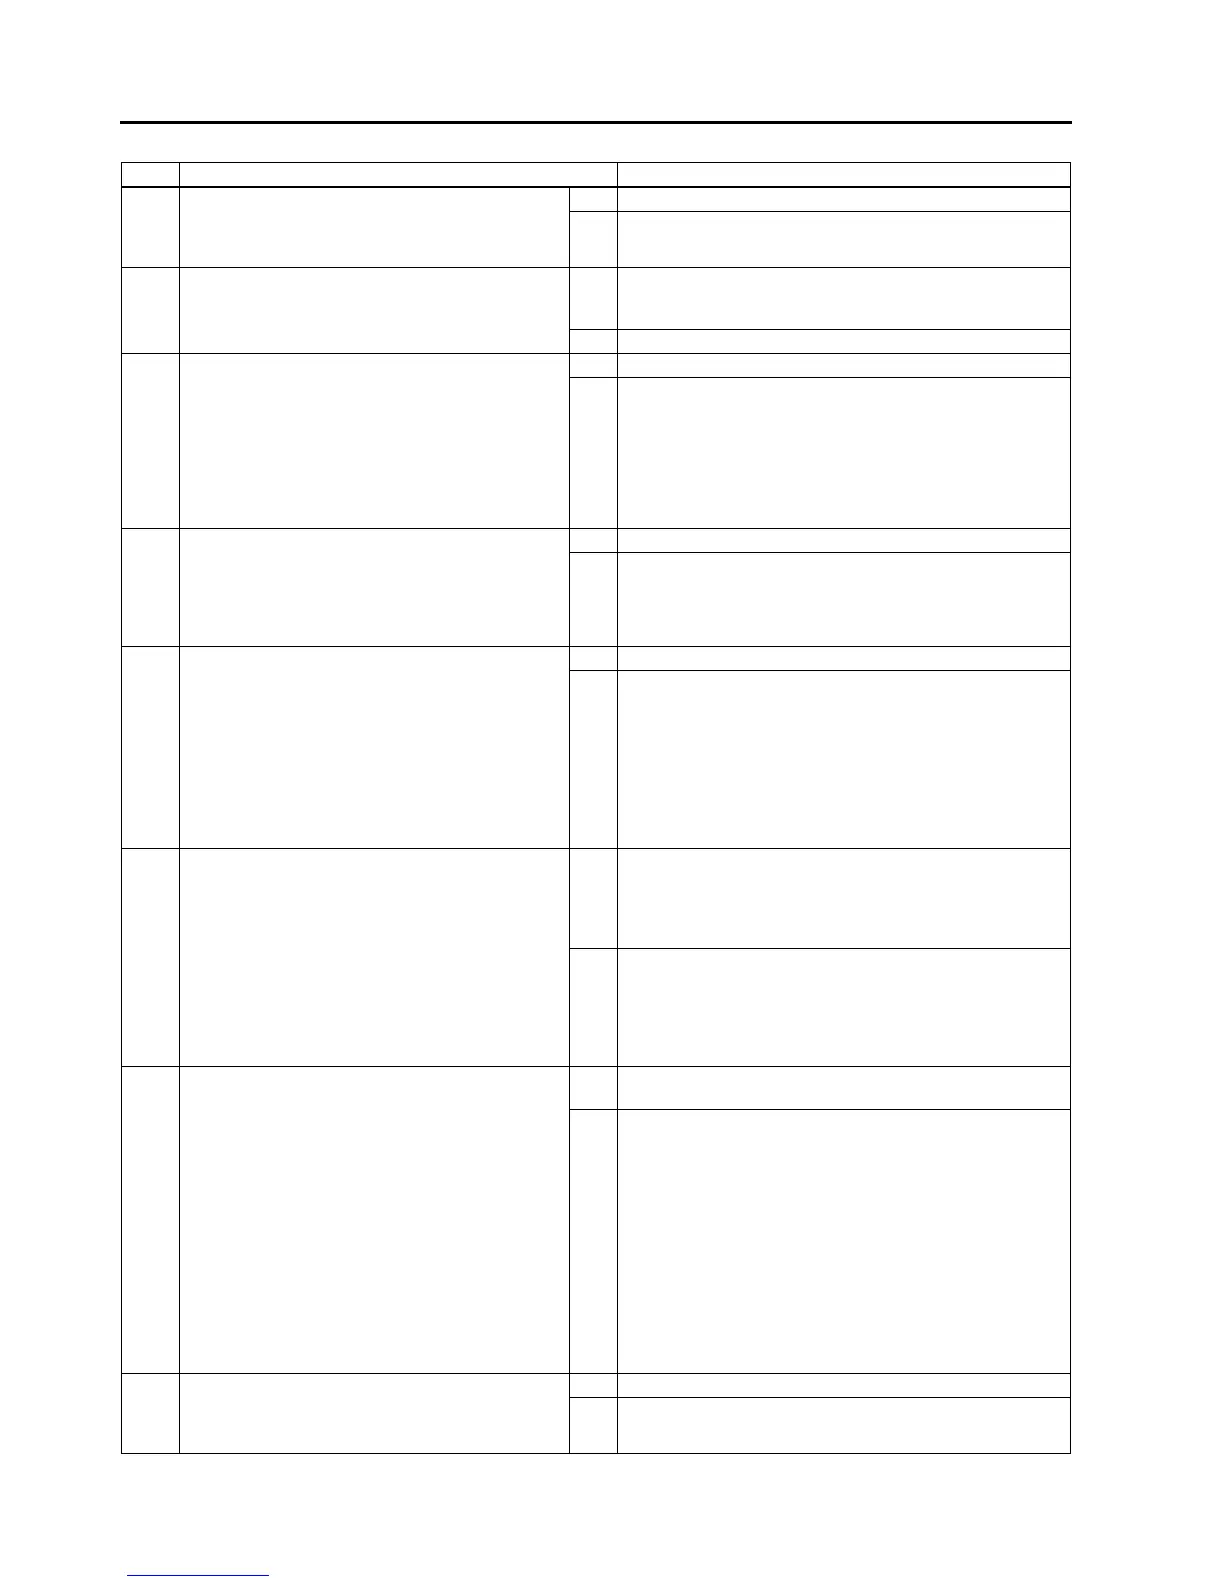
STEP INSPECTION ACTION
1 VERIFY FREEZE FRAME DATA HAS BEEN
RECORDED
• Has FREEZE FRAME PID DATA been
recorded?
Yes Go to next step.
No Record FREEZE FRAME PID DATA on repair order, then
go to next step.
2 VERIFY RELATED REPAIR INFORMATION
AVAILABILITY
• Check for related Service Bulletins availability.
• Is any related repair information available?
Yes Perform repair or diagnosis according to available repair
information.
• If vehicle is not repaired, go to next step.
No Go to next step.
3 CHECK ATF CONDITION
• Turn ignition key to OFF.
• Check ATF condition.
Clear red: Normal
Milky: Water mixed in fluid
Reddish brown: Deteriorated ATF
• Is it okay?
(See K12 Automatic Transaxle Fluid (ATF)
Condition Inspection.)
Yes Go to next step.
No If ATF color milky or reddish brown, replace ATF, then go to
Step 5.
(See K13 AUTOMATIC TRANSAXLE FLUID (ATF)
REPLACEMENT.)
4 CHECK ATF LEVEL
• Start engine.
• Warm up ATX.
• Is ATF level within specification?
(See K12 Automatic Transaxle Fluid (ATF) Level
Inspection.)
Yes Go to next step.
No Adjust ATF level, then go to Step 7.
(See K12 Automatic Transaxle Fluid (ATF) Level
Inspection.)
5 INSPECT LINE PRESSURE
• Start engine.
• Measure line pressure.
Specification
Idle: 330470 kPa {3.44.7 kgf/cm
2
, 4966
psi}
Stall: 1,2001,360 kPa {12.313.8 kgf/cm
2
,
175196 psi}
• Is line pressure within specification?
(See K6 Line Pressure Test.)
Yes Go to next step.
No • All ranges: Replace oil pump or control valve body, then
go to Step 7.
• Any ranges: Replace ATX, then go to Step 7.
(See K29 AUTOMATIC TRANSAXLE REMOVAL/
INSTALLATION.)
(See ATX Workshop Manual FN4A-EL (9999-95-FN4A-
99).)
6 CHECK OPERATION OF EACH VALVE AND
EACH SPRING
• Turn ignition key to OFF.
• Remove control valve body.
• Disassemble control valve body.
• Is each valve operation okay and is return
spring okay?
(See K34 CONTROL VALVE BODY REMOVAL,
K35 CONTROL VALVE BODY INSTALLATION.)
(See ATX Workshop Manual FN4A-EL (9999-95-
FN4A-99).)
Yes Replace ATX, then go to next step.
(See K29 AUTOMATIC TRANSAXLE REMOVAL/
INSTALLATION.)
(See ATX Workshop Manual FN4A-EL (9999-95-FN4A-
99).)
No Repair or replace shift valve and return spring, then go to
next step.
(See K34 CONTROL VALVE BODY REMOVAL, K35
CONTROL VALVE BODY INSTALLATION.)
(See ATX Workshop Manual FN4A-EL (9999-95-FN4A-
99).)
7 VERIFY TROUBLESHOOTING OF DTC P0772
COMPLETED
• Make sure to reconnect all disconnected
connectors.
• Clear DTC from memory using WDS or
equivalent.
• Start engine.
• Warm up ATX.
• Drive the vehicle under the following conditions
and make sure that gears shift smoothly from
1GR to 4GR.
ATF temperature: 20 °
°°
°C {68 °
°°
°F} or above
Drive in D range
Vehicle speed (VSS PID): below 70 km/h
{43 mph} (4th gear only)
• Is pending code present?
Yes Replace PCM, then go to next step.
(See F43 PCM REMOVAL/INSTALLATION.)
No Go to next step.
8 VERIFY AFTER REPAIR PROCEDURE
• Perform After Repair Procedure.
(See K52 AFTER REPAIR PROCEDURE.)
• Are any DTCs present?
Yes Go to applicable DTC inspection.
No Troubleshooting completed.



 To Next Page