9
Chapter 2: VessRAID Installation
This chapter covers the following topics:
• Unpacking the VessRAID (below)
• Installing the LCD Panel (Optional) (page 11)
• Mounting VessRAID in a Rack (page 13)
• Installing Disk Drives (page 15)
• Making Data and Management Connections (page 18)
• Setting Up Serial Cable Connections (page 23)
• Connecting the Power (page 24)
Unpacking the VessRAID
The VessRAID box contains the following items:
A Battery Backup Unit (BBU) is optional on the VessRAID subsystem. In the
event of a power failure, the BBU powers the controller cache to preserve any
data it contains.
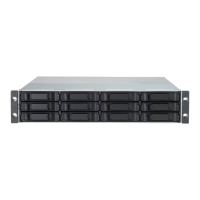
• VessRAID Unit
• Quick Start Guide printed
• RJ11-to-DB9 serial data cable
• Screws for disk drives
(70 pieces for 16-bay, 50 pieces
for 12- and 8-bay)
• 1.5m (4.9 ft) Power cords
(1700i models, 1; 1800i models, 2)
• CD with SNMP files, Product
Manual and Quick Start Guide in
PDF format
Caution
• There is a risk of explosion if the battery is replaced by the
incorrect type.
• Dispose of used batteries according to the instructions that
accompany the battery.
Warning
The electronic components within the VessRAID enclosure are
sensitive to damage from Electro-Static Discharge (ESD).
Observe appropriate precautions at all times when handling the
VessRAID or its subassemblies.
 Loading...