Sampling and editing in Sampling mode
143
indicatesthezonedeterminedbythe“TopKey”
setting.
• Leveladjuststheplaybacklevelofthesample.You
canusethistoensurethatallsamplesina
multisamplehaveaconsistentlevel.
•Ifyoucheck“ConstantPitch,”allnotesintheindex
zonewillsoundthesampleatitsoriginal
pitch.
•“Pitch”adjuststhesamplepitchforeachindex.You
canusethe“PitchBPMAdjust”pagemenu
commandtosettheloopintervaltothedesired
tempo.Formoreinformation,see“PitchBPM
Adjust”onpage 696oftheParameterGuide.
EQ adjustments for a multisample –
P4: EQ/Controller
Hereyoucanuseamid‐sweepablethree‐bandEQto
adjusttheoutputofthemultisample.Youcanalsouse
thecontrolsurfacetocontroltheEQ.
HereyoucanalsoassignthefunctionsofSW1/2,Real‐
TimeKnobs5–8,andthenotenumbersandvelocities
playedbypads1–8.
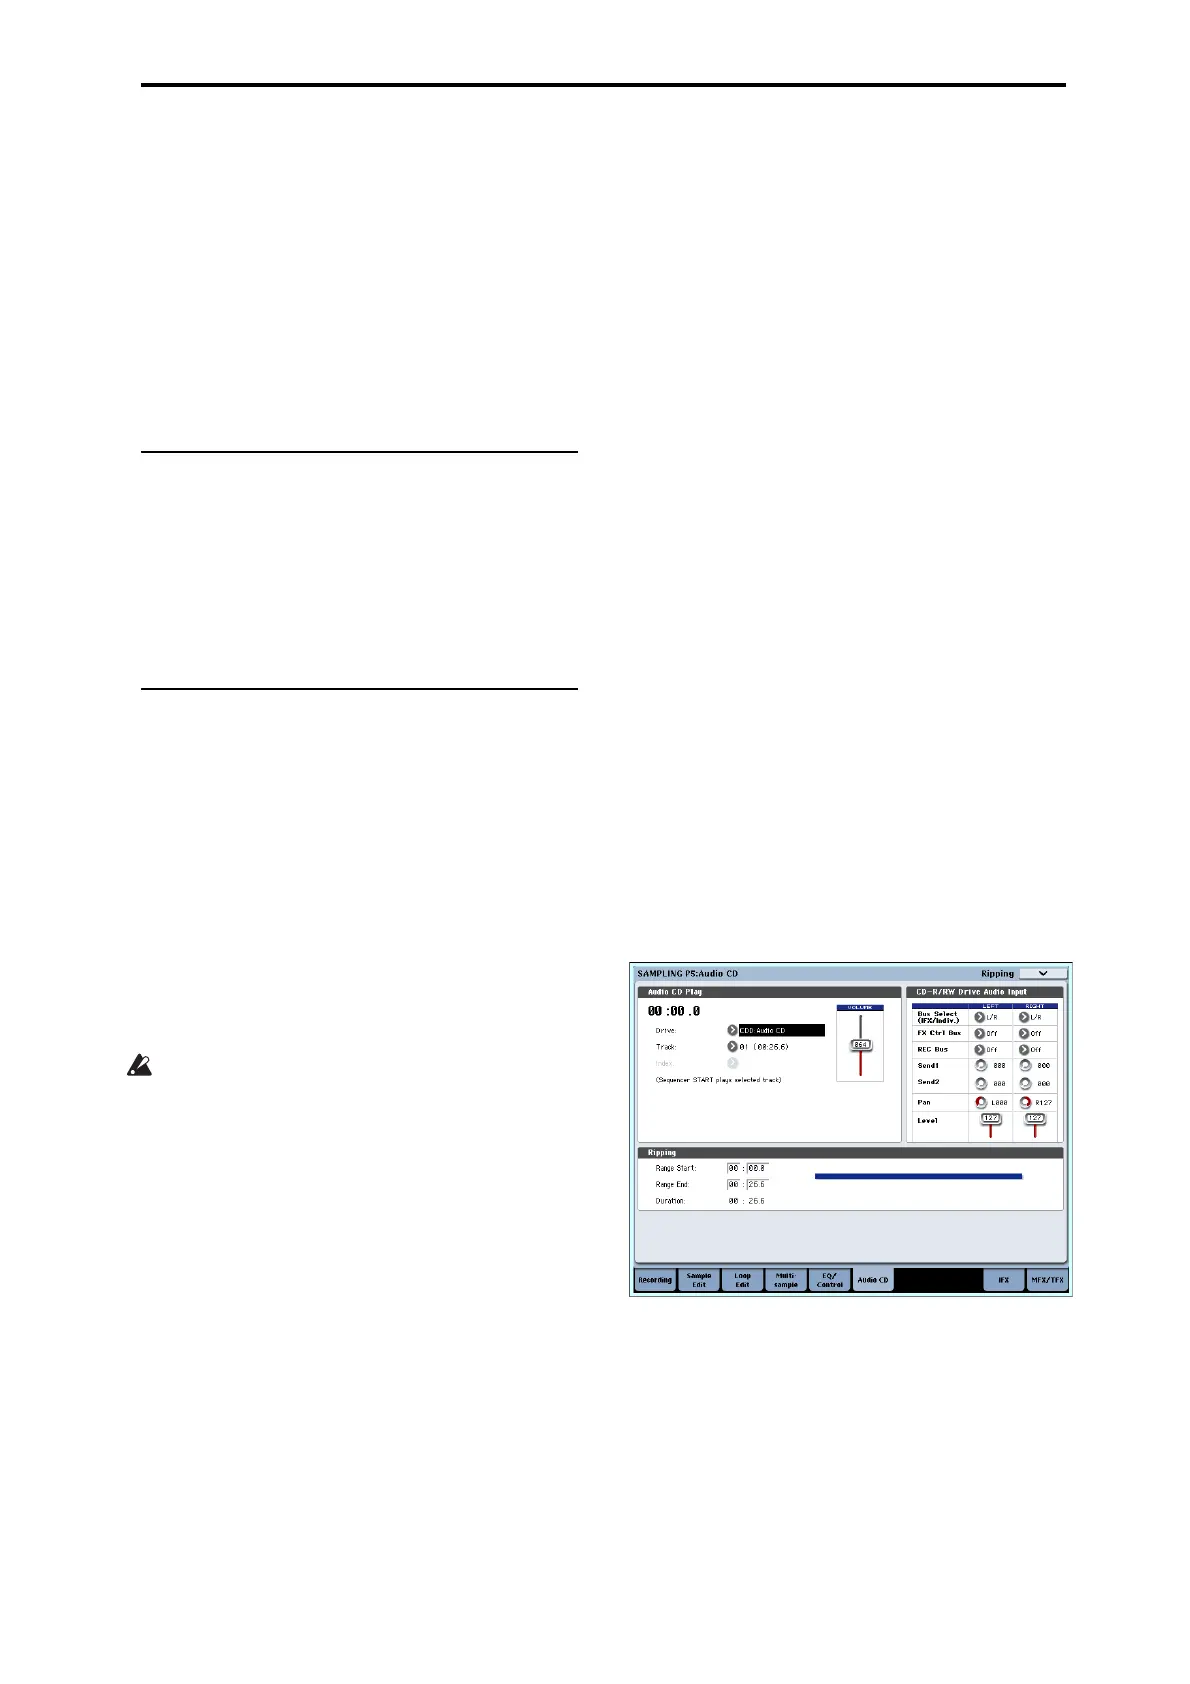
Ripping – P5: Audio CD
TheOASYSallowsyouto“rip”digitalaudiodatafrom
anaudioCDinsertedintheinternalCD‐R/RWdriveor
inaUSB‐connectedCD‐ROMorCD‐R/RWdrive.
Ripping digital data from an audio CD
Here’showdigitaldatafromanaudioCDtrackcanbe
capturedasasample.Inthisexamplewe’llexplain
howtoripusingtheinternalCD‐R/RWdrive.
1. AccesstheSamplingP5:AudioCDpage.
PresstheMODESAMPLINGswitch,andthenpress
theAudioCDtabintheLCDscreen.
2. InsertanaudioCDintotheinternalCD‐R/RW
drive.
UsecautionwhenhandlingtheCD‐R/RWdrive.For
detailsonhowtoinsertandremovediscs,see
“UsingtheCD‐R/RWdrive”onpage 45.
Next,makeafewsettingssothatyoucanmonitor
theCD‐R/RWDriveAudioInput.These
settings
don’taffecttherippingprocessitself.
3. Forboththeleftandrightchannels,setBusSelect
(IFX/Indiv.)toL/R,andLevelto127.
4. Settheleftchannel’sPantoL000,andtheright
channel’sPantoR127.
5. In“Drive”(DriveSelect),choosethedrivethat
containstheaudioCD.
6. Raisethe
Vol ume.
7. UseTracktoselectthetrackthatyouwanttorip.
8. PresstheSEQUENCERSTART/STOPswitchto
playbacktheaudioCDtrack.
9. Duringplayback,presstheENTERswitchatthe
pointswhereyouwantrippingtobeginandend.
ThiswillsetRangeStartandRangeEnd.
Ifyoupressthe
ENTERswitchthreeormoretimes,
RangeStartandRangeEndwillrespectivelybeset
Themethodgivenaboveapplieswhensomething
otherthanRangeStartorRangeEndisselected
(highlighted).
IfRangeStartorRangeEndareselected
(highlighted),thesettingwillbeupdatedeachtime
youpresstheENTERswitch.
IfRangeStartorRangeEndareselected
(highlighted),thisregionwillplayback.
Whenyoufinishmakingsettings,pressthe
SEQUENCERSTART/STOPswitchtostopplayback
oftheaudioCD.
10.Verifytheregionthatwillberipped.
Selecteither“RegionStart”or“RegionEnd”(the
displaywillbehighlighted),
andpressthe
SEQUENCERSTART/STOPswitch.TheCDwill
playfromRangeStarttoRangeEndandthenstop.
Ifyouwanttoadjustthelocation,usetheVALUE
controllerstomodifytheRangeStartorRangeEnd
settings,ormovethecursortoaparameterother
thanRangeStartand
RangeEndandrepeatstep8
tomakethesettingonceagain.
Ifyouwanttomovethetrackplaybackstart
locationtothebeginningofthetrack,pressthe
LOCATEswitch.
11.WhenyouhavefinishedsettingRangeStartand
RangeEnd,selectthepagemenucommand
“Destination.”
Adialogboxwillappear.
Specifythedestinationtowhichtherippedsample
willbewritten.
SelectRAMifyouwanttoripthesampleintoRAM
memory.Inthiscase,youcanalsosetSampleNo.
(L),(R)tospecifythesamplenumberthatwillbe
written.Normallyyoucanleavethisunchanged.
SelectDISKifyouwanttoripthesampletomedia.
Use“DriveSelect”toselectthedrive,andusethe
OpenandUpbuttonstoselectthedirectoryin
whichthedatawillbesaved.Alsospecifyaname
fortheWAVE filethatwillbesaved.
12.PresstheOKbuttontoexecuteripping,orpress
theCancelbuttontocancelwithoutexecuting.
WhenyoupresstheOKbutton,the“Obey
CopyrightRules”dialogboxwillappear.
13.CarefullyreadCOPYRIGHTWARNINGoniii,
andifyouconsenttotheterms,presstheOK
buttontobeginripping.Ifyoudonotconsentto