– 646 –
CHAPTER 5 Operation Procedure for System with PIR
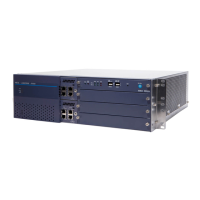
(3) The figures below show the block diagrams for the power supply to each module.
Figure 5-20 Block Diagram of Power Supply System
Note 1:
TSW is used for PIR 0 (1-IMG).
Note 2: Used when PWR is provided in dual configuration.
LC/TRK MUX 0
PWR 0
PWR 1
LC/TRK MUX 1 LC/TRK LC/TRK
BASEU
PWR 0
PWR 1
PWR 0
PWR 1
PWR 0
PWR 1
Power Module 0
Power Module 1
SV8500 Server
PIR0
PIR1
PIR2
PIR3
PIR0 PIR1 PIR2 PIR3
Power Module 0
Power Module 1
Power Receiving Terminal
LC/TRK MUX 0LC/TRK MUX 1 LC/TRK LC/TRK
LC/TRK MUX 0LC/TRK MUX 1 LC/TRK LC/TRK
LC/TRK MUX 0/LC/TRK MUX 1/ LC/TRK LC/TRK
TSW 0 TSW 1
Note
Note
Note
Note
Note
PWR 0
PWR 1
BASEU
TSWR
DLKC0 GT0 TSW00 PLO0TSW01 TSW02 TSW03
Power Receiving Terminal
Note
[PIR]
[TSWR]
 Loading...