Item Details Default Setting
Secondary DNS Serv-
er Address
Specify the IP address of the secondary DNS server. 0.0.0.0
DNS Host Name Specify the printer host name, up to 63 characters (1–63 characters). Use sin-
gle-byte letters, numbers, and - (hyphens). Do not use numbers or - for the
first character or - for the last character.
NB-18GBipxxxxxx
DNS Domain Name Specify the printer domain name, up to 63 characters. Use single-byte letters,
numbers, - (hyphens), and . (periods). Do not use numbers, -, or . for the first
character, or - or . for the last character.
blank
Multicast DNS Service
Name
Specify the printer's Multicast DNS service name. (1–63 characters)
This name will be displayed when Bonjour functions are used.
Canon iPFxxxx
(xxxxxx)
7
Click OK to display the Network page.
Note
• If you specify to configure the IP address using DHCP, BOOTP, or RARP, there must be a server that supports such
protocol running in the network.
• If you specify to configure the IP address using DHCP, BOOTP, or RARP, the IP address obtained by this method is used
first. If you cannot obtain the IP address, the address specified in IP Address is used.
• It takes up to two minutes to determine whether DHCP, BOOTP, or RARP are available. We recommend clearing check
boxes of options you will not use.
• If you are using a DNS server, select Enable DNS Dynamic Update and enter the IP Address for DNS servers and DNS
domain name in Primary DNS Server Address, Secondary DNS Server Address and DNS Domain Name, respective-
ly.
When using an IPv6 IP address
1
Start the web browser and enter the following URL in the Location (or Address ) box to display the Remo-
teUI page.
http://printer IP address or name/
Example: http://xxx.xxx.xxx.xxx/
2
Select Administrator Mode and click Logon.
3
If a password has been set on the printer, enter the password.
4
Click Network in the Device Manager menu at left to display the Network page.
5
Click Edit in the upper-right corner of the TCP/IPv6 group to display the Edit TCP/IPv6 Protocol Settings
page.
6
Refer to the TCP/IPv6 Settings Items table to complete the settings.
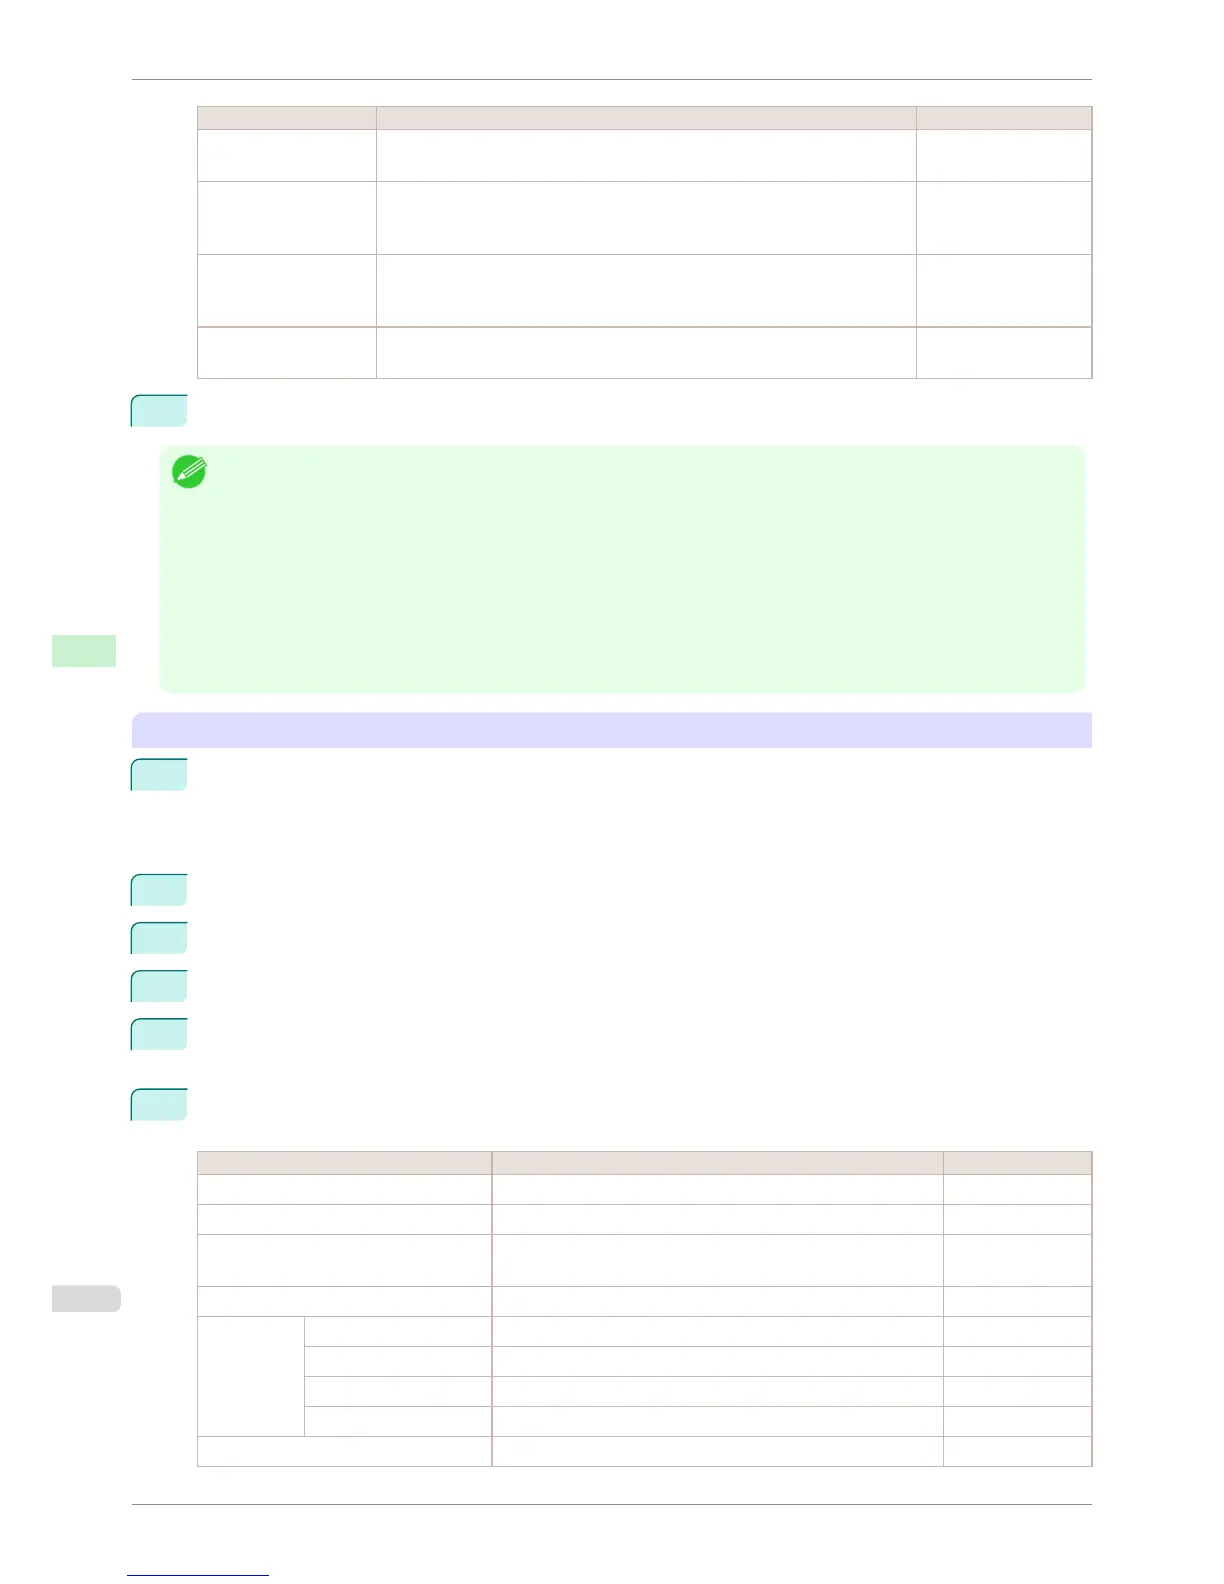
TCP/IPv6 Settings Items
Item Details Default Setting
Use IPv6 Activate to enable IPv6. Off
Use DHCPv6 Activate when using a DHCPv6 server to acquire the IP address. Off
Use a stateless address Activate when using an IPv6-compatible router to acquire the IP
address.
On
Use a manual address Activate when configuring the IP address manually. Off
IP Address Enter the printer's IP address. ::
Prefix Length Enter the IP address prefix length. 0
Default Router Address Enter the default router address. ::
Prefix Length Enter the prefix length of the default router address. 0
Primary DNS Server Address Specify the IP address of the primary DNS server. ::
Configuring the Printer's TCP/IP Network Settings With RemoteUI
iPF6400S
User's Guide
Network Setting Initial Settings
630