102 100-412-234 REV. 06
6.3.1.1 Network Connection
The following procedure is for connecting to a network.
1. Connect the welder to the network by inserting the shielded Ethernet cable into the Ethernet port
on the back of the power supply and the network drop
2. Now you are ready to begin the communication setup
3. From the System Configuration menu, select Windows Setup
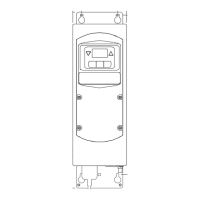
4. Go to Control Panel > Administrative Tools > Local Security Policy > Local Policies > Security
Options > Accounts: Limit local account use of blank passwords to console logon only and set the
option to Disabled, and you will be able to remote desktop without the need for a password
Figure 6.2 Remote Desktop Configuration
5. At the computer, open the Remote Desktop connection, enter the welder IP address in the Server
box and click OK. The computer is now directly linked to the welder. You are now equipped to
monitor the actions on the welder or control the welder from the PC. You can perform any
function on the welder with the exception of initiating a cycle. You can actually have multiple PC
linked to the welder simultaneously
NOTICE
A mouse and keyboard connected to the USB port is necessary to
navigate through the next several steps.