Home
Oce
All in One Printer
ColorStream
Page 238
Oce ColorStream - Page 238
524 pages
Manual
Save Page as PDF
To Next Page
To Next Page
To Previous Page
To Previous Page
Loading...
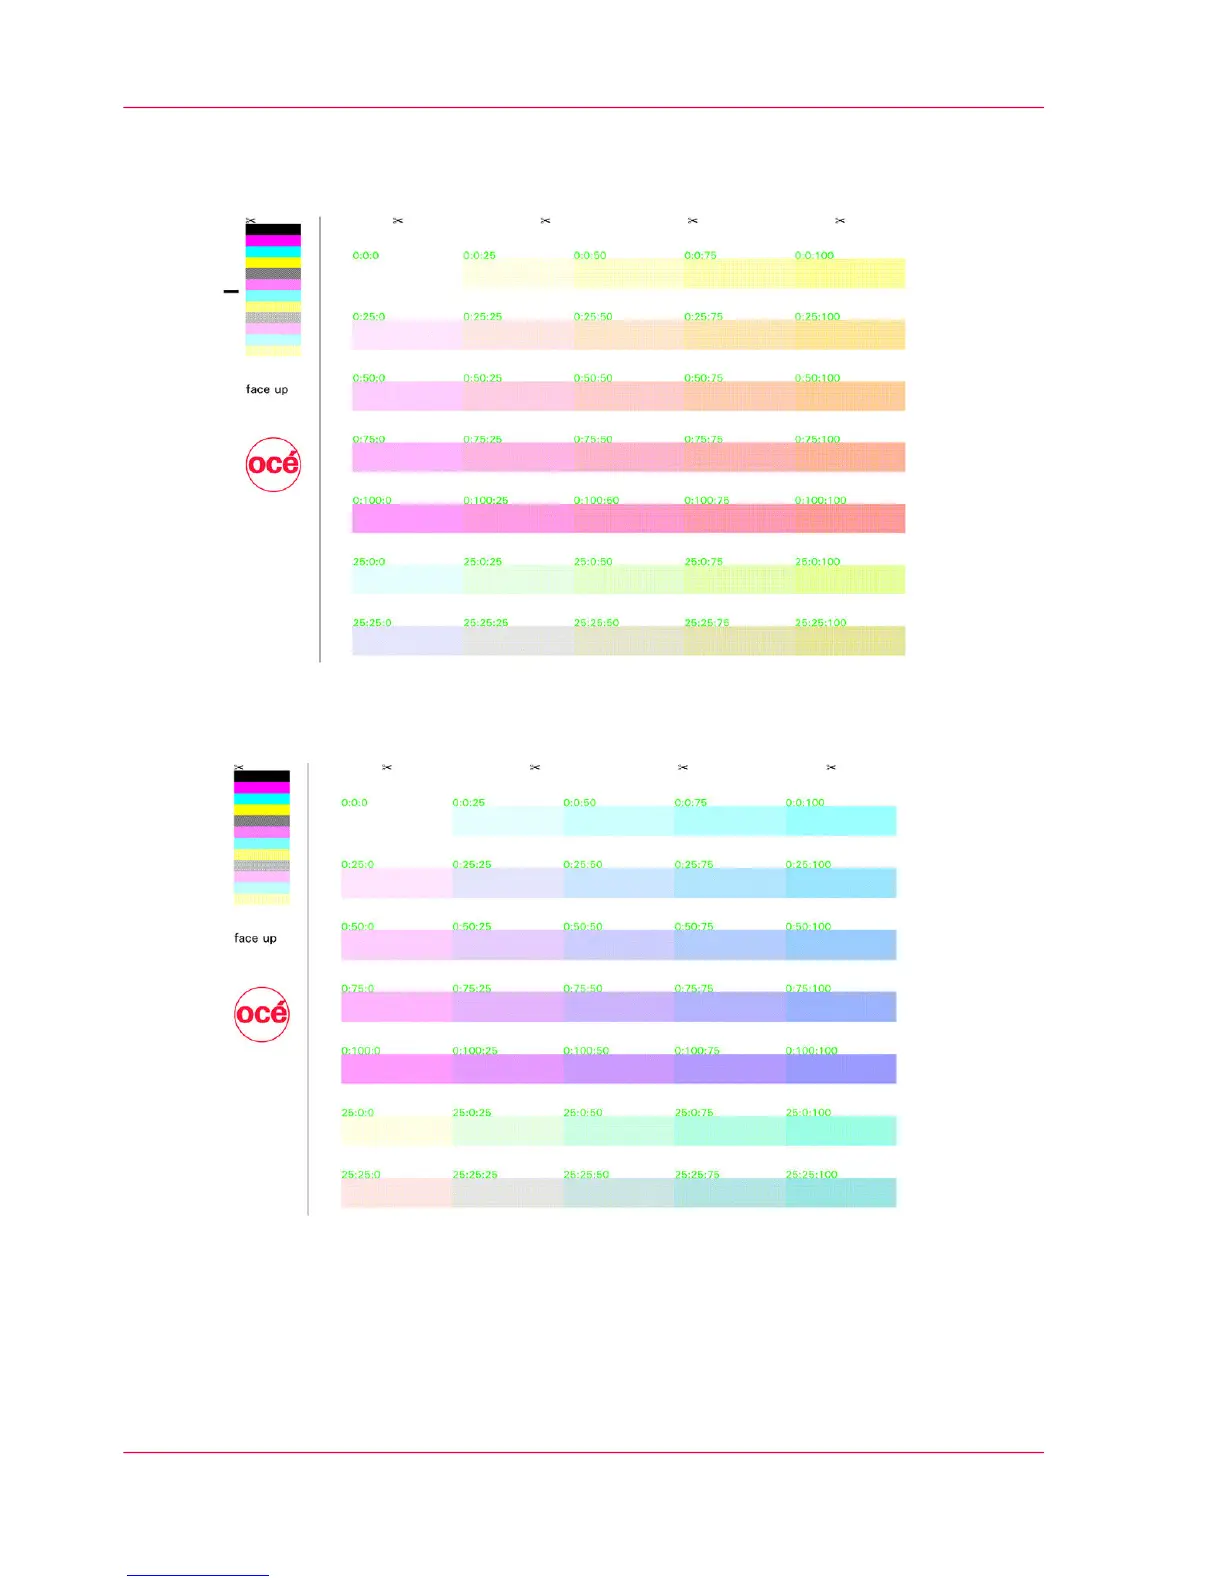
Example: Basic color 1 cyan, basic color
2 magenta, basic color 3 yellow
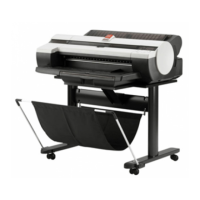
Example: Basic color 1 yellow, basic color
2 magenta, basic color 3 cyan
Chapter 6 - Operating the Printing System
238
'SpotColorPalette.pcl' Test Print Job
237
239
Table of Contents
Main Page
Table of Contents
3
Chapter 1 Notes on the Printing System Documentation
11
Notes on the Printing System Documentation - Overview
12
Guide through the Documentation
13
Notes on Help
15
Notes on the Help - Overview
15
Opening Help
16
Contents
18
Navigating in Help
18
Index
19
Search
20
Opening Direct Help
21
Symbol Conventions
24
Symbols in the Text
24
Symbols in Figures
25
Other Documents
27
Manufacturer of the Printing System
28
Statutory Requirements
29
Chapter 2 Safety
31
Safety - Overview
32
Intended Purpose
33
Flagging of Safety Directives
34
Warning and Information Signs
35
Accident and Damage Prevention
37
Default Chapter
37
Accident and Damage Prevention - Overview
37
Personal Representations
38
Operation
39
Transportation, Assembly and Installation, Repair
42
Fire, Disposal
44
Safety Regulations and Standards
45
Safety Regulations and Standards - Overview
45
CE Mark
48
Accident Prevention Regulation for Replacement Carts (Option)
49
Chapter 3 Description of the Printing System
51
Description of the Printing System - Overview
52
Main Modules
53
Doors and Covers
54
Internal View
56
Internal View - Overview
56
Photoconductor Unit
58
Transfer Unit
60
Filter Module
61
Console
62
Printing Method
64
Operating Elements
67
Operating Elements - Overview
67
On Key
69
Additional Operator Panels
70
Operator Attention Light
72
Operator Attention Light (OPAL) - Overview
72
Operator Attention Light (Opal)/Bundle 11 Version
73
Operator Attention Light (Opal)/Bundle 10 Version
75
Operating Elements in the Printing System
77
Paper Specifications
78
Chapter 4 Description of the Operator Panel
81
Description of the Operator Panel - Overview
82
A Tool Bar
83
Toolbar - Overview
83
Buttons and Displays in the Left Area
84
Buttons and Displays in the Center Area
86
Frame Toolbar
90
Menu Tree
91
Menu Tree - Overview
91
General' Menus
93
General' Menus - Overview
93
User Management' Menus
94
User' Menus
95
Security' Menus
96
Colorstream' Menus
97
Colorstream' Menus - Overview
97
Displays' Menus
99
Configuration' Menus
100
Setup' Menus
101
Replace Consumables' Menus
102
Menu Display
104
Chapter 5 Working with the Operator Panel
105
Working with the Operator Panel - Overview
106
Default Chapter
107
Managing User Settings (Key Operator)
107
Managing User Settings (Key Operator) - Overview
107
Extended Password Protection (Option)
109
Add User
110
Delete User
111
Set Password / 'General' Tab
112
Releasing and Blocking Menus and Elements/'User Rights' Tab
113
Setting Language/'User Profile' Tab
114
Managing User Settings (Operator)
115
Managing User Settings (Operator) - Overview
115
Log on as User and Request an Access Ticket
116
Change Password / 'Password' Tab
118
Changing Language/'User Profile' Tab
119
Log off as User
120
Selecting Settings and Entering Values
121
Applying or Resetting Settings
122
Working with Setups
123
Working with Setups - Overview
123
Creating a New Setup or Changing a Setup
124
Importing a Setup
125
Exporting a Setup
127
Managing Resources
129
Managing Resources - Overview
129
Installing Resources
130
Deleting Resources
132
Editing 'Replace Consumables' Menus on the Operator Panel
133
Chapter 6 Operating the Printing System
137
Operating the Printing System - Overview
138
Powering on the Printing System
139
After Printing Has Stopped, Switch the Printing System Back to 'Ready
142
Inserting the Paper Web
143
Adjusting the Pressure Rollers
148
Synchronizing the Paper Path
150
Affixing the Paper Web
152
Removing the Paper Web
155
Opening or Closing the Doors on the Printing System
156
Opening or Closing the Doors on the Printing System - Overview
156
Opening Right Doors
157
Closing Right Doors
159
Opening Left Doors
161
Closing Left Doors
163
Replacing the Developer
165
Replacing the Developer Station
165
Replacing the Developer Station - Overview
165
Overview
168
Default Chapter
169
Preparing the Replacement Cart
169
Removing the Developer Station
171
Storing the Developer Station in the Developer Station Shelf
177
Putting the Developer Station on the Stacking Tray
181
Removing the Developer Station from the Developer Station Shelf
183
Replacing the Developer Station from the Stacking Tray
187
Installing the Developer Station
189
Removing the Light Protection Cover
194
Installing the Light Protection
196
Installing the Light Protection Cover
197
Completing Developer Station Replacement
198
Checking the Print Image
199
Printing Test Print
200
Printing Test Print Jobs
200
Printing Test Print Jobs - Overview
200
5C_Printqualityinspection.600' Test Print
202
Test Print Job
207
Test Print Job 'Colorproof.ipds
208
Test Print Job
218
Test Print Job 'Colorproof.ipds' - Page
218
Test Print Job 'Colorproof.ipds_Pdf
219
Test Print Job 'Colorproof.pcl
228
Test Print Job 'Colorproof.pcl
229
Test Print Job 'Colorproof.pcl' - Page
231
Test Print Job 'Colorproof.pcl' - Page
234
Spotcolorpalette.pcl' Test Print Job
237
Optimizing the Color Printing
239
Optimizing the Color Printing - Overview
239
Performing a Color Test
242
Calibrating the Colors of the Printing System
244
Calibrating the Colors of the Printing System - Overview
244
Printing Test Pages for Color Calibration
246
Scanning Test Pages for Color Calibration
249
Analyzing Test Pages for Color Calibration
253
Correcting Color Separation Shifts
255
Calibrating the Data Integrity Mark Sensor
257
Converting the Printing System
261
Emptying Condensation Water
263
Switching off the Printing System
264
Chapter 7 Cleaning the Printing System
267
Cleaning the Printing System - Overview
268
Table of Contents
269
Default Chapter
270
Cleaning Agents and Cleaning Intervals
270
Cleaning the Surface of the Developer Stations
273
Cleaning the Surface of the Developer Stations - Overview
273
Swiveling off Developer Stations
274
Cleaning Developer Station Surface
275
Swiveling on Developer Stations
282
Cleaning the Paper Input
283
Cleaning the Paper Output
286
Cleaning the Paper Path
289
Checking the Paper Path
296
Cleaning the Toner Suction System
301
Cleaning the Paper Brake Dust Filter
305
Cleaning the Surface of the Printing System
307
Cleaning the Replacement Cart for Developer Stations (Option)
308
Cleaning the Developer Station Shelf (Optional)
309
Chapter 8 Replacing Consumables
311
Replacing Consumables - Overview
312
Default Chapter
313
Order Numbers and Packing Units
313
Toner
314
Toner Bottle Identification with Océ Tonersafe
314
Toner Supply with Additional Colors
317
Refilling Toner (Standard: 6 Kg / 13.2 Lb Toner Bottle)
318
Refilling Toner (Option: 1 Kg / 2.2 Lb Toner Bottle)
324
Replace Waste Toner Box
331
Filling a Toner Box
335
Developer
336
Replacing the Developer - Overview
336
Draining the Developer Mixture
337
Fill in Developer
340
Chapter 9 Replacing Expendables
345
Replacing Expendables
345
Replacing Expendables - Overview
346
Order Numbers and Packaging Units for Expendables
349
Replacing the Belt
350
Replacing the Belt - Overview
350
Table of Contents
351
Default Chapter
352
Replacing the Photoconductor Belt in the Upper Print Unit
352
Removing Photoconductor Belt in Upper Print Unit and Replacing Photoconductor Blade
352
Insert a Photoconductor Belt in the Upper Print Unit
358
Replacing the Photoconductor Belt in the Lower Print Unit
364
Removing Photoconductor Belt in Lower Print Unit and Replacing Photoconductor Blade
364
Inserting a Photoconductor Belt in the Lower Print Unit
370
Removing the Transfer Belt in the Upper Print Unit - Preparation
376
Removing Transfer Belt in the Upper Print Unit
380
Insert the Transfer Belt in the Upper Print Unit
385
Insertion of a Transfer Belt in the Upper Print Unit (Comple- Tion)
392
Replacing the Transfer Belt in the Upper Print Unit
376
Removing the Transfer Belt in the Upper Print Unit - Prepara- Tion
376
Insertion of a Transfer Belt in the Upper Print Unit (Completion)
392
Removing the Transfer Belt in the Lower Print Unit - Prepara- Tion
395
Replacing the Transfer Belt in the Lower Print Unit
395
Removing the Transfer Belt in the Lower Print Unit - Preparation
395
Removing the Transfer Belt in the Lower Print Unit
398
Inserting the Transfer Belt in the Lower Print Unit
402
Inserting the Transfer Belt in the Lower Print Unit
408
Running in a Belt
411
Replacing Corotrons
412
Replacing the Corotron - Overview
412
Removing the Cleaning Corotron Slide-In Unit or Charge Corotron Slide-In Unit of the Photoconductor Unit
413
Installing the Cleaning Corotron Slide-In Unit or Charge Corotron Slide-In Unit of the Photoconductor Unit
416
Removing the Cleaning Corotron Slide-In Unit of the Transfer Unit.418
418
Unit
418
Installing the Cleaning Corotron Slide-In Unit of the Transfer Unit
420
Removing the Reload Corotron Slide-In Unit of the Transfer Unit
421
Installing the Reload Corotron Slide-In Unit of the Transfer Unit
423
Removing the Recharge Corotron Slide-In Unit of the Transfer Unit.425
425
Unit
425
Installing the Recharge Corotron Slide-In Unit of the Transfer Unit.427
427
Unit
427
Replacing Corotron Wire
428
Replacing the Cleaning Brush
433
Replacing the Cleaning Brush - Overview
433
Removing the Cleaning Brush of the Photoconductor Unit
434
Installing the Cleaning Brush of the Photoconductor Unit
437
Removing the Cleaning Brush of the Transfer Unit
439
Installing the Cleaning Brush of the Transfer Unit
441
Replacing Fine Filter
443
Replacing the Cleaning Felt
448
Replacing the Smoothing Rollers
454
Replacing the Smoothing Rollers - Overview
454
Removing the Smoothing Rollers
455
Installing Smoothing Rollers
461
Replacing Expendables in Expert Mode
469
Chapter 10 Correcting Errors
473
Correcting Errors - Overview
474
Processing Messages on the Operator Panel
475
Remote Diagnosis
479
Allowing Remote Access - Overview
479
Permitting or Blocking Remote Diagnosis
480
Activating or Deactivating Remote Support
481
Correcting Fusing Problems
483
Correcting Print Image Errors
484
Appendix A Technical Data
491
Technical Data - Overview
492
Technology and Print Speed
493
Paper
496
Electrical Values and Power Input
498
Mechanical Conditions
500
Environmental Conditions
502
Replacement Cart for Developer Stations (Option)
503
Ruler for Checking Paper Path Synchronization
504
Appendix B Comments
507
Your Comments on this User Manual
508
Related product manuals
Oce ColorWave 300
376 pages
Oce ColorWave 500
330 pages
Oce CS193
547 pages
Oce cm2520
3 pages
Oce CS2224
76 pages
Oce 3165
206 pages
Oce 9600
308 pages
Oce TDS400
239 pages
Oce im7520
23 pages
Oce im4512
196 pages
Oce VL3200x
239 pages
Oce VarioLink 5022
314 pages