01/02
3-17
8825/8830 Printer
PQ 17, PQ 17A
Print Quality
PQ 17 Smears PQ 17A Smudge
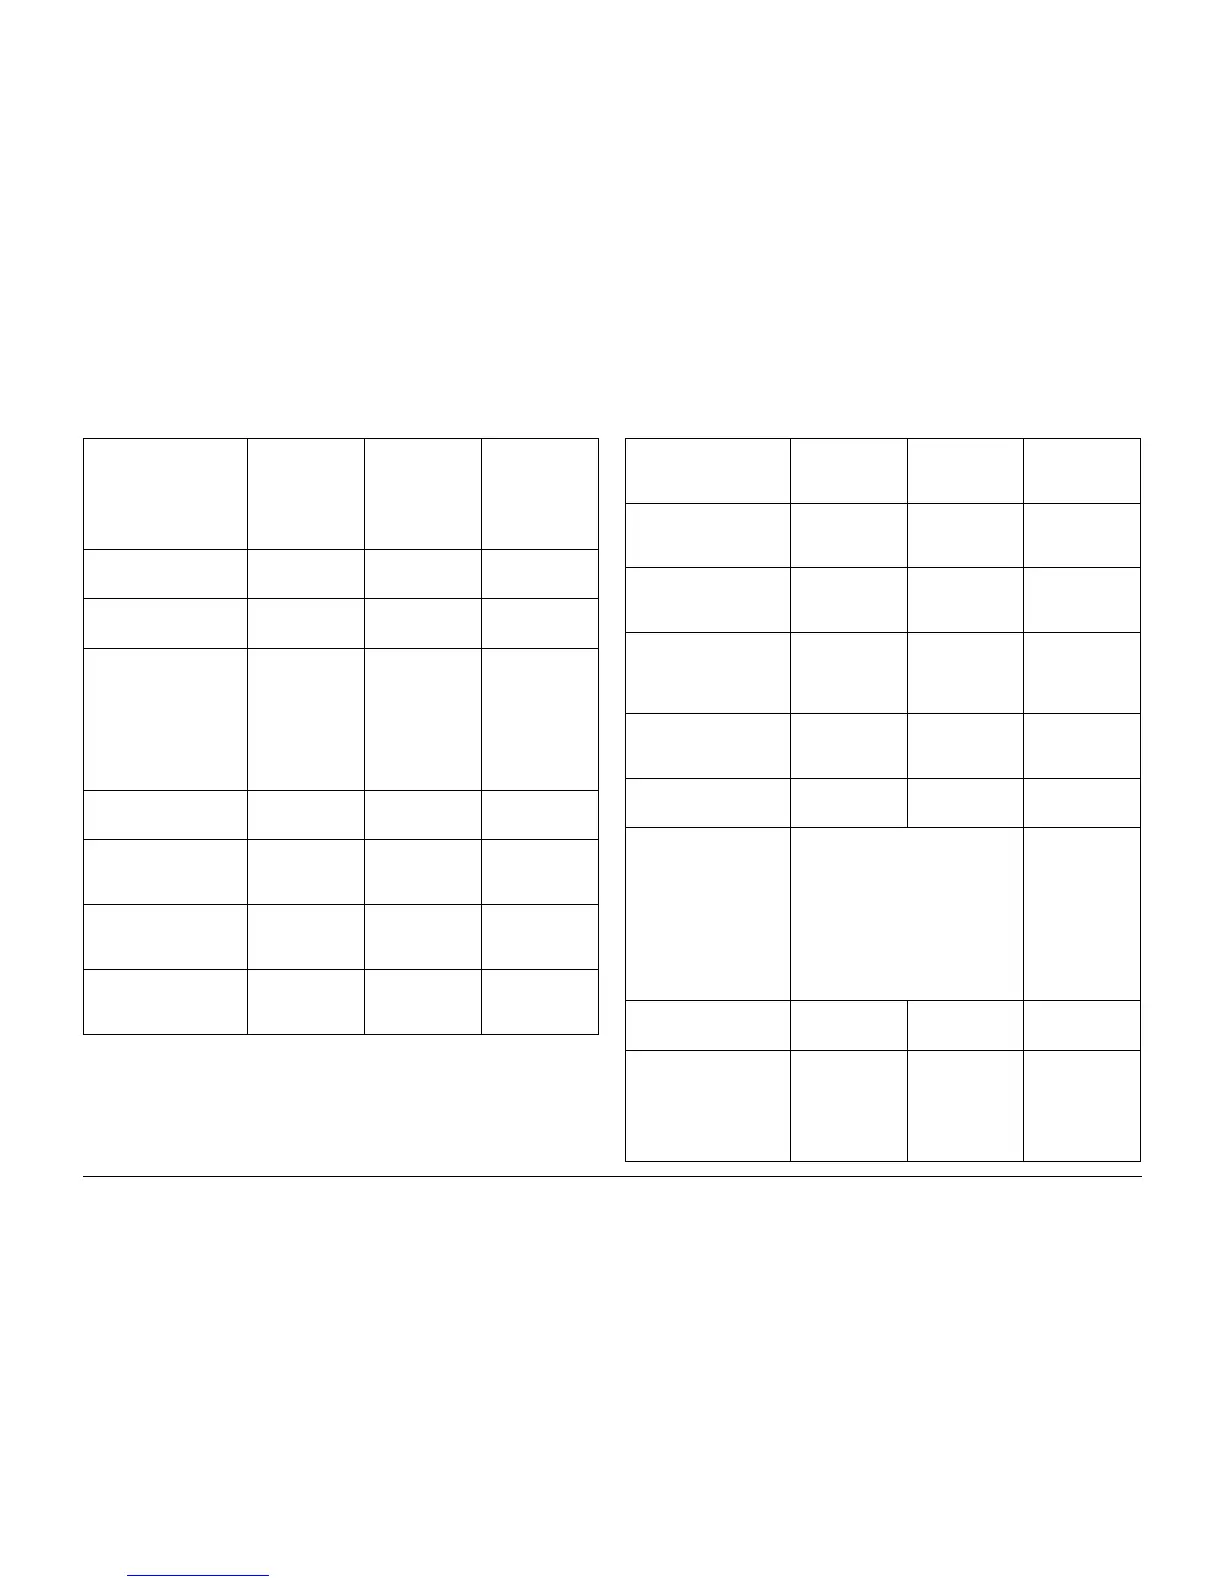
Table 1 Smears Symptom / Check
Symptom/ check
Areas of the image on the
print are blurred. This
occurs at the image transfer
area and is caused by a dif-
ference of speed between
the drum and the media.
Location of Smear Probable Cause Corrective Action
20 - 25 mm from the
Lead Edge of the
print
Transfer/Detack
Shield incorrectly
installed.
Check / replace (
PL 9.4)
40 - 50 mm from the
Lead Edge of the
print
Fabric Guide worn,
contaminated or
incorrectly installed.
Check / replace (
REP 8.9).
106 - 126 mm from
the Lead Edge of
the print
1. Worn (smooth)
Heat Roll ( PL 10.2)
2. Worn Contami-
nated Fabric Guide
( PL 10.3)
3. Pressure Plate A
installed incorrectly
or deformed ( PL
10.3).
Check / replace (
REP 10.2)
Check / replace (
REP 8.9)
3. Check / replace
( REP 8.5)
150 - 170 mm from
the Lead Edge of
the print
Pressure Plate B
installed incorrectly
or deformed.
Check / replace (
REP 8.5)
140 - 160 mm from
the Trail Edge of
the print
Cutter Check for loose
Cutter Drive Pulley,
Shim / replace ( PL
7.8)
66 - 86 mm from the
Trail Edge of the
print (Register Roll
Exit Smear)
Buckle Switch Enter [8-2 and
check for correct
operation ( PL 8.4)
Random smears Media Transport Ensure that the
Media Transport
gap ( ADJ 8.4) is set
correctly.
Table 1 Smudge Symptom / Check
Symptom/ check
A smudge is a displacement
of the toner image on the
drum or the media.
Location of
Smudge
Probable Cause Corrective Action
Perform GP 2, Image on
Drum to determine if the
Smudge occurs on the
media or the drum.
Media Heat Roll Check for a worn
(smooth) Heat Roll.
Replace ( REP
10.2)
Media Fabric Guide Check for a worn /
contaminated Fab-
ric Guide. ( REP
8.9)
Media Excessive media
curl (smudge
appears 100 mm
from lead or trail
edge)
Ask the customer to
replace the media.
Media Detack Corotron Check for contami-
nation or signs of
arcing. Clean /
replace ( PL 9.4)
Media Buckle Switch Check the Buckle
Switch for correct
operation ( PL 8.4)
Vellum Smudge is a special
defect that exhibits marginal
fusing fix. Toner can chip off
of the media and horizontal
lines are broken (image dis-
placement).
Combination of Vellum beam strength
and low Heat Roll drive force. (The
media is flexible enough that it buckles
between Pressure Plates A and B. The
toner then melts and partially sticks to the
Heat Roll. As the media enters the Pres-
sure Plate B, it flattens and the image is
displaced in front of it’s correct position.
The toner can also become a clump on
the media and easily chip off of the
media.)
Replace the Fabric
Guide ( REP 8.9)
and the Heat Roll (
REP 10.2).
Drum Mechanical interfer-
ence with the image
on the drum
Check for interfer-
ence.
Drum Buildup of devel-
oper material on the
lower extrusion of
the developer hous-
ing rubbing the
developed image
on the drum.
Push excess devel-
oper material back
into the housing.

 Loading...


