01/02
1-13
8825/8830 Printer
Maintenance Procedures
Service Call Procedures
NOTE: 1. Ensure that the vacuum does not contact the edge of the cleaner blade that touches
the surface of the photoreceptor drum.
NOTE: 2. Where possible, dust the drum and the cleaning blade with zinc stearate away from
the xerographic module to prevent the charge scorotron from being contaminated. If the drum
and cleaning blade must be dusted while in the xerographic module, remove the charge
scorotron. The zinc stearate will contaminate the charge scorotron and cause print quality
defects.
NOTE: 3. Install the complete cleaning blade kit when installing a new photoreceptor.
Nor-
mal
Call
Clean the xero-
graphic module.
Clean the erase
lamp.
Inspect the photo-
receptor for dam-
age.
Inspect compo-
nents for vellum
contamination.
Inspect all seals
for damage.
Inspect the
Cleaner Blade for
damage.
Contamination can cause
print quality problems.
Contaminants can travel
to the LED bar and
scorotrons, which results
in print quality problems.
Fused toner on the bot-
tom of the module can
cause jams.
Contamination reduces
the effectiveness of the
lamp to discharge the
photoreceptor drum.
Contaminants from vel-
lum
- Cleaner failure
- Contaminants to prints.
Vellum contamination will
contaminate and plug the
cleaner auger at the
ends.
Clean the toner from the housing and
cleaner blade with a vacuum cleaner.
NOTE: Ensure that the vacuum
cleaner does not contact the edge of
the cleaner blade that touches the
surface of the photoreceptor drum.
Perform the Photoreceptor Cleaning
Enhancement procedure in section 6.
Use cleaning solvent to remove any
fused toner from the bottom of the
module. Replace the photoreceptor if
damaged.
Clean the erase lamp with a brush or
dry lint free cloth.
Replace any damaged xerographic
module seals.
Nor-
mal
Call
Check and clean
or replace the
Stripper Fingers.
Clean the Media
Guides.
Bent stripper fingers may
cause feed out jams and
heat roll damage.
Contaminated or dam-
aged media guides can
cause print quality
defects.
Replace the damaged or contami-
nated stripper fingers.
Nor-
mal
Call
Clean/check the
Fuser Roll fabric
guide. Replace the
Fuser Roll.
Smooth or worn fuser roll
loses ability to drive
media.
Contaminated fabric
guide causes too much
resistance to media
which results in jams/
deletions/wrinkles.
Clean the roll with film remover.
Clean the fabric guide with formula A
and film remover.
Perform diagnostic code 1033 every
time the oiler is removed.
Nor-
mal
Call
Check the fuser
roll for lack of oil.
Too little oil can cause
media handling and off-
setting print quality prob-
lems.
Check remaining fuser web life
[1034] and adjust the web oiler rate
[1032].
If the fuser roll is dry, refer to BSD
10.2.
Nor-
mal
Call
Inspect/clean the
thermistor pad
Contamination can cause
fuser heat problems.
Clean the thermistor pad with a brush
or dry lint free cloth.
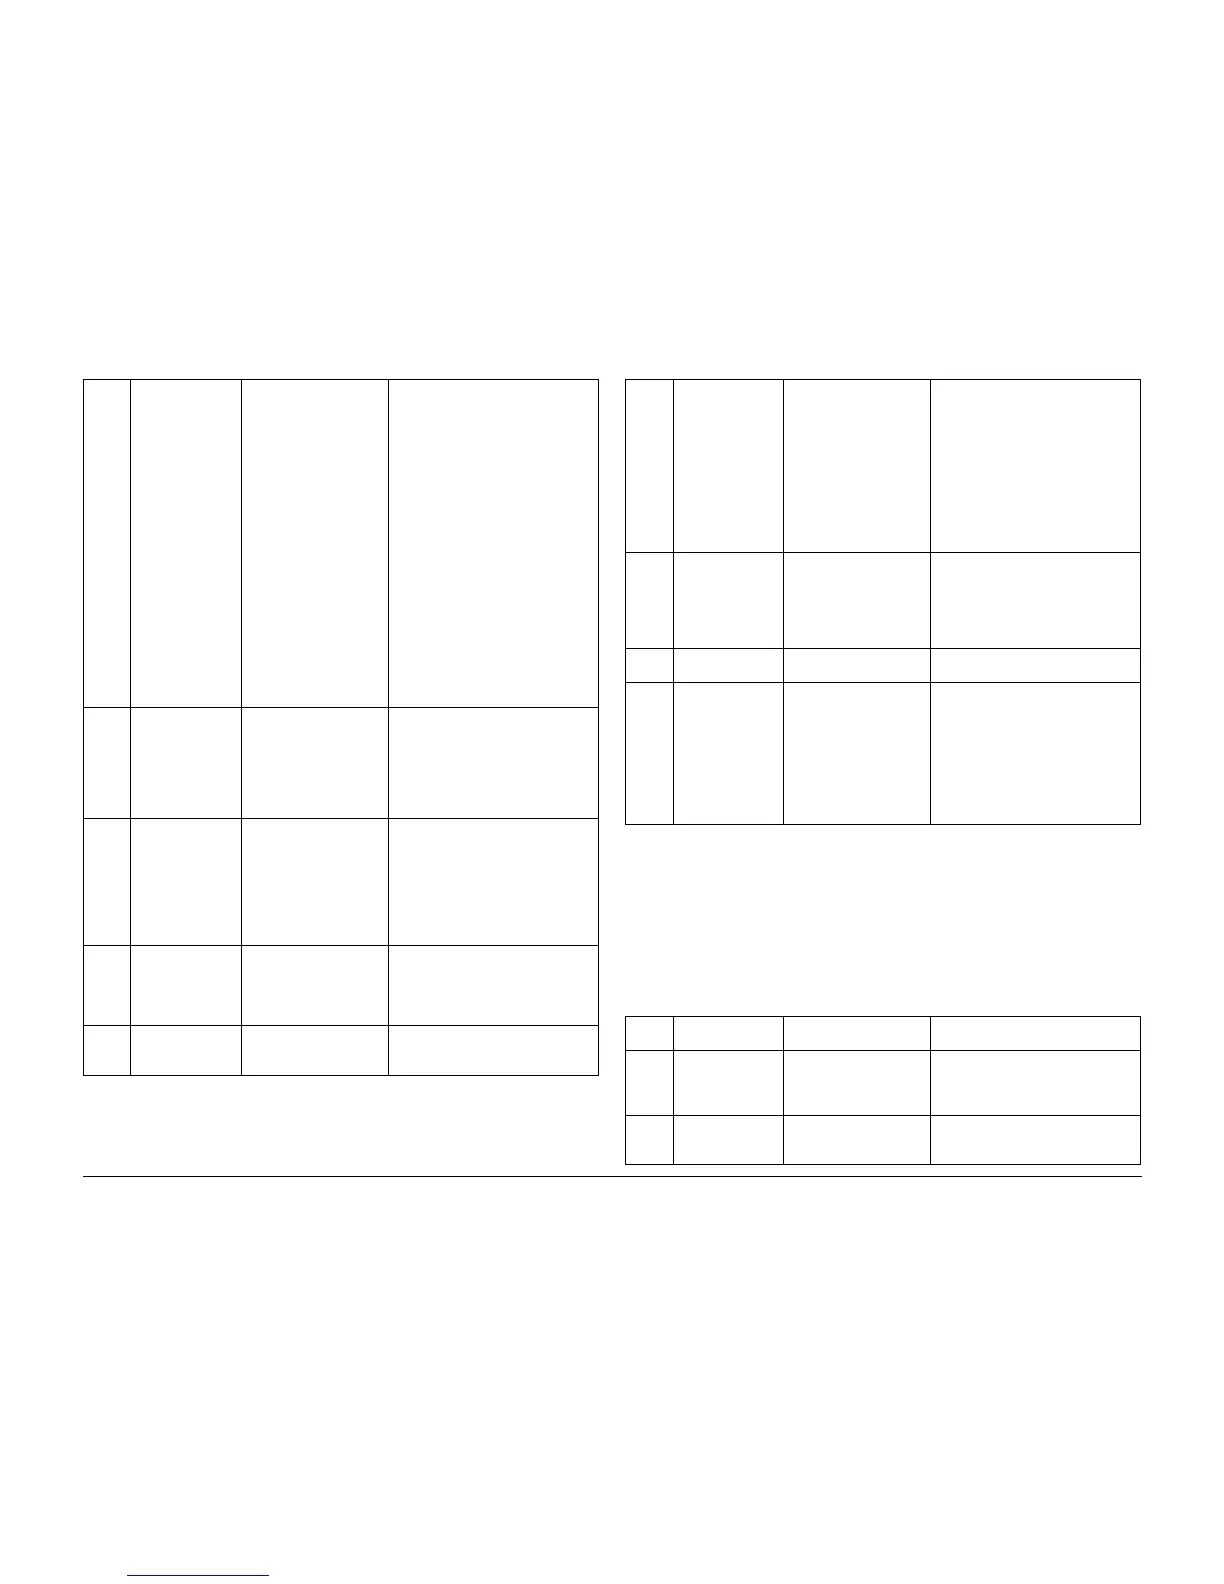
Table 2 Xerographic Module
As
Requir
ed
Check/clean the
photoreceptor.
Contamination/wear,
scratches, or chips can
generate print quality
problems.
Inspect photoreceptor surface for
deep scratches, chips or excessive
wear. Replace photoreceptor if dam-
aged.
Apply zinc stearate to the cleaning
blade and photoreceptor drum. *Note
2
Clean photoreceptor surface with
Xerox Film Remover if contaminated.
Apply zinc stearate when surface is
dry.
As
Requir
ed
*Note 3
Check/clean the
cleaning blade.
Replace with the
new photorecep-
tor or as required.
Residual image, streaks,
drum scuffing can occur if
the blade is worn or con-
taminated.
Vacuum clean the cleaning blade.
*Note 1
Apply zinc stearate to the cleaning
blade and photoreceptor drum. *Note
2
Replace the blade if damaged.
30K ft.
9Km
Replace the fabric
guide.
Jams, deletions, wrinkles. Refer to REP 8.9
30K ft.
9Km
Clean the inner
xerographic mod-
ule components.
If the customer is running
a high percentage of vel-
lum, outgassing of the
vellum contaminates the
cleaner auger and lower
baffle surface resulting in
poor cleaning and high
dirt contamination.
plugged cleaner auger
Remove the fuser roll and photore-
ceptor to enable access.
NOTE: Use caution not to touch or
damage cleaning blade or seals.
Vacuum the Xero Mod and Auger
and then clean all contaminated
areas with Film Remover.
Table 3 Media Transport
INTER
VAL
TASK REASON TASK ENABLER
Nor-
mal
Call
Clean the lower
paper transports,
turnaround baffle,
paper feed rolls.
Contaminates can cause
the media to slip resulting
in print quality defects.
Clean the transport with antistatic
fluid and a lint free cloth.
Clean the feed roller with Formula A.
Nor-
mal
Call
Clean the under
side of the trans-
port.
Reduce the airborne con-
taminants.
Vacuum clean, then wipe down with a
lint free cloth.
Table 2 Xerographic Module

 Loading...


