Home
Quantum
Storage
Scalar i500
Page 418
Quantum Scalar i500 - Page 418
575 pages
Manual
To Next Page
To Next Page
To Previous Page
To Previous Page
Loading...
Chapter 12 Insta
lling, Removing, and Re
placing
Replacing an Expansion Module
Scalar i500 User’s Guide
399
6
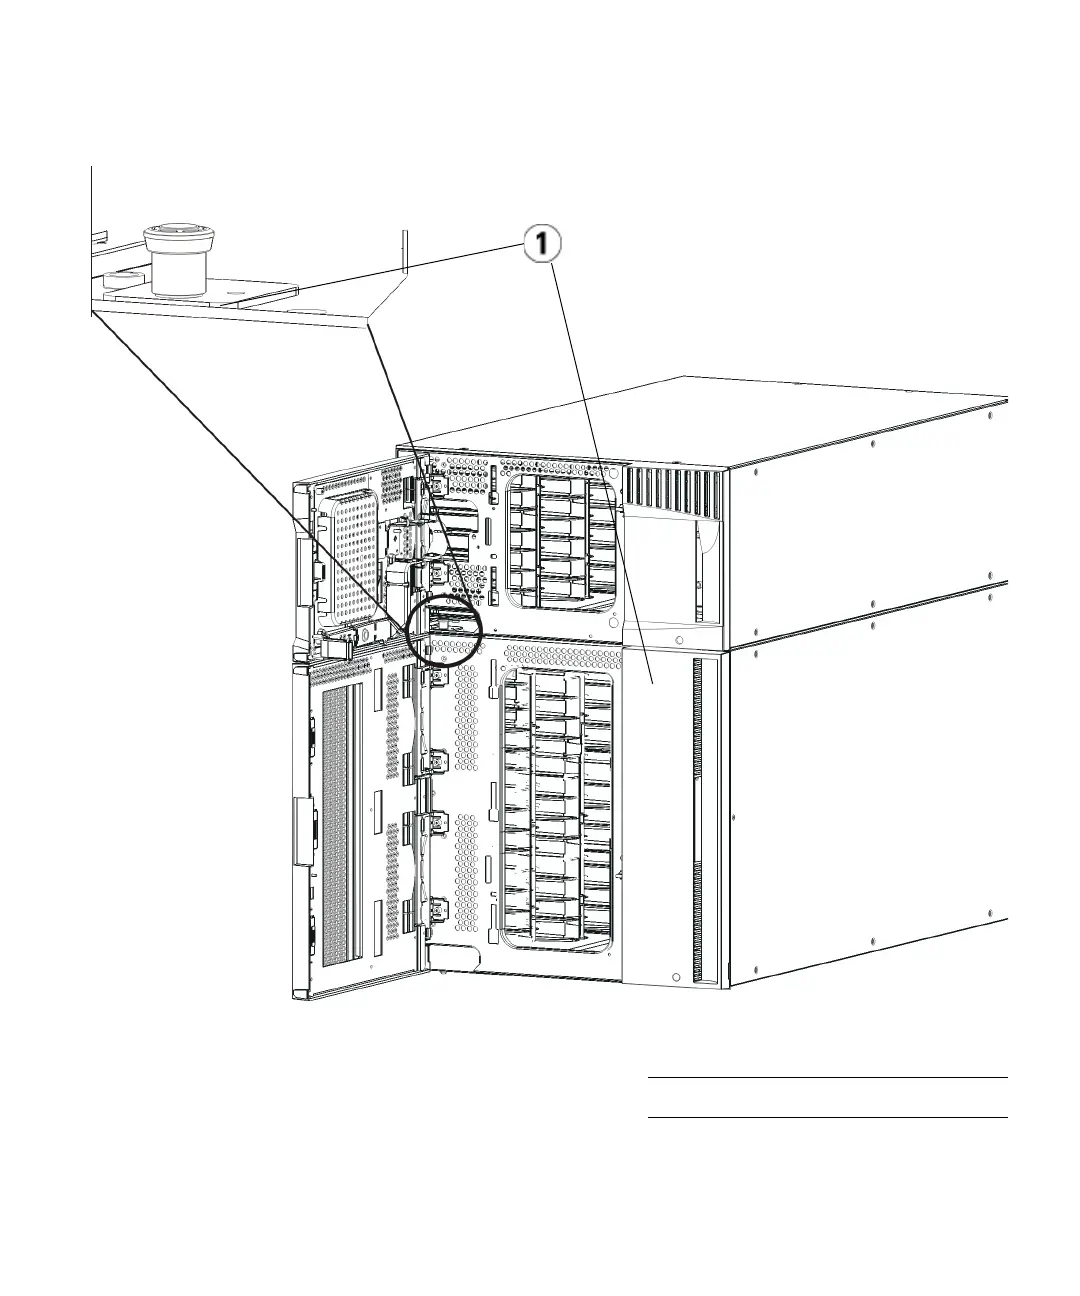
Loosen the two thumbscrews located
at the base of the back
of the
module.
1
Thumbscrews (behind
doors)
417
419
Table of Contents
Main Page
Table of Contents
3
Chapter 1 Description
29
Intelligent Storage
30
Library Configuration
30
Figure 1 5U Library Configuration (Standalone Control Module)
31
Figure 2 14U Library Configuration
32
Figure 3 23U Library Configuration
33
Modules
34
Control Module
35
Expansion Modules
35
Stackability
35
Figure 4 Base Systems Plus Expansion Modules
36
Front Panel Components
37
Figure 5 Front Panel Components
37
Access Door
38
I/E Station
38
Operator Panel
38
Front Power Button
39
Back Panel Components
39
Figure 6 Back Panel Components
40
Power System
41
Rear Power Switches
41
Figure 7 Power Supply Leds
43
Library Control Blade
43
Fibre-Channel Input/Output Blades
45
Figure 8 Library Control Blade
45
Robotic System and Barcode Scanner
48
Figure 10 FC I/O Fan Blade
48
Tape Drive Support
49
Library Features
50
Partitions
50
User Interface
50
Control Path Modification
51
Support for WORM
51
Licensable Features
51
Understanding the Location Coordinates
51
Figure 11 Library Location Coordinates
52
Columns
53
Fibre Channel I/O Blades
53
Modules
53
Slots
53
Tape Drives
53
Ethernet Expansion Blades
54
Power Supplies
54
Understanding Logical Element Addressing
54
Tape Drive Logical Element Addressing
54
Cartridge Slot Logical Element Addressing
55
Figure 12 Logical Element Addressing, 14U, One Partition, Six Tape
57
Chapter 2 Understanding the User Interface
58
Common User Interface Elements
59
Figure 13 Operator Panel User Interface
60
Figure 14 Web Client User Interface
60
System Summary and Subsystem Status
61
Home Page
62
Operator Panel
62
Operator Panel Indicates Intervention Required
63
Operator Panel Keypads
63
Web Client
63
Menu Trees
64
Table 1 Web Client Menus
65
Table 2 Operator Panel Menus
67
User Privileges
69
User Access
70
Chapter 3 Configuring Your Library
71
About the Setup Wizard
72
Completing the Library Configuration with Menu Commands
73
Using the Default Administrator Account
73
Using the Setup Wizard
74
Default Configuration Settings
76
Setup Wizard Tasks
76
Accessing the Web Client
78
Managing the Network
78
Modifying Network Settings
79
Enabling SSL
81
Configuring SNMP Settings on the Library
82
Working with Partitions
87
Table 3 Number of Partitions Supported
88
Automatically Creating Partitions
89
Manually Creating Partitions
90
Mixing Tape Drive Types Within Partitions
92
Modifying Partitions
92
Deleting Partitions
93
Changing Partition Access
94
Taking a Partition Online or Offline
95
Disabling/Enabling Manual Cartridge Assignment
96
Configuring Cleaning Slots
97
Configuring I/E Station Slots
98
Table 4 Number of I/E Station Slots Available
100
Configuring Zero I/E Station Slots
101
Setting Tape Drive Parameters
102
Working with Control Paths
105
Table 5 Control Path Assignment During Partition Creation
105
Obtaining and Installing a License Key
107
About License Keys
108
Obtaining a License Key
109
Viewing Licenses and License Keys
109
Applying a License Key
110
Setting Customer Contact Information
111
Configuring the Library E-Mail Account
111
Working with RAS E-Mail Notifications
113
Creating RAS E-Mail Notifications
114
Deleting RAS E-Mail Notifications
115
Modifying RAS E-Mail Notifications
115
Working with User Accounts
116
About Local User Accounts
116
Local Authentication Vs. Remote Authentication
116
Creating Local User Accounts
117
Modifying Local User Accounts
117
Configuring LDAP
118
Deleting Local User Accounts
118
Figure 15 LDAP Setup Example
122
Configuring Kerberos
123
Setting the Date, Time, and Time Zone
125
Setting the Date and Time Manually
126
Setting the Date and Time Using the Network Time Protocol
126
Setting Daylight Saving Time
127
Setting the Time Zone
127
Working with FC I/O Blades
128
Configuring FC I/O Blade Ports
129
Configuring FC I/O Blade Channel Zoning
130
FC I/O Blade Internal Virtual Port for Media Changers
130
Enabling/Disabling FC Host Mapping
132
Managing FC Hosts and Host Mapping
132
Creating, Modifying, and Deleting an FC Host Connection
133
Viewing FC Host Information
133
Host Mapping - Overview
135
Host Mapping Vs. Channel Zoning
136
Configuring Host Mapping
137
Configuring FC Host Port Failover
138
Repairing and Enabling a Failed Target Port
140
Working with Data Path Conditioning
142
Configuring Library Security Settings
143
Configuring the Internal Network
144
Configuring System Settings
145
User Session Timeout (Minutes)
145
Tape Drive Logical SN Addressing
146
Disable Remote Service User
147
Enable SSL
147
Manual Cartridge Assignment
147
Enable Ipv6
148
Enable SMI-S
148
Enable SNMP V1/V2
148
Unlabeled Media Detection
148
Auto-Ticket Closure
150
Configuring the Library for FIPS
150
Enabling and Disabling FIPS Mode on HP LTO-5 Tape Drives
150
Figure 16 Enabling FIPS Mode
151
Viewing FIPS Status on the Library
151
Configuring Operator Panel Display Settings
152
Registering the Library
152
Chapter 4 Advanced Reporting
153
About the Advanced Reporting License
154
Working with Advanced Reporting Reports
155
Configuring the Drive Resource Utilization Report
155
Configuring the Media Integrity Analysis Report
157
Using Advanced Reporting Templates
159
Deleting Advanced Reporting Data
160
Loading and Reloading Advanced Reporting Data
160
Figure 17 Report Data Buttons
161
Saving and E-Mailing Report Data Files
161
Configuring and Viewing the Media Security Log
162
Figure 18 Saving and E-Mailing the Report Data
162
Viewing the Media Usage Log
163
Automatically E-Mailing Advanced Reporting Reports and Logs
164
Chapter 5 Capacity on Demand
166
Table 6 Available Slots and COD Upgrades Per Configuration
167
Chapter 6 Storage Networking
168
About the Storage Networking License
169
Configuring Control Path Failover
170
Basic Control Path Failover (BPF)
171
Multi-Control Path Failover (MCPF)
171
Advance Control Path Failover (ACPF)
172
Forcing Control Path Failover
172
Figure 19 Forcing Control Path Failover
173
Figure 20 Forcing Control Path Failover
174
Configuring Data Path Failover
175
Basic Data Path Failover
176
Multi-Data Path Failover
176
Advanced Data Path Failover (ADPF)
177
Enabling Data Path Failover
178
Figure 21 HP LTO-5 Fibre Channel and Higher Tape Drive Ports
178
Figure 22 Enabling Data Path Failover
179
Forcing Data Path Failover
179
Figure 23 Forcing Data Path Failover
180
Figure 24 Forcing Data Path Failover
181
Configuring Host Access
182
Registering a Host for Host Access
183
Enabling Tape Drives for Host Access
184
Mapping a Host to Tape Drives and Partitions
185
Modifying a Host
185
Deleting a Host
186
Chapter 7 Encryption Key Management
187
KMIP-Compliant Encryption Key Management
190
General Notes about Encryption on the Library
190
About the EKM License
191
Configuring Encryption Key Management on the Library
191
Figure 25 Setup - Encryption System Configuration
194
Figure 26 TLS Communication Certificate Import Screen
199
Table 7 Partition Encryption Methods
204
Figure 27 Setup - Encryption Partition Configuration Screen
204
Using EKM Path Diagnostics
206
Differences between Manual and Automatic EKM Path Diagnostics
207
Using Manual EKM Path Diagnostics
208
Using Automatic EKM Path Diagnostics
209
Viewing and Changing the Active Key Server
210
Performing Scalar Key Manager Functions on the Library
211
Viewing Tape Drive Encryption Settings
211
• Importing Encryption Certificateson Page 198
212
Exporting Data Encryption Keys
217
Importing Encryption Certificates
217
Importing Data Encryption Keys
219
Accessing the SKM Server Logs
220
Using the SKM Encryption Key Import Warning Log
220
FIPS-Certified Encryption Solution
222
Configuring the Library for FIPS
223
Enabling and Disabling FIPS Mode on HP LTO-5 and LTO-6 Tape Drives
224
Figure 28 Enabling FIPS Mode
224
Viewing FIPS Status on the Library
225
Management
226
Chapter 8 Extended Data Lifecycle Management
226
About EDLM
227
Cleaning for EDLM Drives
230
Incomplete EDLM Scans
230
Configuring EDLM
231
Step 1: Preparing the Library
231
Step 2: Installing the EDLM Plug-In for SNAPI
231
Figure 29 Installing the SNAPI Plug-In
233
Figure 30 Installing the SNAPI Plug-In
234
Step 3: Configuring the Stornext Host Settings on the Library
234
Figure 31 Stornext Host Configuration
235
Figure 32 Testing the Stornext Settings
236
Figure 33 Creating EDLM Partitions
238
Figure 34 EDLM Policy Settings for EDLM Library Managed Partitions
240
Figure 35 EDLM Policy Settings for Standard Partitions
241
Table 8 EDLM Policy Settings for Partitions
242
Pausing EDLM Scans on Partitions
245
Running Manual EDLM Tests
247
Working with EDLM Test Results
249
Testing Suspect EDLM Drives
258
Chapter 9 Running Your Library
260
Powering on the Library
261
Shutting Down, Powering Off, and Completely Removing Power
261
Restarting the Library
262
Logging in
262
Logging in When LDAP or Kerberos Is Enabled
263
Logging out
263
Performing Media Operations
264
Importing Media
265
Bulk Loading
269
Moving Media
271
Exporting Media
272
Loading Tape Drives
274
Unloading Tape Drives
275
Taking a Tape Drive Online or Offline
276
About Cleaning Tape Drives
277
Enabling Autoclean
278
Importing Cleaning Media
279
Using Valid Cleaning Media
279
Viewing the Cleaning Count
279
Exporting Cleaning Media
281
Manually Cleaning Tape Drives
283
About Tape Drive Operations
284
Locking and Unlocking the I/E Stations
285
Controlling FC I/O Blade Power
286
Getting Information - Logs and Reports
288
Viewing Information about the Scalar I500
289
Viewing the System Information Report
290
Viewing the Library Configuration Report
291
Figure 36 Library Configuration Report
292
Viewing the Network Settings Report
294
Viewing Logged-In Users
295
Viewing the All Slots Report
295
Viewing, Saving, and E-Mailing Library Logs
296
Viewing FC I/O Blade Information
298
Viewing FC I/O Blade Port Information
299
Chapter 11 Updating Library and Tape Drive Firmware
301
Upgrading Library Firmware
302
Upgrading Tape Drive Firmware
304
Using an Image File to Upgrade Tape Drive Firmware
305
Downgrading IBM LTO-4 Tape Drive Firmware
306
Autoleveling Tape Drive Firmware
306
Deleting Tape Drive Firmware Used in Autoleveling
307
Uploading Tape Drive Firmware Used in Autoleveling
307
Chapter 12 Installing, Removing, and Replacing
309
Taking the Library Online/Offline
311
Taking a Library Online
311
Taking a Library Offline
312
Cabling the Library
312
Specific Instructions for LTO-5 and LTO-6 Tape Drives
312
Figure 37 HP LTO-5 Dual Port Fibre Channel Tape Drive
314
Figure 38 HP LTO-5 Single Port SAS Tape Drive
315
Figure 39 IBM LTO-5 Single Port Fibre Channel Tape Drive
315
Cabling Libraries with SCSI Tape Drives
316
Figure 40 Stand-Alone 5U Control Module SCSI Cabling
317
Figure 41 Multi-Module SCSI Cabling
318
Figure 42 Cabling One or Two Tape Drives Per SCSI Bus
320
Cabling Libraries with SAS Tape Drives
322
Figure 43 Stand-Alone Control Module SAS Cabling
323
Figure 44 Multi-Module SAS Cabling
324
Cabling Libraries with Fibre Channel Tape Drives Connected
326
Directly to a Host or Switch
326
Figure 45 Stand-Alone Control Module Fibre Channel Cabling
327
Figure 46 Multi-Module Fibre Channel Cabling
328
Cabling Libraries with Fibre Channel Tape Drives Connected to Fibre
331
Channel I/O Blades
331
Figure 47 FC I/O Blade
332
Figure 48 FC with I/O Blade Cabling
333
Recommended Library Cabling for FC I/O Blades
337
Figure 9 FC I/O Blade
338
Cable Management Guidelines
339
Cable Management Kit
339
Managing Power Cords
340
Figure 49 Power Cord Management
342
Managing Ethernet Cables
343
Figure 50 Ethernet Cable Management
345
Figure 51 Cable Management, All Cables, FC I/O Blades Installed
346
Figure 52 Cable Management, All Cables, Ethernet Expansion Blades
347
Installing a Stand-Alone 5U Control Module
348
Installing a New Multi-Module Library Configuration
349
Preparing to Install a Multi-Module Library
350
Figure 53 Cover Plate with Y-Home Flag
353
Figure 54 Recommended Module Locations
354
Installing the Expansion Module
355
Figure 55 Y-Rail in Unlocked, Functional Position
359
Installing the Control Module
359
Preparing to Use the Multi-Module Library
360
Adding Expansion Modules to an Existing Library
362
Preparing to Install an Additional Expansion Module
364
Unstacking the Existing Modules
367
Installing the New 9U Expansion Module
372
Preparing to Use the Library
378
Preparing to Remove or Replace a Module
381
Figure 56 Cover Plate Location after Adding an Expansion Module354 Figure 57 Library Configuration Example 1
383
Figure 58 Library Configuration Example 2
386
Permanently Removing Expansion Modules from an Existing Library370
389
Removing the Expansion Module
390
Figure 59 Cover Plate Location after Removing an Expansion Module
395
Preparing to Use the New Library Configuration
395
Replacing the Control Module
401
Removing the Control Module
402
Replacing the Control Module
406
Preparing to Use the Control Module
410
Special Instructions for Replacing a Control Module in a Library Running SKM
411
Figure 60 Scalar I500 Serial Number Label on Control Module Seen
412
Replacing an Expansion Module
413
Figure 61 Scalar I500 SN/WWN Label
413
Removing the 9U Expansion Module
415
Replacing the 9U Expansion Module
419
Preparing to Use the 9U Expansion Module
425
Removing and Replacing the Library Control Blade and LCB Compact Flash Card
427
Replacing the LCB Only
437
Adding, Removing, and Replacing Power Supplies
439
Adding a Redundant Power Supply
439
Permanently Removing a Redundant Power Supply
440
Removing and Replacing a Power Supply
441
Installing the Library in a Rack
442
Preparing for Installation
443
Table 9 Rackmount Kit Contents
443
Table 10 Rack Ear Kit Contents
446
Installing the Rackmount Shelves
448
Preparing Modules for Rack Installation
451
Installing the Bottom Module in the Rack
452
Installing Additional Modules into the Rack
456
Adding, Removing, and Replacing Tape Drives
463
Adding a Tape Drive
463
Permanently Removing a Tape Drive
465
Removing and Replacing a Tape Drive
466
Adding, Removing, and Replacing FC I/O Blades
468
Figure 62 FC I/O Blade and Fan Blade Bays in an Expansion Module
470
Read this First: Complete Installation Steps
471
Adding an FC I/O Blade
473
Removing an FC I/O Blade
477
Replacing an FC I/O Blade
478
Adding, Removing, and Replacing the FC I/O Fan Blade
479
Adding an FC I/O Fan Blade
480
Removing an FC I/O Fan Blade
482
Replacing an FC I/O Fan Blade
482
Tape Drive Ethernet Connectivity and the Ethernet Expansion Blade
483
Cabling a 5U Library for Ethernet Connectivity
485
Figure 63 Ethernet Connectivity on 5U Libraries
486
Installing the Ethernet Expansion Blade
486
Figure 64 Connecting the Library Control Blade to the Expansion
488
Figure 65 Ethernet Expansion Blade
490
Figure 66 Installing the Ethernet Expansion Blade
492
Cabling the Ethernet Expansion Blade
493
Figure 67 Ethernet Connectivity on 14U and Higher Libraries
495
Permanently Removing or Relocating an Ethernet Expansion Blade
497
Figure 68 Ethernet 27
498
Power Cycling the Ethernet Expansion Blade
499
Replacing an Ethernet Expansion Blade in the same Location
499
Ethernet Expansion Blade Status Leds
500
Viewing Ethernet Connectivity
500
Figure 69 Ethernet Expansion Blade Leds
501
Table 11 Ethernet Expansion Blade Status LED Descriptions
502
Preparing the Library for Moving or Shipping
503
Chapter 13 Troubleshooting
505
Quantum's Knowledge Base
506
About RAS Tickets
506
Viewing RAS Tickets
507
Resolving and Closing RAS Tickets
508
Closing RAS Tickets Automatically
510
Capturing Snapshots of Library Information
510
Saving and E-Mailing the Library Configuration Record
511
E-Mailing the Configuration Record
512
Saving the Configuration Record
513
Saving and Restoring the Library Configuration
513
Restoring the Library Configuration and Library Firmware
514
Saving the Library Configuration
514
Troubleshooting "Library Not Ready" Messages
515
Duplicate Devices Discovered
516
Duplicate Media Changer Devices Discovered
517
Identifying Tape Drives
517
Retrieving Tape Drive Logs
520
Retrieving Tape Drive Sled Logs
521
Identifying FC I/O Blades
521
Permanently Removing FC I/O Blades
522
Resetting FC I/O Blade Ports
523
Viewing and E-Mailing the Command History Logs
524
Interpreting Leds
525
Blade Status Leds
525
Figure 70 Location of Blade Leds
526
Table 12 Blade Status Leds
527
Blade Port Leds
528
Table 13 LCB Ethernet Hub Link Activity
528
Table 14 Fibre Port Link LED on FC I/O Blade
529
Table 15 Ethernet Expansion Blade Ethernet Port Link LED States
529
Servicing the LCB Based on LED Status
530
Tape Drive Leds
530
Table 16 Tape Drive Leds
531
Table 17 Fibre Port Link Status
532
Tape Drive Fibre Port Link LED
532
Power Supply Leds
533
Using the Installation Verification Test
534
Saving and E-Mailing the IVT Logs
536
Viewing the IVT Logs
536
Running Library Demo
537
Configuring the Internal Network
538
Library Diagnostics
538
Drive Diagnostics
539
Drive Tests
539
Media Tests
540
Ethernet Expansion Blade Control
541
Robotics Diagnostics
542
Chapter 14 Working with Cartridges and Barcodes
543
Handling Cartridges Properly
544
Write-Protecting Cartridges
545
Barcode Label Requirements
545
Supported Barcode Formats
546
Installing Barcode Labels
547
Figure 72 Barcode Label Orientation
548
Appendix A Library Specifications
549
Supported Components
549
Library Capacity
551
Environmental Requirements
552
Electrical Requirements
552
Dimensions
553
Component Weights
553
Library Power Consumption and Heat Output
554
Appendix B Tapealert Flag Descriptions
556
Tape Drive Tapealert Flag Descriptions
557
Other manuals for Quantum Scalar i500
Quick Start Guide
44 pages
Getting Started Guide
148 pages
Reference Guide
156 pages
Installation
20 pages
Instructions
8 pages
Unpacking Instructions
2 pages
Release Notes
9 pages
Upgrade Instructions
3 pages
Replacement Guide
4 pages
Related product manuals
Quantum Scalar i6
44 pages
Quantum Scalar i3
44 pages
Quantum Scalar i40
404 pages
Quantum Scalar i80
404 pages
Quantum Scalar i6000
738 pages
Quantum Scalar i2000
447 pages
Quantum Scalar 1000
284 pages
Quantum LTO-8 HH SAS
126 pages
Quantum LTO-9 HH SAS
120 pages
Quantum Superloader 3
306 pages
Quantum StorNext M660
2 pages
Quantum 4000
88 pages