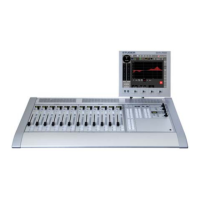
OnAir 2500 Digital Mixing Console
Operating Elements 4-1
SW V3.0
Date printed: 22.07.08
4 OPERATING ELEMENTS
The Studer OnAir 2500 is based on the “Touch’n’Action” concept adopted
from the OnAir 3000 and its predecessor, the OnAir 2000.
Normal operation of the console has been kept as simple as possible, since
it will mainly be operated by technically inexperienced users. This has been
achieved by minimizing the number of operating elements and is possible
thanks to the touch-screen technology, by just showing the elements on the
screen that are currently needed. This is a feature much appreciated by cus-
tomers and users.
Key Labels Some of the keys can be freely configured and assigned. The large keys have
transparent caps that allow inserting individual labels. However, in the fol-
lowing description and examples the default key labels are used. An MS Excel
file for creating key labels is included with the service CD-ROM.
4.1 Setup
Location The console must be set up on a flat surface. In any case, free air circulation
must be guaranteed through all the air vents on the console’s bottom, side,
rear and top. The air vents must never be covered with e.g. a notepad or a
manual. The console must never be placed on a soft surface, and the rubber
feet at its bottom must not be removed.
Temperature Regulations The unit must not be used in conditions of excessive heat or cold, near any
source of moisture, in excessively humid environments, or in positions where
it is likely to be subjected to vibration or dust. The ambient temperature range
for normal operation of the unit is +5...+35° C.
Assembly Fix the main screen with the four supplied screws to the mounting holes [1]
at the console’s rear; a matching Allen key is supplied. Connect the screen’s
cable to the rear-panel SCREEN socket.
Signal Connection Connect your inputs and output signals. For a basic test hookup a digital signal
(AES / EBU IN / OUT) or an analog line source (LINE IN) and a pair of active
monitor loudspeakers (CR LSP) or headphones (DJ) will do.
An optional talkback module can be connected to the optical ADAT 1 (ST MON)
input/output and to the ST MON socket.
Mains Voltage The power supply unit is auto-ranging; it can be used for mains voltages in a
range of 100 to 240 V
AC
, 50 to 60 Hz.
Power Connection Connect your signal input and output cables before connecting the console to
the mains outlet. The supplied mains cable (with female IEC 320/C13 socket)
must be connected to a mains plug matching your local standard (German/
French, UK and US versions supplied) by a trained technician, respecting
your local regulations. Plug the mains cable to the 100-240V~ mains inlet.
External PSU An optional external/redundant power supply unit (PSU) is connected to the
24V DC IN socket.
Earthing Some consideration must be given to the earthing arrangement of the system,
at the center of which is the console frame. The frame is earthed to the mains
earth via the power supply or the earth terminal
. Ground loops may occur
where signal processing equipment, patched to the console, has its signal earth
commoned to the console chassis.