Procedure
Step 1
In the Phone Configuration window (Device > Phone) of the phone to which you are adding the Cisco Unified
Video Camera, enable the Cisco Camera parameter. This field is located in the Product Specific Configuration
Layout portion of the window.
Step 2
In the same window, enable the Video Capabilities parameter.
Step 3
Click Save.
Related Topics
Set Up Cisco Unified Communications Manager Features, on page 97
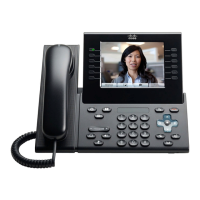
Perform Camera Postinstallation Checks
After installing the Cisco Unified Video Camera, perform the following checks:
Procedure
Step 1
Wait until the camera ready message appears.
The camera may need to upgrade after installation. It may take a few minutes before the camera is
operational.
Note
Step 2
Press Video Preview to check the picture quality.
•
If the video preview image looks too blue, try increasing the camera Brightness setting.
•
If the background looks washed out, try decreasing the camera Brightness setting.
For information about adjusting camera settings on the phone, see the Cisco Unified Video
Camera Quick Start Guide at this location: http://www.cisco.com/en/US/products/ps10655/
products_user_guide_list.html
Note
Step 3
Move the phone and camera to a position where no bright lights are in the field of view.
Step 4
Move the phone and camera so that the user is illuminated by light that comes from the front.
Camera Settings
After you attach the camera on your phone, you can control the features of the camera.
Adjust View Area Setting
The View Area setting acts as a wide angle and zoom function for your camera and allows you to adjust the
view area that is shared during video streaming.
Cisco Unified IP Phone 8961, 9951, and 9971 Administration Guide for Cisco Unified Communications Manager
10.0
122
Perform Camera Postinstallation Checks

 Loading...