T–30
EXTERIOR LIGHTING SYSTEM
DISCHARGE HEADLIGHT CONTROL UNIT REMOVAL/INSTALLATION
A6E811251030W03
Caution
• Incorrect servicing of the discharge headlight control unit could result in electrical shock. Before
servicing the discharge headlight control unit, always refer to the “Discharge headlight service
warnings.” (See T–25 DISCHARGE HEADLIGHT SERVICE WARNINGS)
• When replacing the discharge headlight control unit, configuration procedure must be done
before removing the auto leveling control unit. After replacing the discharge headlight control unit,
perform the headlight zeroset for auto leveling control unit.
1. Configurate the discharge headlight control unit (when only replacing it). (See T–30 AUTO LEVELING
CONTROL UNIT CONFIGURATION)
2. Disconnect the negative battery cable.
3. Remove the front combination light. (See T–26 FRONT COMBINATION LIGHT REMOVAL/INSTALLATION)
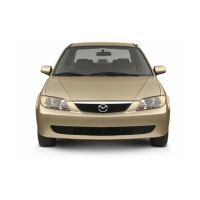
4. Remove in the order indicated in the table.
5. Install in the reverse order of removal.
6. Perform the headlight zeroset for the discharge
headlight control unit (when only replacing it).
(See T–31 HEADLIGHT ZEROSET)
End Of Sie
AUTO LEVELING CONTROL UNIT CONFIGURATION
A6E811251030W04
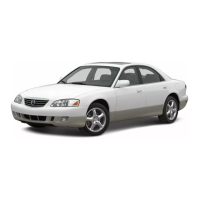
1. Connect the SST (WDS or equivalent) to the
DLC-2.
2. Input vehicle information following the directions
on the screen.
3. Select “Module programming”.
4. Select “Programmable module installation”.
5. When performing configuration corresponding to
each auto leveling control unit, select the following
items and perform procedures according to
directions on the screen.
Items
• Main: “LHID”
• Sub: “RHID”
6. Retrieve DTCs by the WDS or equivalent, then verify that there is no DTC present.
• If DTC is present, perform applicable DTC inspection.
End Of Sie
1Bolt
2 Discharge headlight control unit
A6E8112W141
DLC-2
A6E3970W002