Program mode
32
Using X–Y Motion to move the X–Y position
Volume and CC Control
The X–Y control does two main things: it can control the
relative volume of the two Oscillators in Program mode (or
of up to 16 Programs at once in Combination mode), and it
can generate CCs for controlling Program and Effects
parameters.
X–Y control and MIDI
The X–Y control features interact with MIDI in two different
ways: through the X–Y MODE, and through the X–Y CC
Control.
The X–Y MODE sends and receives two MIDI controllers:
one for the X axis, and the other for the Y axis. In Global
mode, you can assign these to any MIDI CC numbers you
like. The defaults are CC#118 for the X axis, and CC#119 for
the Y axis. The X–Y mode (or X–Y motion) and its CCs
control the X–Y position.
The X–Y CC Control, on the other hand, is generated by the
X–Y position. Normally, this will only affect internal sounds
and effects. If you like, however, you can also enable a
Global parameter to send these generated CCs to external
MIDI devices.
X–Y MODE switch
When you turn on the X–Y MODE switch, the color scheme
of the display will change, and the switch LED will light.
In this state, you won’t be able to select parameters in
the display. Turn this switch off if you want to edit
settings. If you want to select a menu command such as
Write Program, you can access it by holding down the
ENTER switch and pressing a numeric keypad.
To save the program, press the REC/WRITE switch to
access Update Program, and then press the ENTER
switch.
HOLD switch
If you turn the HOLD switch on (LED lit) and then take your
finger off the display, the effect will continue in the state in
which it was at that moment. If this switch is off, the point
will return to the center value (no effect) when you remove
your finger from the display.
MOTION switch
This switch records or plays-back the X–Y motion.
Recording or playback will occur while you hold down the
switch (LED lit).
You can also use a foot switch to control this.
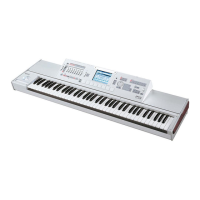
Recording an X–Y motion
If there are no events
1. Press the X–Y MODE switch (LED lit).
2. Press the MOTION switch to enter record-ready mode.
3. Continue holding down the MOTION switch, and
touch the display; recording will begin. Move your fin-
ger to record the motion.
4. Recording will end when you off the MOTION switch
or when the maximum number of events have been
recorded.
If there are already events
1. Press the X–Y MODE switch (LED lit).
2. Press the MOTION switch; playback will begin.
3. Continue holding down the MOTION switch, and
touch the display; recording will begin at that moment.
Move your finger to record the motion.
4. Recording will end when you off the MOTION switch
or when the maximum number of events have been
recorded.
5. Press the MOTION switch once again, and the old
events will play (up to the point you began re-record-
ing) followed by the newly-recorded events.
Playing back the X–Y motion
1. Press the X–Y MODE switch (LED lit).
2. The X–Y motion will play back while you continue
holding down the MOTION switch.
Play the keyboard.
Note: You can also use a foot switch to turn the MOTION
switch on/off. For more information, please see “List of Foot
Switch assignments” on page 599.
Resetting the X–Y motion
While holding down the ENTER switch, press the MOTION
switch; the recorded events will be erased.
1–5a: X–Y Volume Control
You can adjust the relative volume balance between
oscillators 1 and 2 by moving X–Y MODE (or an X–Y
Motion) left or right on the X-axis.
If you check “Equal Power,” you’ll be able to fade smoothly
between the two oscillators when changing the X–Y
position. You can also use OSC 1/2 Center Volume to create
more complex fades.
In Combination mode, you can use this to control the
relative volumes of up to 16 Programs at once, using both
the X and Y axes. For more details, please see the X–Y
Volume Control section of Combination mode.
Enable Volume Control [Off, On]
When this box is checked, moving the X–Y position will
change the volume of oscillators 1 and 2.
When this box is not checked, the X–Y position will not
directly affect volume. However, it’s still possible to control
volume via X–Y CCs and AMS.
Equal Power [Off, On]
This applies only when Enable Volume Control is turned
On.
When Equal Power is On, the X–Y will fade between
Oscillators 1 and 2 using an equal-power volume curve. This
provides a smooth fade between the two sounds, and is the
type of volume control used by classic vector synths.
Also, when this is checked, the OSC 1 and OSC 2 Center
Volume parameters will be grayed out, since Equal Power
sets the center volumes automatically.
When Equal Power is Off, the OSC 1 and OSC 2 Center
Volume parameters determine the way in which X–Y
position affects volume.
+127
+127–127
0
0
Y-Axis
X-Axis
 Loading...