Program mode
36
1–7: Pads 1–4 Setup,
1–8: Pads 5–8 Setup
There are eight velocity-sensitive trigger pads below the
display. These look like drum machine pads, and playing
drum sounds is certainly one use for them.
However, they can also play up to eight-note chords on any
sound–not just drums. The pads even remember the
velocities of the individual notes within the chord, as well as
the notes themselves. These settings are stored
independently for each Program.
Assigning notes to the pads
You can assign notes to the pads directly from the keyboard
and front-panel controls, without using this page at all.
Alternatively, you can enter notes and velocities using the
parameters on this page. Regardless of how the notes were
first assigned, you can edit their values here.
For more information, including step-by-step instructions
and usage tips, please see “Drum & Chord Pads” on page 44
of the Operation Guide.
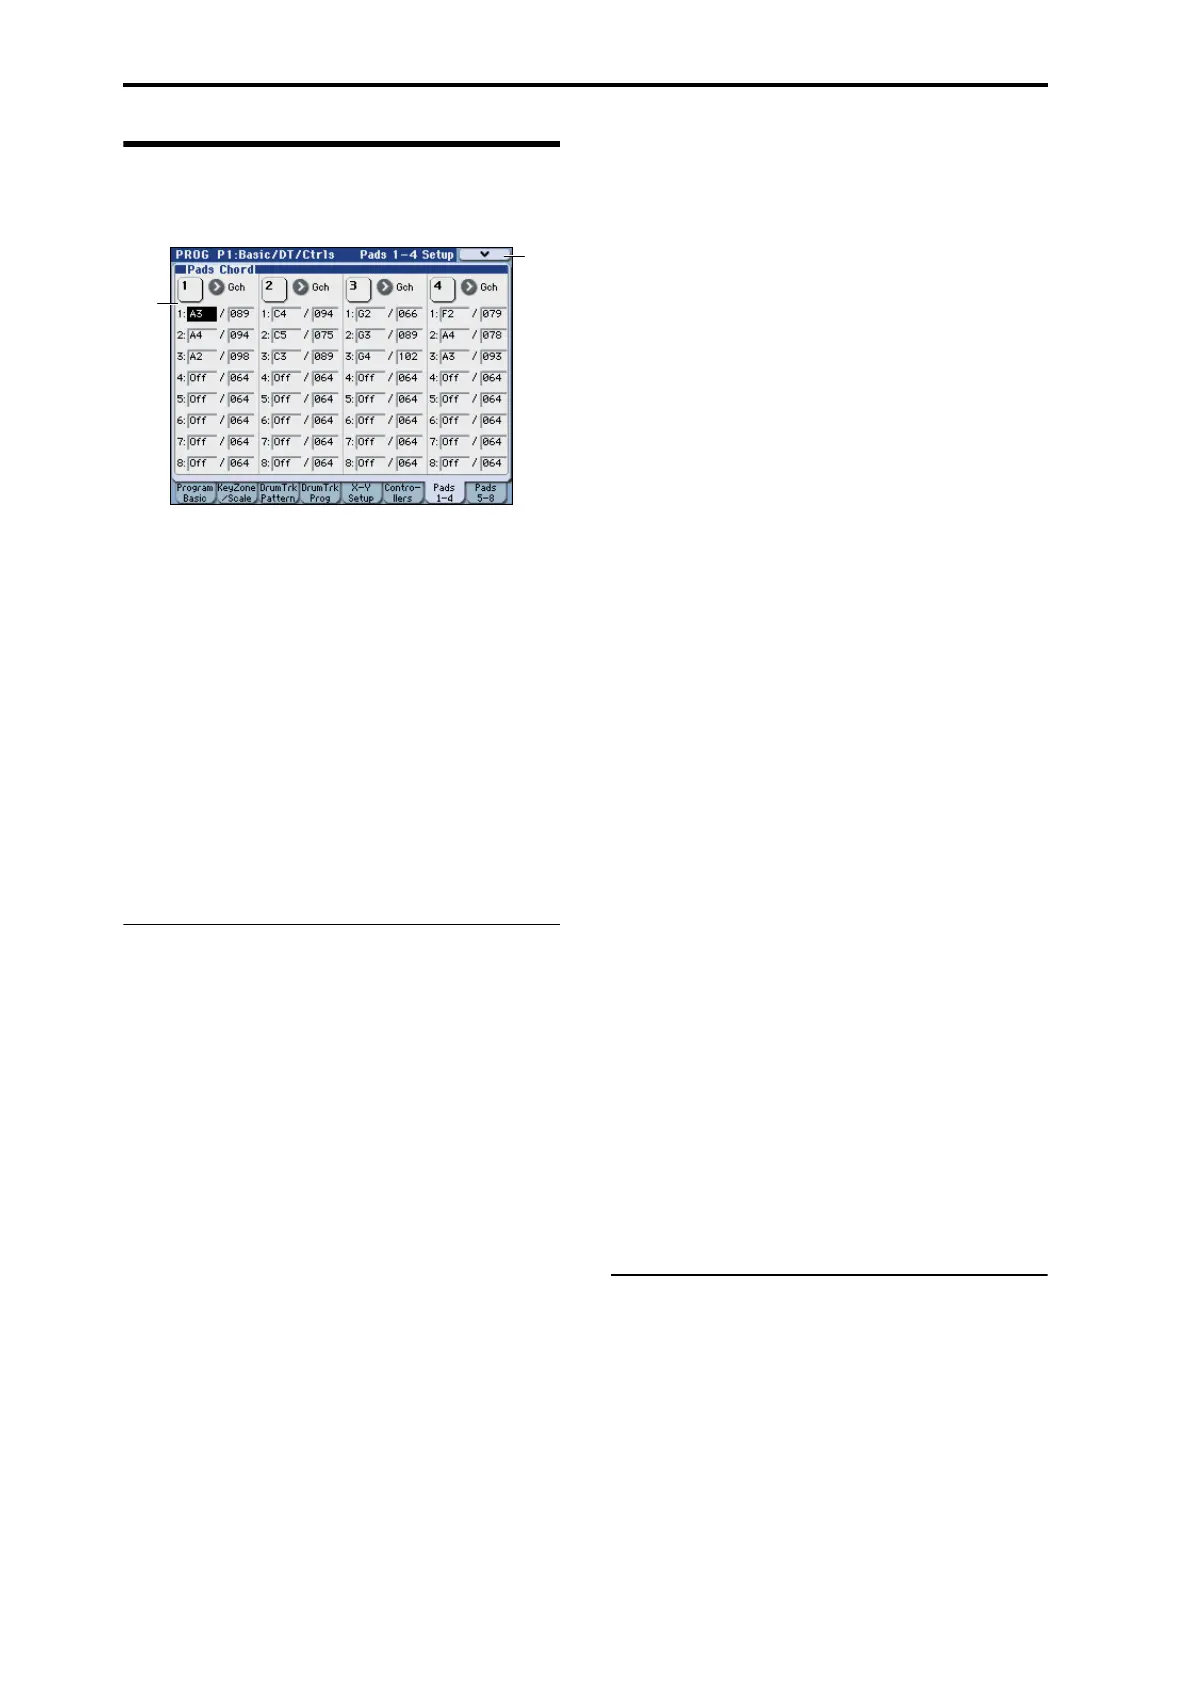
1–7(8)a:Pads Chord
Pad 1
MIDI Channel [Gch, Dch]
Here you can specify the MIDI channel on which the pad
will transmit.
Gch: The pad will transmit on the global MIDI channel. The
program will sound.
Dch: The pad will transmit on the Drum Track MIDI
channel. The program of the drum track will sound.
Notes 1...8 [Off, C–1...G9 / 001...127]
These parameters let you edit the 8 notes assigned to each
pad, along with a separate velocity for each note. To play
fewer than 8 notes, just set the unwanted notes to Off.
Off: Select this to disable the note.
C–1…G9: This sets the note number.
001…127: This sets the note’s velocity value. For more
information on pads and velocity, please see “Pad Mode:
Fixed Velocity vs. Velocity Sensitive,” below.
Pad Mode: Fixed Velocity vs. Velocity Sensitive
Each pad stores a velocity level for each of its 8 notes. The
PAD MODE switch, to the right of the pads, controls
whether or not the pads respond to how hard you play. Its
setting is stored with each Program, Combination, and
Song.
In Fixed Velocity mode, the pads always use their stored
velocity settings, regardless of how hard you play.
In Velocity Sensitive mode, hitting the pad very strongly
produces the preset velocities. When you play more softly,
the preset velocities are scaled down accordingly,
maintaining the balance between the notes in the chord.
Assigning notes and chords to pads
You can assign single notes and chords to the pads in three
different ways.
Play the notes, and then press CHORD ASSIGN
1. Play a single note, or a chord of up to 8 notes.
2. Press the CHORD ASSIGN switch.
3. Press the pad to which you’d like to assign the notes.
That’s it! The notes are now assigned to the pad.
Press CHORD ASSIGN, and then play notes
This method lets you create a chord out of widely-spaced
notes, even if you can’t play all of the notes simultaneously.
1. Press the CHORD ASSIGN switch.
2. Play a single note, or a chord of up to 8 notes.
You can play a single note, or a simple chord.
If you like, you can also play up to 8 notes as a legato
phrase. As long as you take care that the notes overlap each
other, the entire phrase will be recorded as a single chord.
You can take as long as you like to play the phrase.
3. Press the pad to which you’d like to assign the notes.
After pressing the pad, you’re done!
Edit notes and velocities using the display
You can edit the recorded notes and velocities using the on-
screen parameters. If you like, you can also enter new notes
this way. For more information, please see “Pad 1,” above.
Copying and Merging Pads
Just as you can assign notes to a pad by playing them on the
keyboard, you can press a pad to copy its assigned notes to
another pad.
The method is similar to steps 1–3 above; press the pad that
you want to copy, and then press the CHORD ASSIGN
switch. Then press the copy-destination pad; the
assignments will be copied.
You can also use this to combine the assignments of two or
more pads, up to a maximum of eight notes. To do so, just
press all of the “copy from” pads simultaneously, and then
proceed as above.
For more detailed instructions, please see “Drum & Chord
Pads” on page 44 of the Operation Guide.
Pad 2...4, 5...8
These are the same as for Pad 1, as described above.
▼1–7(8): Menu Command
• 0: Write Program ☞p.106
• 1: Panel–SW Solo Mode On ☞p.106
• 2: Exclusive Solo ☞p.107
• 3: Copy Pad Setup ☞p.112
For more information, please see “Program: Menu
Command” on page 106.
1–7a
1–7
Menu