Sampling mode
344
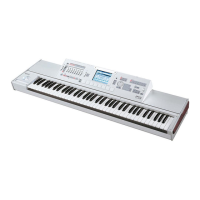
2. Select “Time Slice” to open the dialog box.
3. Specify the number of quarter-note beats and tempo of
the currently selected sample. If you know the BPM of
the original waveform, set Source BPM. If you do not
know the BPM, specify Beat and the BPM will be calcu-
lated automatically.
The setting you make here will be used as the reference
value when detecting the attack, when performing Time
Stretch in step 9b, and when saving the sequence data in
step 10.
Beat: Specifies the number of quarter-note beats. When you
specify Beat, the Source BPM will indicate the playback
BPM at the original key. This BPM value will automatically
be calculated from the start address to the end address (if
loop is off) or from the loop start address to the end address
(if loop is on) of the selected sample. If you know the BPM
and it is different than the displayed value, change Source
BPM to the correct value.
For example in the case of a 120 BPM sample of one measure
of 4/4 time, set Beat to 4. The Source BPM will be calculated
automatically. If the Source BPM is not set to 120.00, due to
inaccuracies in the start address (or loop start address) and
end address, change the Source BPM to 120.00.
Source BPM: Specifies the tempo at the original key of the
source waveform.
4. To execute Time Slice, press the OK button. To cancel
without executing, press the Cancel button.
When you press the OK button, the attacks will be detected,
the sample will automatically be sliced, and a dialog box
will appear.
In the case of a stereo sample in which L and R have
different lengths, silent data will automatically be added to
the end of the shorter sample so that the two samples will be
the same length.
If you want to re-set Beat and Source BPM after
pressing the OK button, you can do so in step 9a).
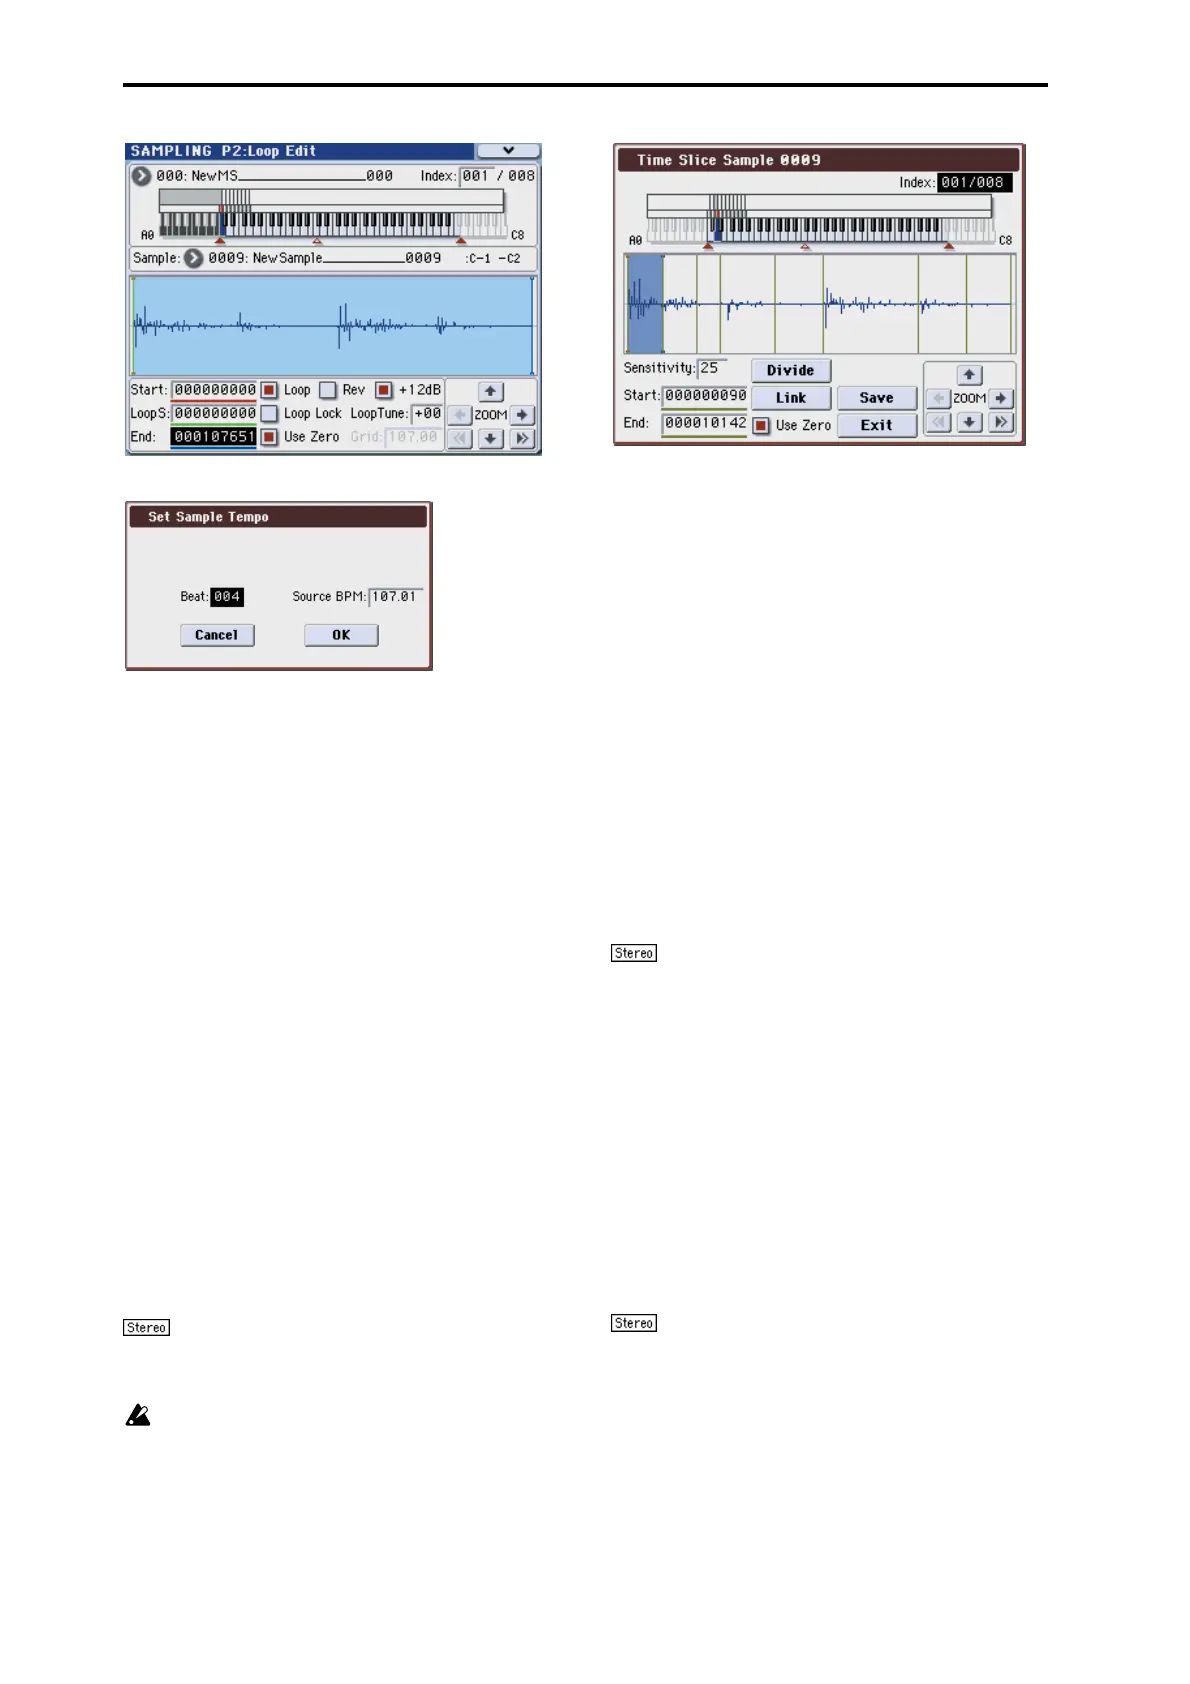
5. Listen to the samples that were divided by detecting
their attacks.
The sample before slicing is assigned to the C2 note of the
keyboard, and the sliced samples are assigned to notes D2
and above. When you change the Index, the corresponding
display will be highlighted, allowing you to view the sliced
waveforms.
You can also select an index by holding down the ENTER
switch and pressing a note on the keyboard. The index that
is assigned to the note you pressed will be selected.
To hear the sliced sounds, you can either press the
corresponding note on the keyboard, or change the index to
select the desired sample and then press the SAMPLING
START/STOP switch. When you press the SAMPLING
START/STOP switch, the sample in the range between the
specified “Start” and “End” will be played at the original
key.
Keyboard & Index: This shows the multisample that is
being used temporarily in this dialog box.
When you play the keyboard, this multisample will sound.
It will behave in the same way as in normal pages (such as
the Recording page). (0–1a)
In the case of a stereo sample, a stereo multisample
will be temporarily used. The sample at each index will
sound in stereo.
Index [Source, xxx(001...090)/yyy(001...090)]:
Selects the sample index.
If this is set to Source, the original waveform before time
slicing will be selected.
By selecting xxx/yyy you can specify individual samples
that were sliced. xxx indicates the selected sample, and yyy
indicates the total number of samples that were sliced. A
maximum of 90 samples can be assigned to the keyboard. If
more than 90 samples were sliced, this will display 90.
Sample waveform display: Gray lines indicate the locations
at which the sample is sliced. Red and blue lines indicate the
Start and End addresses respectively. When Index is xxx/
yyy, the sample of the selected index will be highlighted.
In the case of a stereo sample, the L channel sample
data will be displayed above, and the R channel sample data
will be displayed below.
ZOOM: You can zoom in and zoom out in the vertical and
horizontal dimensions of the waveform shown in the
“Sample waveform display.” (1–1e)
6. If the slice locations are not appropriate, you can adjust
“Sensitivity” to change the sensitivity at which the
attacks are detected, in order to change the slice loca-
tions.

 Loading...