Sampling: Menu Command Time Slice
345
Sensitivity [00...30]:
Adjusts the sensitivity at which the attacks are detected. By
increasing this value, you can detect attacks at even lower
levels, to create more finite slices.
The Level in this case does not necessarily correspond
to the “waveform level.”
Depending on the sample, the desired slicing may not occur
even if you increase the Sensitivity. If the attack portion of
the following sample has overlapped into the end of the
sample, or if the sample contains two sounds, make
adjustments in step 7.
7. Make adjustments where the automatic attack detec-
tion did not occur correctly.
Change Index to select the sample that you wish to adjust.
Make adjustments by changing “Start” and “End”, and by
executing Divide or Link to adjust the slice location.
Start: Specify the start address for the sample of the
currently selected Index. At the same time, the end address
of the sample for the preceding Index will also be adjusted.
End: Specify the end address for the sample of the currently
selected Index. At the same time, the start address of the
sample for the next Index will also be adjusted.
When adjusting the “Start” and “End” addresses of the
divided samples, use ZOOM to increase the magnification
(×1 or more) so that the sample waveform is displayed
accurately when you make adjustments. (1–1e)
If Index is set to Source, the address of the original
waveform will be modified. If you change the start
address, the loop start address will also be changed at
the same time.
Use Zero: (2–1d)
If you wish to adjust the “Start” or “End” address of a
divided sample, it is best to first check Use Zero. In general,
using zero-cross points to specify sample addresses will
make it less likely that clicks or pops will occur, particularly
at the end address.
Divide: This splits the sample of the currently selected
Index into two. Use this when you wish to add another
location to slice the sample. Modify “End” or “Start” to
adjust the divided sample.
Link: This joins the sample of the currently selected Index to
the sample of the next Index. Use this when you wish to
merge together two sliced locations.
When you use Time Slice on a rhythm loop sample, the
quality of the playback in Sequencer mode will depend
largely on the “cutoff” of each percussion instrument sound
that was sliced.
Be aware that if you change the Sensitivity after
adjusting the slice location, the attacks will be re-
detected and the sample will automatically be sliced
again.
What kind of slices will produce the best result?
A. Divide the separate percussion instrument notes as
finely as possible
For example in the case of a sample where the decay of the
kick is overlapped by the hi-hat, the attack sound of the kick
and the attack sound of the hi-hat should be sliced to create
two samples. If these sounds are left as one sample
(containing both kick and hi-hat), their rhythm may become
incorrect when the sample is played at a different tempo.
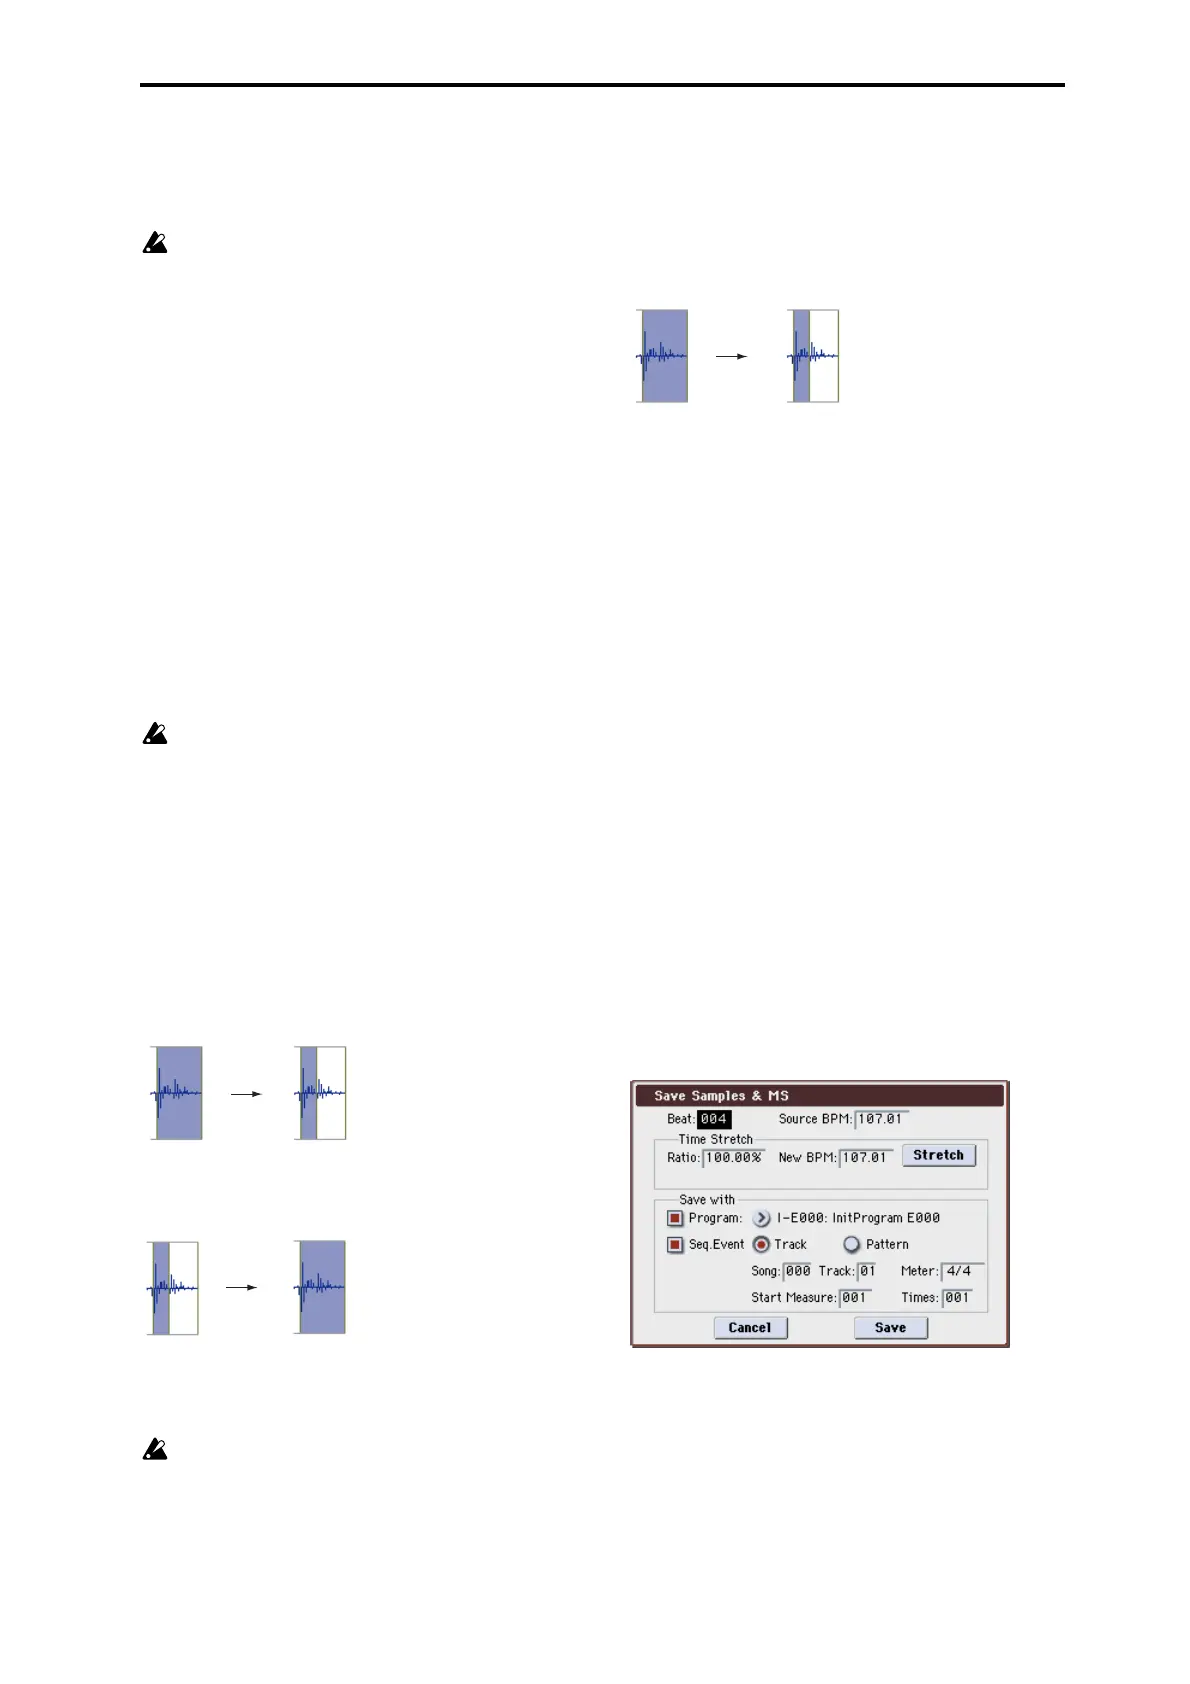
Kick + Hi-hat kick/Hi-hat
If the sample is not sliced appropriately even after you
adjust the Sensitivity, use Divide to divide the sample into
halves, and adjust “End” and “Start” as needed.
B. Make sure that each divided sample has a clear attack
The attack portion is vital for percussion sounds. Slice the
sample at a point where the attack will be sounded crisply.
C. Avoid the noise that can occur toward the end of each
divided sample
For example as shown in the above right illustration, noise
can be present at the end of the kick sample. Adjust the end
address of the kick sample so that the noise is not obtrusive.
In this case, adjusting the end address will also affect the
start address of the hi-hat sample. While listening to the two
samples, make adjustments so that the noise at the end of
the kick sample is as inconspicuous as possible, and also
that the hi-hat attack is heard cleanly.
Pay attention to these points as you adjust Sensitivity. If
necessary, use the methods described above to edit each
sample.
The noise occurring at the end of the sample in “C.” will be
automatically reduced when you execute steps 8 and
following. You should adjust Sensitivity while paying
particular attention to sections “A” and “B,” and then
execute step 9. If the noise is still obtrusive, then you can
adjust the end address.
8. Save the sliced samples to the multisample to which
they have been assigned.
When you press the Save button, the Save Samples & MS
dialog box will appear.
9. Use Time Stretch to adjust the length of the sliced sam-
ples.
When you press the Stretch button, Time Stretch (a function
that expands or shrinks the length of a sample without
affecting its pitch) will be applied to the sliced sample.
If you wish to save the sliced sample as it is, proceed to step
10 without executing Time Stretch.
Sometimes when a sliced sample is played in Sequencer
mode and the tempo is slowed down, the silent portion
between samples may become obvious or noise may be
more apparent, producing an unnatural-sounding result. To