OPERATOR’S MANUAL
CMA-9000 FLIGHT MANAGEMENT SYSTEM
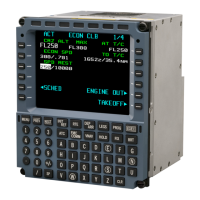
NOTE: The annunciator layout depends on the selected Front Panel hardware variation (refer to Table 1).
Also, individual annunciators may be enabled/disabled via dedicated configuration options.
Front Panel
Variation
Position 2 Position 3 Position 4 Position 5 Position 6 Position 7 Position 8
045/445 FAIL MSG RNP OFST IND None ATC
Table 2-1 Annnunciator layout per Front Panel Variation
SENSOR - Item 9:
9. LDR Sensor - detects ambient light conditions in order to perform auto-brightness control of display screen
and annunciators.
KEYS - Items 10-33 (except 11, 14, 16-23 & 32):
10. Line Select Keys (LSK) - There are twelve LSKs on the front panel, six on either side of the display. LSKs
are identified by their location from top to bottom of the screen and as left or right, e.g. LSK 1L, LSK 6R.
Entry of data from the scratchpad into the selected field is accomplished by pressing the adjacent LSK
which moves the data from the scratchpad to the selected field. Data entries are permitted only on lines
adjacent to the LSKs.
Data can also be duplicated from a data field into the scratchpad by pressing the LSK adjacent to the
desired data line.
Inward pointing arrow symbols indicate that an option may be selected in that field.
Outward pointing arrow symbols indicate that a new page will be displayed when the adjacent LSK is
pressed, or that an action will be initiated.
12. EXEC Key - is used to accept modifications to the active route (flight plan) performed on the LEGS, RTE
(route), Departures/Arrivals, or HOLD pages or VNAV pages. Modifications to the active flight plan will turn
on the EXEC annunciator and display in reverse video a MOD status in the page title line and also an ERASE
prompt. When data entries have been made active (by pressing the EXEC key), the title MOD status will
revert to ACT (active). Until the MOD status is made active, the FMS will continue to use the previous active
data for navigation and guidance even though it is not displayed. Any modification can be erased (cancelled)
prior to EXECution by pressing the ERASE LSK.
13. BRT Key - controls the brightness of the screen and annunciators. After an elapsed time of 5 seconds, the
first press of this key will always increase brightness, each depression of the BRT key alternately brightens
or dims the display.
15. CLR Key - clears one character to the left during scratchpad data entry. When pressed and held for more
than 1 second, it clears the entire scratchpad.
The CLR key also acknowledges alert and advisory messages and clears them from the scratchpad.
To delete an entry made in a given field:
• Pressing the CLR key with the scratchpad empty will display DELETE in the scratchpad.
This DELETE message can be cleared by another press of the CLR key if the latter was inadvertantly
pressed.
• The delete process is completed by pressing the LSK next to the data to be deleted.
24. SP Key - provides a "space" character for separation of words.
25. Plus-Minus [+/-] Key - pressing the [+/-] will first display the "-" (minus) symbol. Pressing it a second time will
display the "+" (plus) symbol.
26. Slash (/) Key - separates data fields in scratchpad data entry.
Page 2-5
August 17, 2010