59
Style Record mode
Style Record procedure
very useful to record different percussive ins tru‐
mentsatanycycleonaDrumorPercu
ssiontrack.
Note: While recordin
g, the track’s Keyboard Range
(seepage68)isignored,andthetrackcanplayoverthe
whol
e keyboard range. The Local parameter (see
“Local”onpage127)isalsoautoma
ticallysettoOn,to
allowplayingonthekeyboard.
8. When finished recording, press STAR
T/STOP to
stop the arranger. Select a different track, and go
onrecordingthewholeChordVariation.
Note: You can select a different track
only when the
arrangerisnotrunning.
9. When finished recording the Chord Va
riation,
selectadifferentChordVariationorStyleElement
togoonrecordingthewholeStyle.
10. When finished recording the new Style, press
WR
ITE or RECORD to save it in memory. The
Writepagewillappear:
•To change th
e Style’s name: press the right A
VOLUME/VAL
UE button to enter editing, and
modifythenameusingtheUP/DOWNbuttonsto
movethe cursor, andtheDIAL to selectacharac‐
ter.Pr
essINSERTtoinsertacharacter
atthecursor
position,orDELETEtodeleteit.
•To sel ect a different loc
ation in memory, press
oneoftheBVOLUME/VALUEbuttons,thenselect
a location with these buttons or the TEMPO/
VALUEcontrols.
Press ENTER to confirm, or one of the D (Abort)
VOLUME/VALUEbuttonstoabortthesave.The
“A r e yousure?”messagewillappearinthedisplay.
PressENTERtoconfirm,EXITtoabort.Afterpress‐
ingEN
TER,youwill
exitfromtheRecordmode.
IfyoupressEXITwhileintheWritepage,youwill
gobacktothepreviousStyleRecordpage,without
anychange.
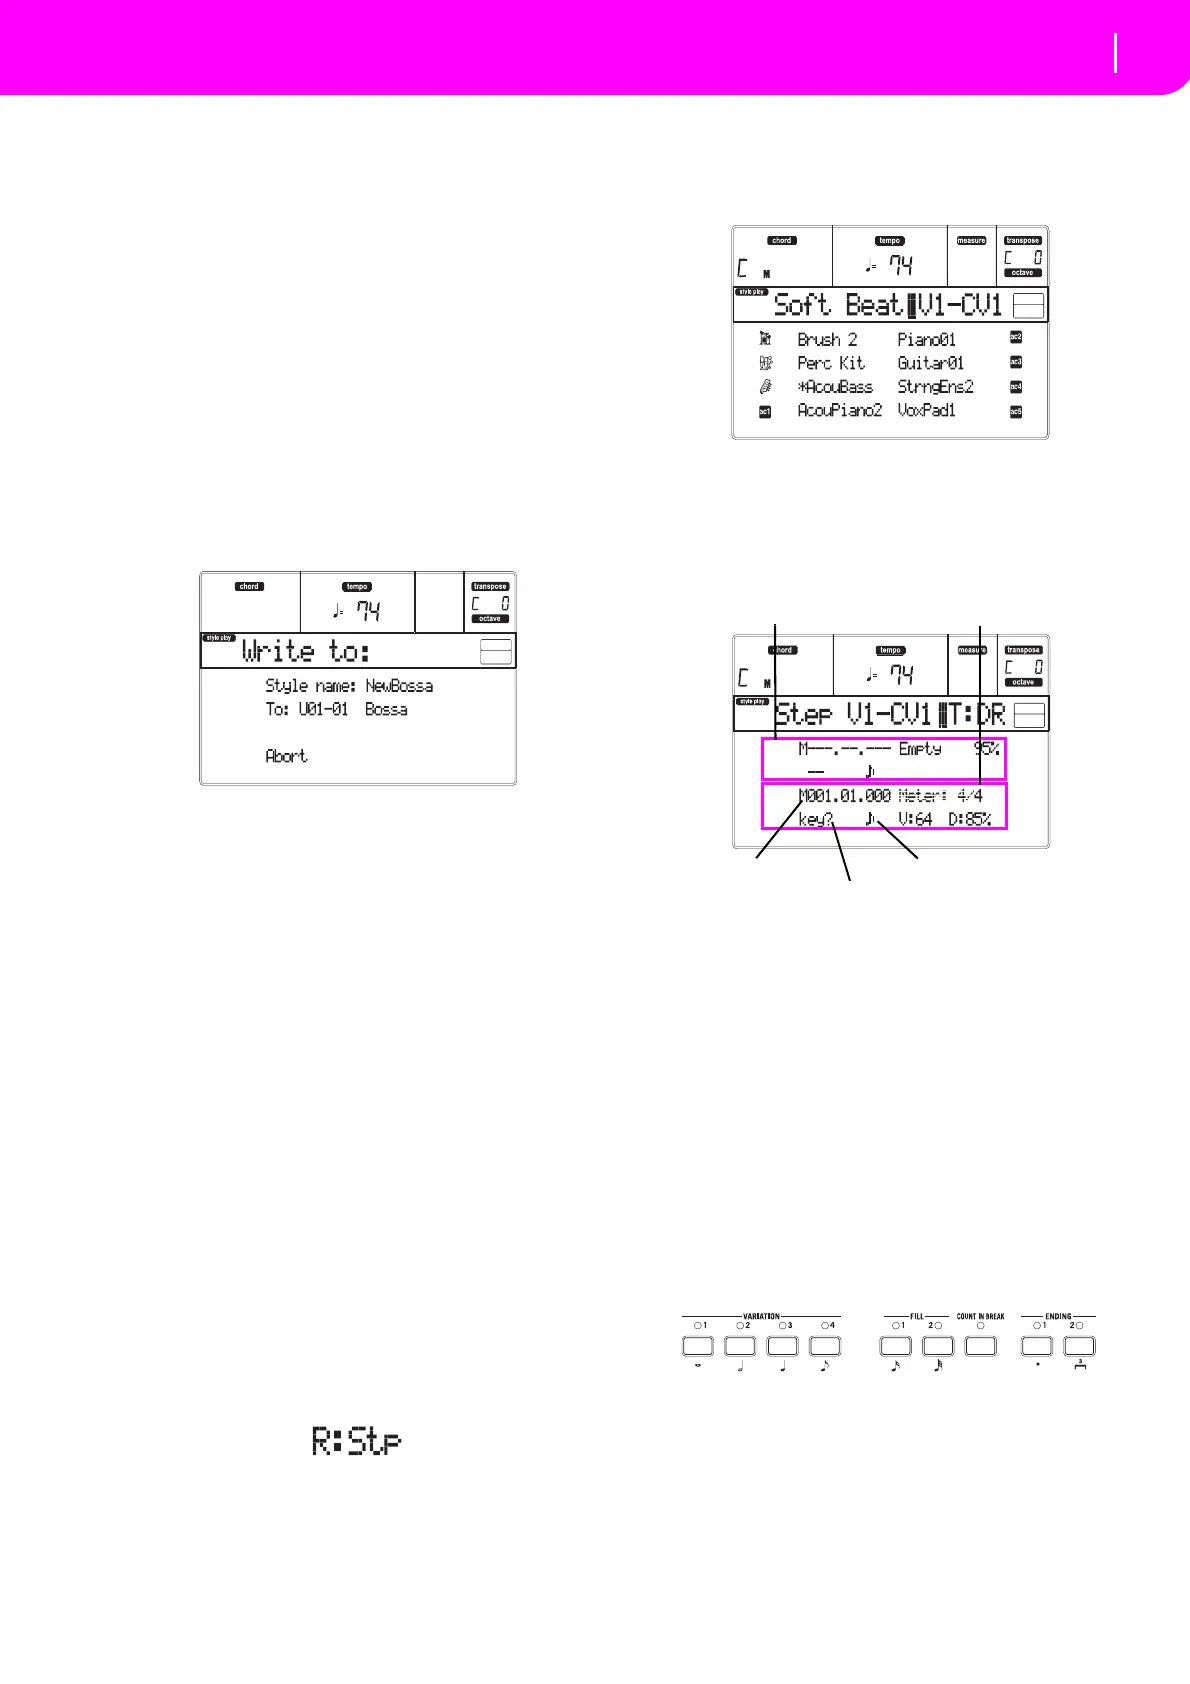
Step Record procedure
1. When still in the Main page of the Style Record
mode, press one of the E VOLUME/VALUE but‐
tons, to select the “R” parameter. Use these but‐
tons,or
theTEMPO/VALUEcontrols,toselectthe
“Stp
”recordingmode.
2. Press TRK SELECT to switch to the Style Track
s
page. Here you can assign the right Program to
each Style track. (For more details, see “Style
Trackspage”onpage56).
3. AssignaProgramtoeachtrack,byusingthePRO‐
GRAM/PERFORMANCEse
ction.
4. Press START/STOP to turn on its
LED and enter
theStepRecordpage.(See“StepRecordpage”on
page57formoreinformationoneachparameterof
thispage).
Thefi
rsttwoli
nes(a)arethelate
stinsertedevent.
The last two lines (b) are the event currently in
edit,readytobe inserted.
The“Empty ” eventmarksthebeginningofthepat‐
tern,when thereareno events insert
ed.Itisauto‐
maticallyinsertedwhen enteringtheRecordmode.
Itw
illberemovedwhenanev entisinserted.
5. The “Maaa.bb.ccc” parameterin(b)isthecurrent
position. This is the place where the note in edit
willbeinserted.
•Ifyou don’twant toinsert anote atthisposi‐
tion,insertarestinstead,asshowninst
ep7.
•Tojumptothenextmeasure,fi
llingtheremain‐
in
gbeatswithrests,pressthe>>button.
6. To ch
ange the step value, us
e the NOTE VALUE
buttons,onthelowerleftareaofthecontrolpanel.
7. Insertanote,restorchordatthecurrentposition.
•To insert a single note, just play it on the key‐
board.Theins
ertednotelengthwillmatchthestep
lengt
h. You may change the velocity and relative
duration of the note, by editing the V (Velocity)
and D (Duration) parameters. See “V (V
elocity)”
and“D(Duration)”onpage57.
(a)
(b)
Previous event
Event to be inserted
Current position
Waiting for a keystroke…
Step value