4535 612 10261 HD11 Service Manual Page 82
CSIP Level 1 Installation: Assembling the System
8. Check that the system filter is clean (see “Fan Air Filter” on page 264).
9. Verify that there is good continuity between the power supply and system ground.
Assembling
the System
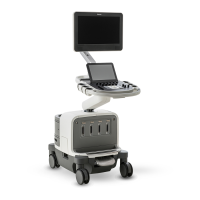
Assemble the HD11 system by installing the following components.
Installing the
Monitor
Install the monitor by following the instructions in “To install the system monitor” on page 114.
Installing the
Printers and
VCR
If the system is ordered with a B&W printer, it will come installed in the B&W printer bay
(Figure 1-1) from the factory.
If the system is ordered with a color printer or VCR, you will need to install it on the short
peripheral mounting plate, which will come installed on the cart from the factory. Follow the
color printer or VCR installation instructions (“To install the color printer (as a single periph-
eral)” on page 118, or “To install the VCR (as a single peripheral)” on page 119).
If the system is ordered with a color printer and VCR, you will need to install the long peripheral
mounting plate provided as part of installing these two (dual) peripherals as described in the
installation instructions (“To install dual top-mounted peripherals” on page 120).
NOTE The peripherals come from the factory already configured with the Philips-recom-
mended settings (refer to “Peripheral Settings” on page 342).
Installing the
System Power
Cord
After the system has been inspected and properly assembled, install the system power cord by
following the instructions in “To install the system power cord” on page 127.