Installation & Configuration Manual
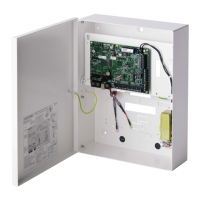
A1 — Connects to the power input (+/-) on the SPC5350/6350.
COMM1 — Expander 4-pin interface. Connects to item 32, power and data
connection, in image above, with a straight-through cable.
Clock Reference — Connects to Clock Reference on SPC5350/6350.
T1, T2 — Tamper switch inputs. Connect these to the Front/Back tamper
switch.
See Mounting the housing with tamper protection [➙ 50].
Front back tamper switch. See Mounting the housing with tamper protection
[➙ 50].
NO/NC — Configurable NO/NC logical relay output. See Wiring the Outputs
[➙ 62] for more information.
Glass fuses — 400 mA T fuses for outputs 1-8.
OP 6 – 8 and SW 6 – 8 — Combined power outputs (OP) and logical outputs
(SW).
Standard 12V DC power outputs combined with configurable, open-drain,
logical outputs (4K7 EoL supervised/unsupervised).
OP 1 – 5 — Standard 12V DC power outputs.
See Warning note below table for more information.
BTE2 — Battery 2 temperature monitoring input.
BATT1 and BATT2 — Battery 1 and 2 connectors.
BTE1 — Battery 1 temperature monitoring input.
PTC fuses — Fuses rated at 300mA. Protecting the A1 and A2 outputs.
For more information see System Recovery [➙ 65].
PTC fuse — Fuse rated at 5A. Protects the AC power input (item 3 in image
above).
For more information see System Recovery [➙ 65].
PSU Kickstart Switch — For more information see System Recovery [➙ 65].
NO/NC — Logical relay outputs. The expander provides two configurable
NO/NC logical relay outputs.
For more information, see Wiring the Inputs [➙ 61]
I 1 – 8 — Inputs. The expander has 8 on-board inputs which can be configured
as intruder alarm zones on the SPC system.
For more information, see Wiring the Inputs [➙ 61]
Auxiliary power supply 12V — Do not use.
Expander is powered through COMM1 on the SPCP355.300 Smart PSU.
X-BUS Input power — Do not use.
Expander is powered through COMM1 on the SPCP355.300 Smart PSU.
X-BUS Interface — The communications bus connects expanders on the SPC
system.
Termination Jumper — This jumper is always fitted, by default.
For more information, see Wiring the X-BUS Interface [➙ 60].
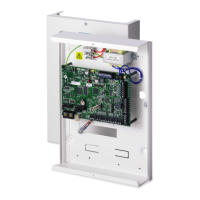
PSU 4-pin interface — Connects to COMM1 on the SPCP355.300 Smart PSU
(item 12 in image above), power and data connector, with a straight-through
cable.
Front tamper switch — Not used. The Front/Back tamper connected to T1 and
T2 of the SPCP355.300 Smart PSU is the only tamper required by this
installation.