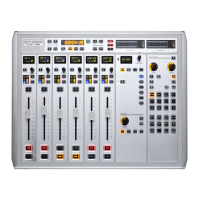
OnAir 3000 Digital Mixing Console
4-8 Operating Elements
Document generated: 10.10.14
SW V6.0
Overload Indication, Analog Inputs: As soon as one sample at an analog input reaches full scale, the overload
indicator is on for approx. 300 ms (the idea is that the probability of an A/D
converter reaching full scale modulation without clipping is close to zero.
Any full scale levels within the path are considered to be overloads).
Overload Indication, Digital Inputs: Full scale modulation at a digital input is not considered to be an overload – it
is simply the output level of a source.
Overload Indication, REC/PGM Outputs:
If one sample of an output signal reaches full scale, the corresponding over-
load indication is on for approx. 300 ms.
Auto Take-Over Indication: The physical value and the internal processed value of the fader may be differ-
ent. This can be the case after routing, snapshot, or CAB changes – or simply
because a fader value has been changed with the GUI rotary encoder. If the
values are different, auto take-over mode is enabled. The channel dis play
indicates by ‘FDR UP’ or ‘FDR DOWN’ in which direction the fader knob
has to be moved. As soon as the fader knob has been moved a bit, the display
changes to a numerical value, such as ‘–15 UP’ or ‘27 DOWN’. When the
fader position matches the internal value, ‘TAKEOVER’ flashes three times;
the whole process is quite self-explanatory.
GRM A gain reduction meter is provided in each channel strip. It is activated if the
channel’s compressor/limiter is active; it can also be configured to be active
in De-Esser mode With the VoiceMix-option, the GRM meter can also be
used to display the channels VoiceMix control gain.
Rotary Encoder/Channel Display A rotary encoder and a corresponding key are available in every fader strip.
The function of these elements can be assigned/configured via the GUI or
the fader assign module. If the rotary knob in the fader strip or in the rotary
module is touched, the 8-digit channel label display shows the corresponding
value, depending on the selected function. Several functions are selectable,
suchasinputrouting,inputgain,balance,N–Xlevel,AUXlevel,etc.
The corresponding key has an ‘Enter’ or on/off function, depending on
the selected function.
Input Channel Routing: To select an input signal for this channel, first turn the rotary to select an input
source group, followed by pressing . Then turn the rotary again to select
one of the input sources that can be routed to a channel. If the input signal is
routed to a different channel already, the label is marked with a dot. When
the desired source name shows up, press to assign the respective signal
to the channel.
Cal / Gain: The rotary adjusts the mic input gain level or the calibration level for digital
inputs; the setting is displayed in dB. There is no function for the key in
this mode.
In case of remote microphone access the gain control automatically switches
over to calibration level control (V3.0)
Balance: L/R balance or pan (-orama) is adjusted with the encoder and optically indi-
cated by the LED ring around the encoder knob. Using the key next to
the encoder, balance or panning is set to the adjusted value (on) or to center
position (off), while the adjusted value remains stored.
N–X Contribution Level: The N–X contribution level of this channeltoallN–Xmastersissetand
displayed in dB (‘weighted N–XFeature’).
N–X Send Level: If this channel is an N–Xownerchannel,therotarysetstheN–Xsendlevel.
AUX Level: TheAUXcontributionforthischannelisadjusted.Thecorresponding key
activatesthecontributiontotheAUXchannel,thedisplayshowstheAUX
send level in dB.
 Loading...