Home
Ricoh
Office Equipment
MP9000
Page 647
Ricoh MP9000 - Page 647
942 pages
Manual
Save Page as PDF
To Next Page
To Next Page
To Previous Page
To Previous Page
Loading...
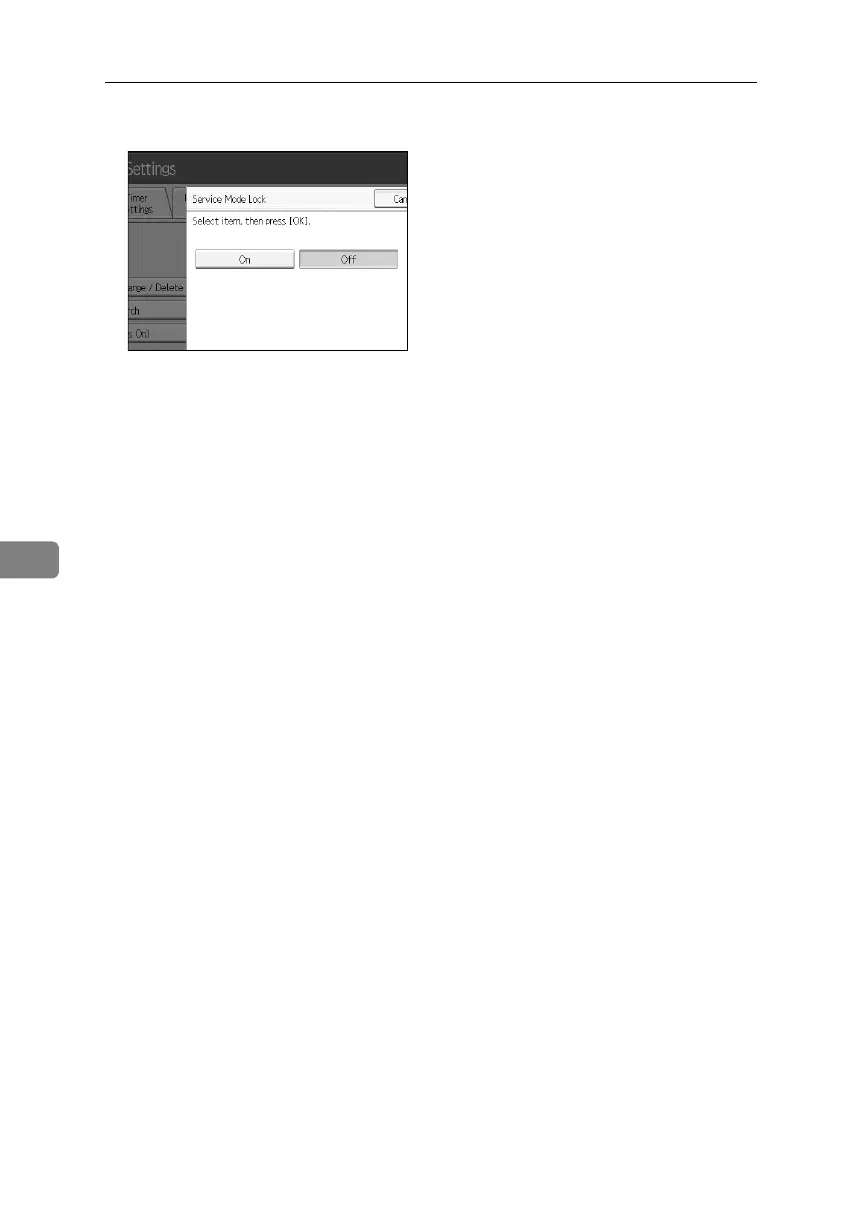
Specifying the Extended Secur
ity Functions
162
6
E
Press
[
Off
]
and then press
[
OK
]
.
F
Press the
{
User Tools
}
key.
The customer engineer can
switch to service mode.
Bellini
C
3-E
N
_S
ec
_
F
_F
M
_
for
P
aper
.bo
ok
P
a
g
e
162
Fr
iday,
D
e
cem
ber
16,
20
05
9:
16 A
M
646
648
Table of Contents
Main Page
Table of Contents
12
What You Can Do with this Machine
5
Copier, Printer, and Scanner Functions
5
Utilizing Stored Documents
6
Connecting Two Machines for Copying
7
Using the Scanner in a Network Environment
8
Administrating the Machine/Protecting Documents (Security Functions)
9
Monitoring the Machine Via Computer
10
Preventing an Unauthorized Copy
11
Table of Contents
12
Notice
15
Notice to Wireless LAN Interface (Optional) Users
15
How to Read this Manual
16
Symbols
16
Safety Information
17
Safety During Operation
17
Positions of RWARNING and RCAUTION Labels
20
ENERGY STAR Program
21
Recycled Paper
22
Machine Type
22
1 Getting Started
23
Guide to Components
23
Options
25
Control Panel
27
Display Panel
30
Simplified Display
31
When the Authentication Screen Is Displayed
32
User Code Authentication (Using the Control Panel)
32
User Code Authentication (Using a Printer Driver)
33
Login (Using the Control Panel)
33
Log off (Using the Control Panel)
34
Login (Using a Printer Driver)
34
Login (Using Web Image Monitor)
35
Log off (Using Web Image Monitor)
35
Changing Modes
36
System Reset
36
Turning on the Power
37
Turning on the Main Power
37
Turning on the Power
38
Turning off the Power
38
Turning off the Main Power
39
Saving Energy
40
2 Entering Text
41
Available Characters
41
Keys
42
How to Enter Text
43
3 Appendix
45
Dos and Don'ts
45
Software and Utilities Included on the CD-ROM
46
Viewing the Contents of the CD-ROM
47
Printer Drivers for this Printer
47
TWAIN Driver
48
Desktopbinder Lite
49
Smartdevicemonitor for Admin
50
Desktopbinder-Smartdevicemonitor for Client
51
Copy Paper
52
Recommended Paper Sizes and Types
52
Unusable Paper
56
Paper Storage
57
Index
58
Table of Contents
67
How to Read this Manual
71
Symbols
71
Display
72
Accessing User Tools (System Settings)
73
Changing Default Settings
73
Quitting User Tools
74
Displaying Counter
75
About Menu Protect
75
Connecting to the Interfaces
77
Connecting to the Ethernet Interface
78
Connecting with the USB Interface
79
Connecting to the IEEE 1394 Interface
80
Connecting to the IEEE 1284 Interface
81
Connecting to the IEEE 802.11B (Wireless LAN) Interface
82
1 Connecting the Machine
77
Network Settings
85
Settings Required to Use the Printer
85
Settings Required to Use E-Mail Function
88
Settings Required to Use Scan to Folder Function
92
Settings Required to Use the Network Delivery Scanner
95
Settings Required to Use Network TWAIN Scanner
98
Settings Required to Use Document Server
101
Using Utilities to Make Settings
103
General Features
113
Output Tray Settings
118
2 System Settings
113
Timer Settings
119
Interface Settings
122
Network
122
Parallel Interface
126
Ieee 1394
127
IEEE 802.11B
129
Print List
130
File Transfer
132
Administrator Tools
138
Program / Change / Delete LDAP Server
147
Programming the LDAP Server
148
System Settings on Main and Sub-Machines
153
General Features
153
Timer Settings
154
Administrator Tools
156
3 Tray Paper Settings
159
Changing Tray Paper Settings
159
Quitting Tray Paper Settings
160
Items of Tray Paper Settings
161
Tray Paper Setting on Main and Sub-Machines
181
General Features
183
4 Copier/Document Server Features
183
Reproduction Ratio
190
Edit
194
Stamp
200
Background Numbering
200
Preset Stamp
200
User Stamp
203
Date Stamp
205
Page Numbering
207
Stamp Text
210
Input/Output
212
Settings for the Document Server
215
Copier/Document Server Features on Main and Sub-Machines
216
General Features
216
Reproduction Ratio
218
Edit
219
Stamp
221
Input/Output
225
List / Test Print
227
Printing the Configuration Page
228
Interpreting the Configuration Page
229
5 Printer Features
227
Maintenance
231
System
232
Host Interface
237
PCL Menu
238
PS Menu
240
PDF Menu
241
General Settings
243
6 Scanner Features
243
Scan Settings
245
Send Settings
247
Address Book
249
Managing Names in the Address Book
252
Sending E-Mail by Quick Dial
252
Sending Scanned Files to a Shared Folder Directly
253
Preventing Unauthorized User Access to Shared Folders from the Machine
253
Managing Users and Machine Usage
253
7 Registering Addresses and Users for Scanner Functions
249
Registering Names
254
Changing a Registered Name
255
Deleting a Registered Name
256
Authentication Information
257
Registering a User Code
257
Changing a User Code
259
Deleting a User Code
260
Displaying the Counter for each User
261
Printing the Counter for each User
262
Printing the Counter for All User
263
Clearing the Number of Prints
264
E-Mail Destination
266
Registering an E-Mail Destination
266
Changing an E-Mail Destination
268
Deleting an E-Mail Destination
269
Registering Folders
270
Using SMB to Connect
270
Using FTP to Connect
277
Using NCP to Connect
282
Registering Names to a Group
288
Registering a Group
288
Registering Names to a Group
289
Adding a Groupe to Another Group
291
Displaying Names Registered in a Group
292
Removing a Name from a Group
293
Deleting a Group Within Another Group
294
Changing a Group Name
296
Deleting a Goup
297
Registering a Protection Code
298
Registering a Protection Code to a Single User
298
Registering a Protection Code to a Group User
300
Registering SMTP and LDAP Authentication
301
SMTP Authentication
301
LDAP Authentication
303
Changing the Display Language
305
8 Other User Tools
305
Inquiry
306
Counter
308
Displaying the Total Counter
308
Method of Counting
309
9 Appendix
311
Adjustment Settings for Operators
311
Changing the Adjustment Settings for Operators
311
Setting Values
312
Specifications for the Main Unit
323
Auto Document Feeder
329
Specifications for Options
330
Booklet Finisher BK5000
331
Cover Interposer Tray CI5000
332
Punch Unit PU5000
333
Z-Folding Unit ZF4000
334
Lcit Rt5000
334
Lcit Rt5010
335
Multi Bypass Tray BY5000 (Tray 7)
335
Others
336
Information about Installed Applications
337
Open SSL
337
Open SSH
339
Open LDAP
344
Index
346
Table of Contents
359
How to Read this Manual
361
Symbols
361
Names of Major Options
362
Indicators
363
Panel Tone
364
Checking Machine Status and Settings
365
When an Indicator to the Right of a Function Key Is Lit
368
When You Have Problems Operating the Machine
369
When a Job Is Not Performed
374
When a Message Appears
379
2 Troubleshooting When Using the Copy Function
379
Display During Connect Copy
385
If Connect Copy Is Cancelled
386
If You Cannot Exit from Connect Copy
387
When You Cannot Make Clear Copies
388
When You Cannot Make Copies as Wanted
390
When Memory Is Full
394
When a Message Appears During Installation of the Printer Driver
395
Windows 95/98/Me
395
Windows 2000
396
Windows XP, Windows Server 2003
396
Windows NT 4.0
397
3 Troubleshooting When Using the Printer Function
395
If USB Connection Fails
398
When a Message Appears
399
Status Messages
399
Alert Messages
400
Checking the Error Log
401
When You Cannot Print
402
Other Printing Problems
405
When Scanning Is Not Done as Expected
411
4 Troubleshooting When Using the Scanner Function
411
When You Cannot Send Scanned Files
412
When Stored Files Cannot be Accessed
412
When You Cannot Browse the Network to Send a Scan File
412
When the TWAIN Driver Cannot be Started
412
When Stored Files Cannot be Edited
413
When the Network Delivery Function Cannot be Used
413
Operations Are Not Possible When Messages Appear
413
When a Message Is Displayed
414
When a Message Is Displayed on the Control Panel
414
When a Message Is Displayed on the Client Computer
421
Loading Paper
425
Loading Paper into Tray 1 (Tandem Tray)
425
Loading Paper into the A3/11" × 17" Tray Unit
427
Loading Paper into Tray 2 and 3
428
Loading Paper into the Large Capacity Tray (LCT)
429
Loading Paper into the Wide Large Capacity Tray (Wide LCT)
430
Loading Paper into the Multi Bypass Tray (Tray 7)
431
Loading Paper in the Interposer
432
5 Adding Paper, Toner and Staples
425
Changing the Paper Size
435
Changing the Paper Size in Tray 2 and 3
436
Changing the Paper Size in the Large Capacity Tray (Tray 4 and 5)
438
Changing the Paper Size in the Wide Large Capacity Tray
441
Changing to a Size that Is Not Automatically Detected
444
Pausing Copy When Using Finisher
446
Adding Toner
447
Inserting Toner
449
Used Toner
449
Adding Staples
450
Finisher
450
Booklet Finisher (Saddle Stitch)
451
Removing Jammed Paper
453
Locating Jammed Paper
454
Removing Jammed Paper
456
When Z-Folded Paper Is Not Properly Aligned
465
6 Clearing Misfeeds
453
Removing Jammed Staples
466
Finisher
466
Booklet Finisher (Saddle Stitch)
467
Removing Punch and Staple Waste
468
Finisher
468
Where to Put Your Machine
469
Machine Environment
469
Moving
471
Power Connection
472
Access to the Machine
473
7 Remarks
469
Maintaining Your Machine
474
Cleaning the Exposure Glass
474
Cleaning the Auto Document Feeder
474
Index
475
Table of Contents
482
How to Read this Manual
486
Symbols
486
Enhanced Security
488
Glossary
489
Setting up the Machine
490
1 Getting Started
488
Security Measures Provided by this Machine
492
Using Authentication and Managing Users
492
Preventing Information Leaks
492
Limiting and Controlling Access
494
Enhanced Network Security
495
Administrators and Users
496
Administrators
496
User
497
2 Authentication and Its Application
496
The Management Function
498
About Administrator Authentication
499
About User Authentication
500
Enabling Authentication
501
Authentication Setting Procedure
501
Administrator Authentication
502
Specifying Administrator Privileges
502
Registering the Administrator
505
Logging on Using Administrator Authentication
509
Logging off Using Administrator Authentication
511
Changing the Administrator
512
User Authentication
514
User Code Authentication
514
Basic Authentication
518
Windows Authentication
527
LDAP Authentication
535
Integration Server Authentication
541
If User Authentication Is Specified
550
User Code Authentication (Using the Control Panel)
550
User Code Authentication (Using a Printer Driver)
550
Login (Using the Control Panel)
551
Log off (Using the Control Panel)
552
Login (Using a Printer Driver)
553
Login (Using Web Image Monitor)
553
Log off (Using Web Image Monitor)
553
Auto Logout
554
Authentication Using an External Device
555
Guarding against Unauthorized Copying
556
Unauthorized Copy Prevention
557
Data Security for Copying
558
Printing Limitations
559
Notice
560
Printing with Unauthorized Copy Prevention and Data Security for Copying
560
3 Preventing Information Leaks
556
Printing a Confidential Document
563
Choosing a Locked Print File
563
Printing a Locked Print File
564
Deleting Locked Print Files
565
Changing Passwords of Locked Print Files
567
Unlocking Locked Print Files
569
Specifying Access Permission for Stored Files
570
Assigning Users and Access Permission for Stored Files
571
Specifying Access Privileges for Files Stored Using the Scanner Function
574
Assigning the User and the Access Permission for the User's Stored Files
577
Specifying Passwords for the Stored Files
580
Unlocking Files
582
Preventing Data Leaks Due to Unauthorized Transmission
584
Restrictions on Destinations
584
Protecting the Address Book
587
Address Book Access Permission
587
Encrypting the Data in the Address Book
590
Deleting Data on the Hard Disk
593
Overwriting the Data on the Hard Disk
593
Preventing Modification of Machine Settings
602
4 Managing Access to the Machine
602
Menu Protect
603
Limiting Available Functions
606
Specifying Which Functions Are Available
606
Managing Log Files
608
Specifying Delete All Logs
608
Transfer Log Setting
609
5 Enhanced Network Security
612
Enabling/Disabling Protocols
612
Access Control
614
Specifying Network Security Level
615
Encrypting Transmitted Passwords
619
Driver Encryption Key
619
Group Password for PDF Files
621
IPP Authentication Password
623
Protection Using Encryption
624
SSL (Secure Sockets Layer) Encryption
625
User Settings for SSL (Secure Sockets Layer)
629
Setting the SSL / TLS Encryption Mode
630
Snmpv3 Encryption
632
Changing the Extended Security Functions
634
Settings
636
6 Specifying the Extended Security Functions
634
Other Security Functions
640
Scanner Function
640
Weekly Timer Code
640
Limiting Machine Operation to Customers Only
644
Settings
644
Authentication Does Not Work Properly
648
A Message Appears
648
Machine Cannot be Operated
650
7 Troubleshooting
648
8 Appendix
652
Operations by the Supervisor
652
Logging on as the Supervisor
652
Logging off as the Supervisor
653
Changing the Supervisor
654
Resetting an Administrator's Password
655
Machine Administrator Settings
657
System Settings
657
Copier / Document Server Features
659
Printer Features
659
Scanner Features
660
Settings Via Web Image Monitor
661
Settings Via Smartdevicemonitor for Admin
663
Tray Paper Settings
663
Network Administrator Settings
665
System Settings
665
Scanner Features
666
Settings Via Web Image Monitor
666
Settings Via Smartdevicemonitor for Admin
668
File Administrator Settings
669
System Settings
669
Printer Features
669
Settings Via Web Image Monitor
670
User Administrator Settings
671
System Settings
671
Settings Via Web Image Monitor
672
Settings Via Smartdevicemonitor for Admin
672
Document Server File Permissions
673
The Privilege for User Account Settings in the Address Book
674
User Settings
677
Copier / Document Server Features
677
Printer Functions
681
Scanner Features
684
System Settings
685
Web Image Monitor Setting
691
Functions that Require Options
704
Index
705
Copying 2-Sided Pages Onto 1-Sided Pages
723
Notice
729
How to Read this Manual
730
Symbols
730
Functions Requiring Optional Configurations
731
Display Panel
732
Simplified Display
733
User Tools Menu (Copier / Document Server Features)
734
Originals
740
Originals Not Recommended for the Auto Document Feeder (ADF)
740
Sizes Detectable by the Auto Paper Select
741
Sizes Difficult to Detect
742
Missing Image Area
743
1 Placing Originals
740
Placing Originals
744
Original Orientation
744
Reverse Orientation
746
Placing Originals on the Exposure Glass
747
Placing Originals in the Auto Document Feeder
748
Batch Mode
749
SADF Mode
750
Mixed Size Mode
751
Thin Mode
752
Original Size
753
Regular Sizes
753
Custom Sizes
754
Basic Procedure
757
Interrupt Copy
758
Left Original Beeper
759
Copying Onto Tab Stock
759
Surplus Tab Stock Auto Eject
761
When Copying Onto OHP Transparencies
762
Auto Start
762
Job Preset
763
Job Preset Display
763
To Check Job Contents
764
To Change Job Contents after Checking
764
To Delete a Job after Checking Its Contents
765
Deleting a Job
765
2 Copying
757
Job List
766
Job List Screen
766
Checking Jobs in the Print Queue
767
Changing the Order of Jobs
768
Holding Print Jobs
769
Deleting Jobs
769
Checking Job History
770
Copying from the Multi Bypass Tray
771
Setting the Tab Stock in the Multi Bypass Tray (Tray 7)
773
When Copying Onto Regular Size Paper
774
When Copying Onto Custom Size Paper
775
When Copying Onto Special Paper
776
Copier Functions
777
Adjusting Copy Image Density
777
Auto Image Density
777
Manual Image Density
778
Selecting the Original Type Setting
779
Selecting Copy Paper
780
Auto Paper Select
781
Preset Reduce/Enlarge
782
Create Margin Function
784
To Select the Ratio with [O] and [N]
785
Auto Reduce/Enlarge
786
Size Magnification
787
Directional Magnification (%)
788
To Enter the Ratio with the Number Keys
789
To Specify a Ratio with [O] and [N]
789
Directional Size Magnification (Inch)
790
Sort
792
Sample Copy
793
Changing the Number of Sets
794
When Memory Is Full
794
P.67 "Shift Tray off in Sort/Stack
796
Stack
796
Staple
797
Punch
800
Edges Full Bleed
802
Z-Fold
803
Using the Z-Fold Support Tray
803
Z-Fold Positions and Z-Folding Copies
804
Duplex
804
Originals and Copy Orientation
807
One-Sided Combine
808
Two-Sided Combine
811
Series Copies
814
Booklet/Magazine
816
Creep Adjustment
821
MIX 1 & 2 Sided
822
Scanning Position
823
Margin Adjustment
825
Erase
826
Border Erase (same Width)
828
Border Erase (Different Width)
829
Center/Border Erase (same Width)
830
Center/Border Erase (Different Width)
831
Inside Erase
832
Outside Erase
833
Background Numbering
834
Preset Stamp
835
Changing the Stamp Position, Size and Density
837
User Stamp
838
Changing the User Stamp Position
840
To Program the User Stamp
841
To Delete the User Stamp
843
Date Stamp
844
To Change the Date Stamp Position
847
Page Numbering
847
Changing the Stamp Position
850
Specifying the First Printing Page and Start Number ("P1,P2
850
Specifying the First Printing Page and Start Number ("1-1,1-2
850
Stamp Text
853
Image Repeat
855
Double Copies
856
Centering
858
Positive/Negative
859
Covers
860
Designate
862
Chapters
863
Designation Sheet Copy
864
Blank Slip Sheets
866
Slip Sheets
867
Copy Face up
869
Storing Originals in the Document Server
870
Programs
872
Storing a Program
872
Changing a Stored Program
873
Deleting a Program
874
Recalling a Program
874
Programming Defaults in Initial Display
875
What Is Connect Copy
877
How It Works
878
Machine Types and Options
878
Interrupt Copy
878
3 Connect Copy
877
Connect Copy Display Panel
880
Display Panel of the Sub-Machine
882
Using Connect Copy
883
Order of Copy Output
886
Auto Reset When Using Connect Copy
887
Auto off
887
Exiting Connect Copy
887
Copying Stored Documents Using Connect Print
888
Using Job Preset in Connect Copy
890
Connect Copy Job Flow
892
When One of the Two Machines Is Idle
892
Using the Idle Machine as the Main Machine (Connect Copy)
893
Using the Machine Currently Copying as the Main Machine (Connect Copy: Job Preset)
894
When both Machines Are in Use
894
When both Machines Are Copying the same Number of Originals (Connect Copy: Job Preset)
895
When One Machines Is Copying a Larger Number of Originals (Connect Copy: Job Preset)
896
Relationship between Document Server and Other Functions
897
Document Server Display
898
Simplified Display
899
Preview Display
900
4 Document Server
897
Using the Document Server
902
Storing Data
902
To Register or Change a User Name
904
To Register or Change a User Name
905
To Change a File Name
906
To Set or Change a Password
907
Changing User Name, File Name or Password of a Stored Document
908
Checking the Details of a Stored Document
909
Searching for a Stored Document
910
To Search by File Name
910
To Search by User Name
911
Printing a Stored Document
912
When Interrupting Printing
913
Changing Number of Print Copies While Printing Is in Progress
914
Sample Print
914
Printing the First Page
915
Printing a Specified Page
916
Printing a Specified Range
916
Edit File
917
Combining Files
917
Inserting Documents
918
Deleting Pages
918
Copying Documents
919
Print Backup
920
Deleting a Document
920
Displaying a Document in Document Server with Web Image Monitor
921
Downloading Stored Documents
922
5 Appendix
923
Function Compatibility
923
Supplementary Information
925