4. TSM Service Program 1/2010 4 - 127
BA-TE-DE08W M.KAY Dialog+ SW9xx_SM_Chapter 4-3-1_1_2010.doc/pdf <110301> yymmdd B. Braun Avitum AG
Dialog
+
SW 9.xx
Pay attention to the negative or positive sign during the enter of the reference
value.
Prevent offset during calibration
Pay attention that there is no fluid in the tubing to the manometer.
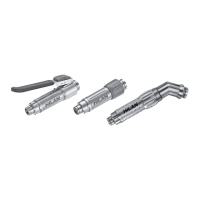
3. Disconnect tubing (to filter FVD) from rinsing bridge.
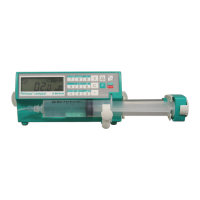
4. Connect manometer and a syringe to the left tubing connector outlet (red
dialyser coupling) on rinsing bridge.
5. Clamp tubing between blood leak detector BL and dialysate outlet
pressure sensor PDA.
6. Set measurement unit to mbar with the
key if you want to
perform a calibration in mbar.
PDA Calibration Point -400 mmHg
–530 mbar
7. Press Dialysis Pressure PDA
key.
8. Press
key and enter a third calibration point.
9. Use a syringe to create a negative pressure of (reading on manometer
display):
• -400 mmHg ±10 mmHg
• -530 mbar ±13 mbar
10. Press
key.
11. Enter the stable value from the manometer as reference value.
Wait until digits are stable.
12. Confirm with the
key.
PDA Calibration Point 0 mmHg
0 mbar
13. Open syringe to atmosphere for 0 mmHg/0 mbar calibration.
14. Press
key.
15. Enter the value “0” from the manometer as reference value.
Wait until digits are stable.
16. Confirm with the
key.
PDA Calibration Point +400 mmHg
+ 530 mbar
17. Use the syringe to create a positive pressure of (reading on manometer
display):
• +400 mmHg ±10 mmHg
• +530 mbar ±13 mbar
18. Press
key.
19. Enter the stable value from the manometer as reference value.
Wait until digits are stable.
20. Confirm with
key.
21. Confirm and store complete calibration procedure with
key.
Note: The calibration data is saved only after the bit sequence 0-1-0 (for
detailed information see 4.8.3.1 General Calibration Information).
22. Remove calibration devices.
23. Reconnect tubings.