5. Installation
5.6.2 Set up of the master projector
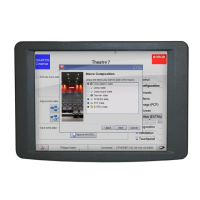
How to setup
1. Click on Linked lamp output (1). (image 5-17)
The Linked Lamp output window opens (2).
2. To set the projector as master, check the check box in front of Is master projector (3).
3. Tip on the up down control (4) next to Master CLO target until the desired value is reached and tip then
on Set target now (5).
4. To set the slave CLO IP address, tip on Change.(6)
The Slave IP address window opens.
5. Fill out the IP address (7a) and click OK (10)
or click on Device scan (7b).
When Device scan is used, all projectors on the network are displayed in Projector on Network window.
6. Tip on the IP address of the slave projector (8) and tip OK (9).
The IP address will be filled out as slave IP address.
7. Tip OK on the Slave IP address window (10)
136
R59770488 COMMUNICATOR TOUCH PANEL 06/06/2012
 Loading...