5. Installation
Image 5-2
Assign IP address via DHCP
When DHCP is enabled and the projector does not find a DHCP server on the network,
or the projector is not connected to a network, than the projector will be in a fail state.
The hardware Fail LED on the interface board will be on. The status (Status tab) will
indicate ’Ethernet Not OK’
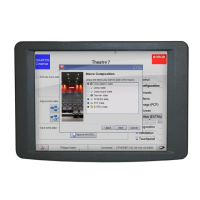
5.1.5 Manually assign an Ethernet address
How to set up
1. While in Communication,tipEdit (1) bu
tton under Projector IP address. (image 5-3)
The Edit the Barco IP address window opens (2).
2. Check the check box next to Use the following IP address (3).
3. Tip in the input field of the IP address and fill out the 4 fields.
Note: An address contains 4 octets with a maximum value of 255.
This must NOT be 0.0.0.0 for static IP-Address assignment
4.TipintheSubnet mask input fields and fill out the 4 fields as appropriate for the local subnet.
5.TipintheDefault Gateway input fields and fill out the 4 fields. Set the Default-Gateway to the IP-Address
of the router (MUST be on the local subnet!).
Note: This must NOT be 0.0.0.0.
If there is no router on the projector’s local subnet then just set this field to any IP-Address on
the subnet.
6. Tip Apply to activate (4).
R59770488 COMMUNICATOR TOUCH PANEL 06/06/2012
121
 Loading...