5. Installation
How to set the clock
While in the Advanced tab page:
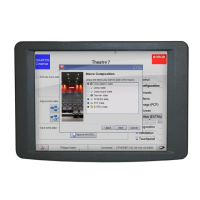
1. Tip on Internal clock (1). (image 5-33)
The Projector internal clock window opens.
2. Tip on Link decryptor tab (3).
3. Make your choice about the clock synchronization source (4)
Select Touch panel time to synchronize with the touch panel time. No other set up is necessary.
Select User defined time and set up the clock.
4. To change the month, tip on the left or right arrow button next to the current month indication (5).
5. To select the day, tip on a day in the calender view (6).
The background of the selected day changes to dark blue.
6. To set the time, hour, minutes and seconds, tip on the up down control of the corresponding spin box
until the correct value is displayed (7)
Or,
tipintheinputfield, select the current value and enter the new value with the simulated keyboard.
7. To enter an offset, click on the up down control of the corresponding spin box until the desired offset is
displayed (8)
Or,
click in the input field, select the current value and enter the new value with the keyboard.
8. Tip on Apply all to set the new time as current time (9).
Tip on OK to set the new time as current time and to close the system clock window at the same time.
154
R59770488 COMMUNICATOR TOUCH PANEL 06/06/2012
 Loading...