9.3
Remove Plug-In Unit
The following links lead to related informaon:
Install Plug-In Unit
Prerequisites:
■ Any ber connecons to the PIU have been removed and properly marked or labeled according to local
pracce.
■ Replacement PIU or ller panel is available, if the blade is acve.
Warning: PIUs can be damaged by ESD during installaon or removal or whenever they are contacted.
Wear an ESD wrist strap with a minimum resistance of 1 megohm that is properly secured to the ESD
grounding wrist strap connecon post to prevent possible PIU damage. Before using the strap, check it for
opens, shorts, and the minimum resistance value. If the strap does not pass these checks, do not use it.
Cauon: Do not remove the wrong ber connecons. Removing a ber connecon that is in use disrupts
service.
Note: Removal/installaon instrucons involving an acve blade are typically maintenance-related acvies.
Step 1
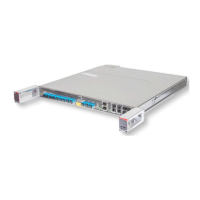
Locate the PIU to be removed.
Step 2
Prepare slot for PIU removal.
Command:
> request prepare-removal shelf-id 1 slot-id x
Note: In this example, x = 1…4.
Step Result:
The LED turns red for any port with an installed pluggable module, but trac remains UP.
Step 3
Ensure that an appropriate ESD wrist strap is worn and is properly grounded onto the ESD wrist strap grounding
post on the chassis.
Step 4
Gently pull open the locking latch unl the unit is released from the rear of the slot.
Equipment Removal
Remove Plug-In Unit
427
Release 19.1.1 · Issue 1.1, May 2021
Fujitsu and Fujitsu Customer Use Only