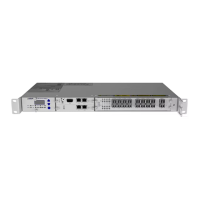
Unpacking the SH12 and SH4R Shelves
6. Take inventory. A packing slip is located on the cap’s front side. Compare the
contents of the trays with the packing slip and the copy of the purchase order list or
equipment list provided by ADVA Optical Networking to ensure complete and
accurate shipment. Make note of missing items, if necessary.
7. Remove the shelf from the shipping box.
EQUIPMENT DAMAGE MAY RESULT IF:
You lift the shelf by inserting your hands into the shelf. Lift from the
outside of the shelf to avoid damage.
8. Move the shelf to a stable surface in the work area and place it on a static-dissipative
mat. Do not release your grip until the shelf is secure.
ELECTROSTATIC CAUTION
Risk of damage due to electrostatic discharge!
Keep the shelf in its ESD protective bag until you are ready to inspect it.
Do not drop the shelf or any modules on a hard surface - damage to
internal components may result. If any components are dropped,
return them to ADVA Optical Networking for examination and repair.
9. Remove the ESD protective bag from the shelf and lay it aside.
10. Verify that you have the proper shelf type, using the Product IDLabel for
identification.
11. Open the accessory kits and boxes that contain the cables, documentation, and
management software. Do not use a knife to open these boxes.
12. Visually check the shelf and accessories for external damage. If identified, make
note of any damaged or missing items.
13. Verify that you have all of the necessary equipment, cables, documentation, and so
forth by comparing the your shipment's packing slip to your purchase order copy.
Some shelves are ordered preconfigured according to specific
requirements. Differences between your site planning and the delivered
configuration may occur caused for example by last-minute changes.
14. If any items are missing or you need additional information, notify your customer
service representative or ADVA Optical Networking immediately.
178 FSP3000 C Hardware Guide - R1.1 - Issue:A (12/09/2016)