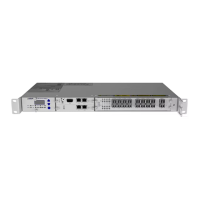
Replacing a Pluggable Transceiver
When inserted, the management system is notified of the change.
7. When the module is inserted completely, hand tighten the thumb screws to prevent
inadvertent dislodging. Do not overtighten.
8. If needed, install a pluggable transceiver as described in Installing a QSFPPluggable
Transceiver.
9. Clean the fiber-optic connectors before you reconnect them.
10. Reconnect the various cables.
11. Check the module LEDs to ensure they are operating correctly. For LEDinformation,
see the FSP 3000 C Troubleshooting Guide.
12. Reinstall the front cover, as described in Removing and Installing Front Covers.
13. If a firmware mismatch alarm is raised on this module, upgrade your traffic module
software. Refer to the appropriate software document for procedures. See FSP 3000
C Documentation Suite for a list of available documents.
14. Return the defective traffic module to ADVA Optical Networking as described in
Returning Equipment
If the replacement traffic module does not work or the LEDs are not
responding as expected, remove and reinstall it. If it still does not work,
immediately install another replacement.
l Inspecting and Cleaning Fiber-optic Connectors and Receptacles
l Electrostatic Discharge Damage Prevention and Warning
l Laser and LED Safety Guidelines and Warnings
l Traffic Module Support
l Handling Modules
l Handling Fiber-Optic Cables
l Handling Pluggable Transceivers
l FSP 3000 C Troubleshooting Guide
Replacing a Pluggable Transceiver
Overview 297
Required Tools and Equipment 297
Removing a Pluggable Transceiver 297
Installing a QSFPPluggable Transceiver 298
296 FSP3000 C Hardware Guide - R1.1 - Issue:A (12/09/2016)