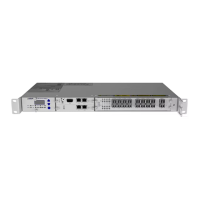
Replacing an ECM-2
l Electrostatic Discharge Damage Prevention and Warning
l Handling Modules
l General Installation and Maintenance Guidelines
l Maintenance and Operational Safety Guidelines and Warnings
Replacing an ECM-2
This procedure assumes that:
l The shelf is properly grounded to the rack;
l The replacement module has been unpacked and properly inspected;
and
l The new ECM-2 has the same software version as the ECM-2 you
are replacing.
To make reattaching the cables easier, make sure your cables are
labeled.
1. Before removing the ECM-2, backup the database to a remote server. Refer to the
appropriate software document for procedures. See FSP 3000 C Documentation
Suite for a list of available documents.
2. If you have a second FSP 3000 C shelf available, place the replacement ECM-2 in
that shelf and install the backed up database onto the replacement ECM-2.
3. Verify that you are properly grounded with an anti-static wrist strap or heel strap
connected to the grounded ESDjack.
4. If mounted, remove the front cover from the shelf as described in Removing and
Installing Front Covers.
5. Disconnect the RJ-45 Management port, if connected (M).
6. Disconnect the RJ-45 Serial port, if connected (Dbg).
7. Disconnect the USB port, if connected.
8. Use a Torx T10 screwdriver to unscrew the thumb screws from the ECM-2.
9. Lift out on the locking levers . This action disconnects the module from the
backplane.
10. Grasp the levers and carefully slide the ECM-2 away from the shelf.
11. Place the malfunctioning ECM-2 on a static-dissipative mat.
12. Hold the replacement ECM-2 with the faceplate toward you and the levers extended.
13. Align the ECM-2 edges with the guides of the shelf slot.
14. Lift out on the levers and gently apply pressure to the bottom of the faceplate while
pushing the module into the slot.
15. Push on the faceplate to fully seat the module.
16. Press down on the locking levers to secure the module and connect it to the
backplane. The module is completely inserted when its faceplate is flush with the
faceplates of the adjacent modules and the shelf panels.
17. Press down on the locking levers to secure the module and connect it to the
backplane. The module is completely inserted when its faceplate is flush with the
faceplates of the adjacent modules and the shelf panels.
284 FSP3000 C Hardware Guide - R1.1 - Issue:A (12/09/2016)