3 - 30
Chapter 3 Removal and Replacement Procedures (RRPs)
Version 2 2007.03.20
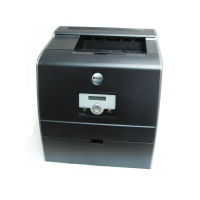
Removal 16 INTEGRATED FEEDER ASSEMBLY (PL3.2.99)
When using a screwdriver in the step below, you may want to close the FRONT COVER
for ease of work.
18) Remove the two screws (silver, tap, 10mm) that fix the INTEGRATED FEEDER ASSEMBLY
to the printer.
When performing the step described below, take care not to drop and lose the SPRING
EARTH on the right side of the INTEGRATED FEEDER ASSEMBLY.
19) Release the left side boss on the INTEGRATED FEEDER ASSEMBLY from the hole on the
printer. Move the INTEGRATED FEEDER ASSEMBLY slightly backward to the left and
release the two bosses (One is provided with the SPRING EARTH.) on the right side from the
hole on the printer.
20) Remove the INTEGRATED FEEDER ASSEMBLY from the printer by pulling out its right
pivot and clutch from the hole on the printer.
Gnb03024KA
18)
18)
20)
NOTE
19)-2
19)-2
19)-1